Reference Guide
Welcome
Welcome to RouteBLAZE™. RouteBLAZE™ is a suite of tools and services that allow you to integrate your data, build complex workflows: connect anything to anything else with business logic inbetween. API-centric, it integrates seamlessly with both asynchronous APIs and protocols - such as JMS, STOMP, AMQP, MQTT etc, and synchronous API types such as REST and Web Services. It provides development tools and runtime containers for Apache Camel applications, along with all the necessary management, security and governance features.
It's purpose is to faciliate rapid application and interface development. The feature-set was developed as a result of use cases that have become apparent to the author over years of STP development (primarily in the Investment Banking sector).
RouteBLAZE™ can connect to any queue manager that provides a suitably permissioned server-connection channel. Queue managers can be either local or remote. RouteBLAZE™ can seamlessly switch from browsing any queue on any of the queue managers it knows about.
Key Features
Robo MQ's features broadly fall in to three categories: Websphere MQ, Monitoring or Execution (Apache Camel EAI)Websphere MQ
RouteBLAZE™'s Websphere MQ features provide powerful tools for EAI development and service maintenance.-
Connectivity:
RouteBLAZE™ connects to MQ exclusively in client mode, over server-connection channels. This is the mechanism typically employed by STP applications running JMS or WMQI. RouteBLAZE™ requires no special permissions to function; if your application can connect to your queue manager and operate on the target queue, then so can RouteBLAZE™.
-
Security:
RouteBLAZE™'s feature set is also provided transparently over SSL secured server-connection channels. Multiple SSL connections to multiple Queue Managers are supported.
- Scalability: RouteBLAZE™ had been tested on queues where the queue depth > 2,000,000 messages - without performance degredation. Full Pagination support with configurable row count per page means navigation through massive data-sets is fluid and responsive.
-
Powerful Searching
RouteBLAZE™ provides for full text search across the entire queue depth and has been tested where target queue depth > 2,000,000 messages. Regular expression type searches are supported in additon to plain-text style 'globbing' type searches.
-
Backup/Restore and Archiving
RouteBLAZE™ supports the full or partial backup of queue contents to disk. Messages can be saved as binary archives that can be restored (in the original order, complete with original headers and messageId's) to any given queue known to RouteBLAZE™. In additon single or collections of messages can be written to disk as distinct text files. RouteBLAZE™ supports the re-injection of multiple text files to a given queue, with the ability to preview the text and control the message order when injecting the files.
-
Formatting/XML Support
RouteBLAZE™ understands XML natively. If message data (either prior to injection, after injection or when previewing data) is represented as well-formed XML, then RouteBLAZE™ can reformat the text to improve readability, and also provide syntax highlighting. It comes bundled with a light-weight multi-document XML editor.
RouteBLAZE™ also supports displaying message data as unformatted ASCII text or as EBCDIK.
-
Message Clipboard
RouteBLAZE™ provdes a message clipboard, with Copy/Cut/Paste and 'Special Copy'. Cut/Copy/Paste behave as though operating on standard files, however when pasting, the option exists to either preserve the original messageId's (useful when your application is required to use the messageId for correlation purposes) or to request new messageId's from the queue manager.
Monitoring
RouteBLAZE™'s monitoring service provides a scalable solution for keeping track of key resources.-
Queue Monitoring
RouteBLAZE™ Monitor Agents can be configured to monitor queue depth for a given set of queues. The Agent has a built-in database, which is used to record metrics such as queue depth over time, incidents, alerts etc. This data is available for charting and reports, and also is downloadable in CSV format
-
Channel Monitoring
Conection counts on channels can be monitored in a similar fashion to queues - connection counts, incidents and alerts are also recorded in the database and are available as above.
-
Process Monitoring
Execution processes can be monitored via the Monitor Agent. As for all types of monitor, health of the underlying resource is presented via a traffic light system (red/yellow/red) providing a quick overview of the enterprise.
Execution
RouteBLAZE™'s execution services provide a suite of tools for application development, and a runtime container with management tools.-
Scalability
RouteBLAZE™'s Execution Agents provide for a virutally limitless number of serivices under management, all of which can be controlled from single console.
-
Camel DSL
RouteBLAZE™ supports both the Spring and Java versions of Camel's domain specific language. Services can be developed using either approach as the RouteBLAZE™ runtime is DSL agnostic.
-
Multi-Environment Support
RouteBLAZE™'s service builder has built in support for multi-environments via its templating engine. This makes moving projects from development, through to User Acceptance Testing and into Production a smooth process.
-
Powerful Toolset
RouteBLAZE™ comes packed with powerful tools to aid development, including wizards to automate common tasks and a graphical service designer, XSLT support and more.
Broker Connection Panel
The Connection Panel is where the configuration data necessary to connection to your queue manager are entered.
IBM Websphere MQ
Apache Active MQ
For IBM WMQ, At a minimum the following is required:
- Host:
The server where the WebSphere MQ queue manager is running
- Port:
TCP port the queue manager listener is configured with
- Server Channel:
The channel through which all communication between MQ and RouteBLAZE™ will run
- Queue Manager:
The queue manager that is hosting your target queue
- Queue:
The target queue
A user ID may also required.
Once the required parameters have been entered, pressing Connect will attempt to establish a connection to the queue manager. A descriptive name and notes can be added at both the queue and queue manager level. These are shown in the Browse tree view, if required.
Preview Filter allows the user to reference a XSLT stylesheet that will be used to generate message previews - visible on the Browse tab. This can be used to pick out and display key information from large messages. It could also be used to perform limited processing on the message e.g. for validation purposes.If the XSLT cannot successfully process a given message, then a standard preview is generated and the background colour for that row set to grey.
Example Consider messages of the following structure:
<>xml version="1.0" encoding="UTF-8">>
<trade>
  <counterparty>Chris Bank</counterparty>
  <account>362718</account>
  <currency>GBP</currency>
  <amount>1028383</amount>
</trade>
with a XSLT filter as follows:
<>xml version="1.0" encoding="UTF-8">>
<xsl:stylesheet xmlns:xsl="http://www.w3.org/1999/XSL/Transform" version="1.0">
  <xsl:output method="text" omit-xml-declaration="yes" indent="no" />
  <xsl:template match="/">
    C_pty: <xsl:value-of select="trade/counterparty" /> ,  Account: <xsl:value-of select="trade/account" /> ,Ccy: <xsl:value-of select="trade/currency" />, Amount:<xsl:value-of select="trade/amount" />
  </xsl:template>
</xsl:stylesheet>
This would produce as message preview as follows: A correctly configured connectionn may look as follows:
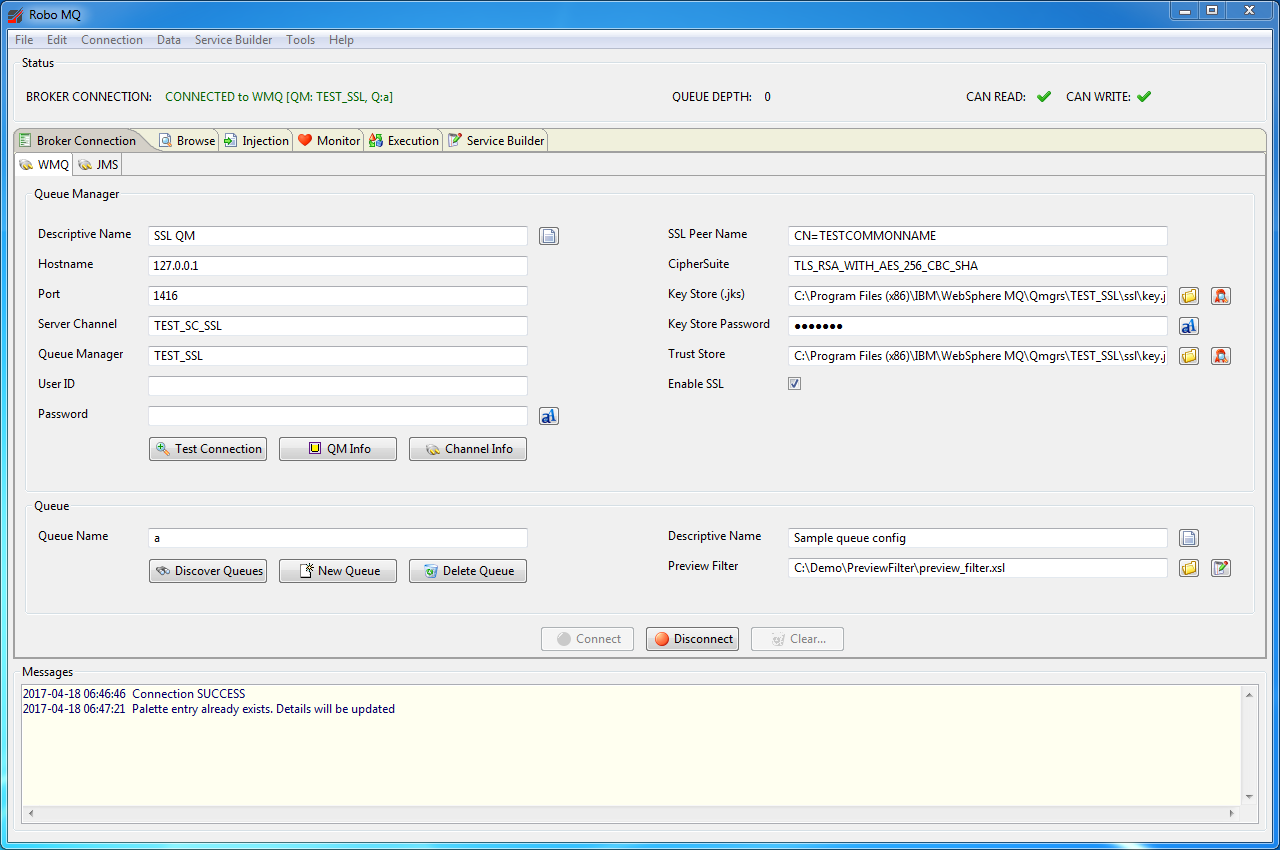 If the server channel is SSL sercured, then additional parameters are required for a proper connection (see screen-shot).
NOTE: In all cases (whether running the Browser or Monitor Agents) the paths to the key store and trust store
relate to the local machine on which the process is running. So if you get a SSL connection running on your local machine and
then want a RouteBLAZE™ Monitor Agent running on a remote server to monitor a queue using those credentials, the key store and trust
store files must exist on the remote machine at the location specified in the Configuration Tab settings.
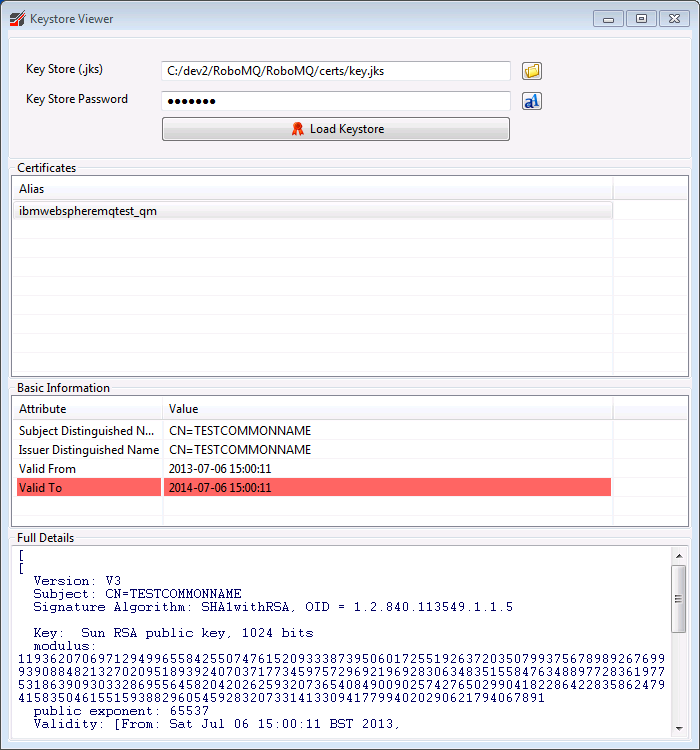
Both the keystore and trust store fields have a button that allows the contents of the specified certificate stores to be viewed. NOTE:
in view-only mode, no keystore password is needed. The password is there to protect the integrity of the keystore, rather than prevent
its contents from being viewed.
If the server channel is SSL sercured, then additional parameters are required for a proper connection (see screen-shot).
NOTE: In all cases (whether running the Browser or Monitor Agents) the paths to the key store and trust store
relate to the local machine on which the process is running. So if you get a SSL connection running on your local machine and
then want a RouteBLAZE™ Monitor Agent running on a remote server to monitor a queue using those credentials, the key store and trust
store files must exist on the remote machine at the location specified in the Configuration Tab settings.
Both the keystore and trust store fields have a button that allows the contents of the specified certificate stores to be viewed. NOTE:
in view-only mode, no keystore password is needed. The password is there to protect the integrity of the keystore, rather than prevent
its contents from being viewed. However, if a password IS supplied, it must be correct or the keystore cannot be opened. Any issues with the contents of the keystore (such as expired certificates) will be highlighted in red. See below for an example.
 Back to top
'Test Connection' Button
The 'Test Connection' button validates that the queue manager information is valid. It does not attempt to access your queue - indeed, it is not necessary to specify a queue for this to work. The purpose of this over and above the 'Connect' button is to make it easy to distinguish between issues relating to the queue manager vs the queue.
Back to top'Queue Manager Info' Button
Once RouteBLAZE™ is connected to a queue manager, this button (provided the required authorities have been granted to the user specified in the connection) displays information about the queue manager. This incoudes the command level
 Back to top
'Channel Info Button
The 'Channel Info' button displays the status of the channel in use for the current connection. This includes a list of all currently connected client, their source addresses, message count and last message time. This can be useful for troubleshooting resource issues on the channel.
 Back to top
'Discover Queues' Button
The 'Discover Queues' button attempts to retrieve a list of queues (and their respective depths) from the currently configured queue manager.
 This function works using PCF messages. For it to work additional authorities are required beyond what is usually needed for a STP application.
Specifically
This function works using PCF messages. For it to work additional authorities are required beyond what is usually needed for a STP application.
Specifically SYSTEM.ADMIN.COMMAND.QUEUEneeds MQI PUT and MQ GET authorities. In addition all the non-system queues require MQI BROWSE and MQI ENQUIRE authorities. If these are not present then the queue manager will return
2035 MQRC_NOT_AUTHORIZEDOnce the full list of queues is displayed, it is often convenient save the list to the Palette for quick access later. Back to top
'New Local Queue' Button
The 'New Local Queue' button attempts to create a new local queue in the currently configured queue manager.
This function works using PCF messages. For it to work additional authorities are required beyond what is usually needed for a STP application. SpecificallySYSTEM.ADMIN.COMMAND.QUEUEneeds MQI PUT and MQ GET authorities. In addition all the non-system queues require MQI BROWSE and MQI ENQUIRE authorities. If these are not present then the queue manager will return
2035 MQRC_NOT_AUTHORIZEDOnce the queue is created it is then automatically added to the palette database. Back to top
'Delete Queue' Button
The 'Delete Queue' button attempts to delete the queue to which RouteBLAZE™ is currently connected. Note: Any messages that are on the queue will be permanently deleted.
] This function works using PCF messages. For it to work additional authorities are required beyond what is usually needed for a STP application. SpecificallySYSTEM.ADMIN.COMMAND.QUEUEneeds MQI PUT and MQ GET authorities. In addition all the non-system queues require MQI BROWSE and MQI ENQUIRE authorities. If these are not present then the queue manager will return
2035 MQRC_NOT_AUTHORIZEDOnce the queue is deleted it is automatically removed to the palette database. Back to top
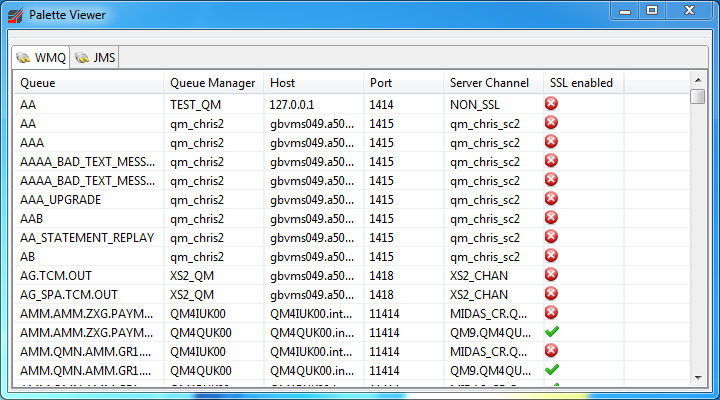
Palette
The Palette allows you to bookmark Queue, Queue Manager and JMS Broker connections. Connection details first defined in the Broker Connection Panel can be added to the Palette.
Once the connection details have been entered into the Broker Connection Panel (and ideally validated, by clicking 'Connect'),
File->Save To Paletteto persist the connection (or Ctrl-W).
NOTE: This function will create a connection reference in the Palette based on what is displayed in the connection detail fields on the currently active tab (either JMS or WMQ broker types). It does NOT persist the details of what is currnetly connected! To remove entries from the Palette:
File->Remove Palette EntriesSelect the required entries and click 'Delete Selected'. Multiple entries can be selected and deleted in one go. A shortcut to the Palette is displayed on the Browse Panel Back to top
Message Area
The Message Panel is always displayed, and is located in the lower section of the main screen (regardless of which tab is selected). The Message Panel provides status updates from RouteBLAZE™ as to the status of any user requests that are issued. In the event of a failure, the Message Panel will report the WMQ exception that occured as a result.
If the content of the message reports a failure and contains a MQ reason code, the RouteBLAZE™ will attempt to resolve the code to a meaningful description.
NOTE: More information is available in the log folder; this can be found in the folder under which RouteBLAZE™ was installed. This can be useful for troubleshooting.
Back to topBrowse Panel
The Browse Panel allows the inspection of the messages on a queue. Also, it provides a shortcut to the Palette on the left-hand area of the form. Single-click on the Palette shortcut will disconnect the current queue (if connected), load the details from the Palette and then connect. Up/Down arrows can also be used to navigate through the shortcuts.
In the tree view, the icon type indictes if there are any notes attached to the particular queue and queue manager. The collapse/expand icon on the top-right of the tree view window toggles queue & queue manager descriptions being displayed.
The tree browser has a context menu, which allows queue or queue manager to be removed from the palette, and also to display any notes associated with the object.
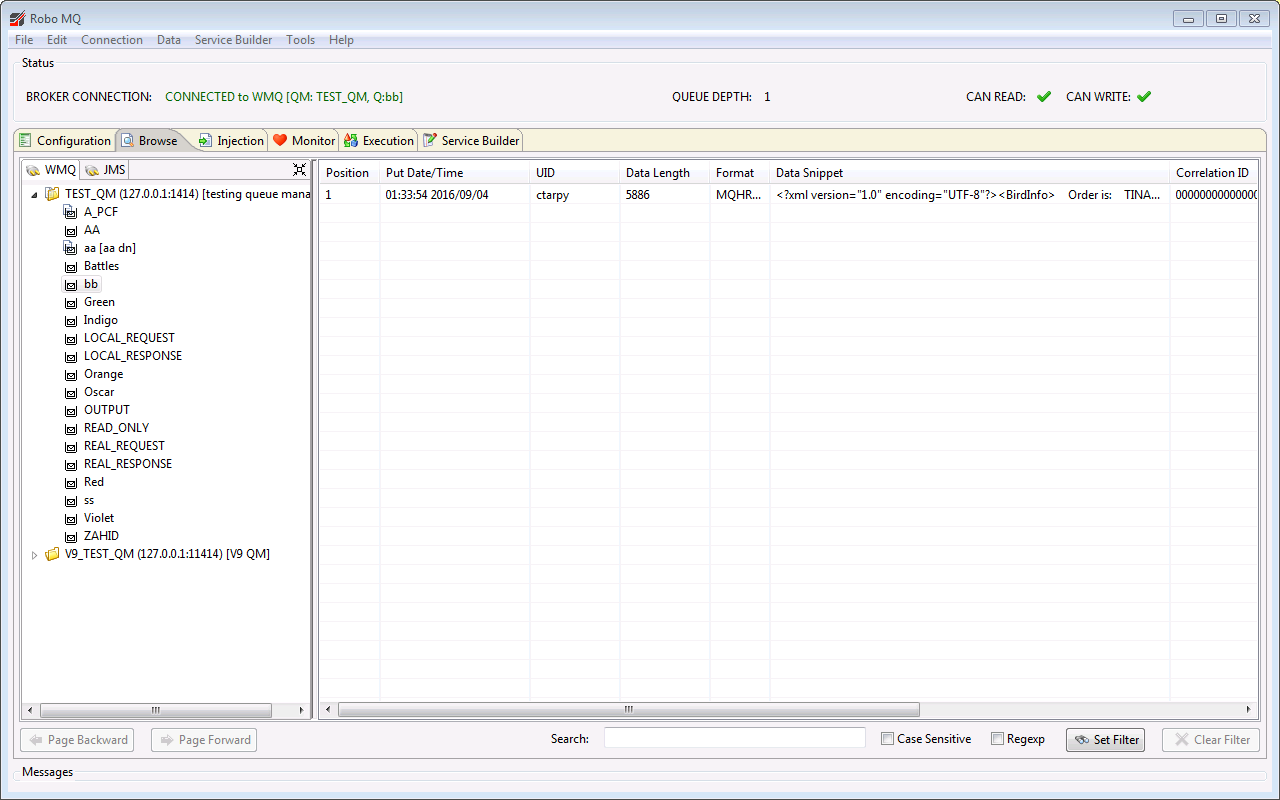
To the right of the Palette shortcut area is a table that contains a view of the messages currently residing on the queue. In order for this table to display any messages, the proper object authorities must have been granted to the user with which you connected. In this case the target queue must be permissioned with
MQI ENQUIRE
MQI BROWSE
RouteBLAZE™ supports message pagination. If the number of messages on the queue exceeds the max messages per page (configured in Browser Settings Panel), then the 'Page Backward' and 'Page Forward buttons become active.
Back to topMessage Filtering

RouteBLAZE™ supports full text search across the entire queue contents. It uses either basic pattern matching or regular expressions. The filtering process will display up to a maximum number of matches - as defined the Browser Settings screen. Full pagination is supported even when filtering is enabled. By default searches are case-insensitive.
NOTE: When performing regexp searches the Case Sensitive button has no effect.
Once set, the filter will remain enabled even if RouteBLAZE™ is connected to a different queue. To remove the filter it must be explicitly canceled ('Clear Filter' button).
Back to topBrowse Context Options
RouteBLAZE™ provides a message clipboard that behaves in a manner similar to the Windows clipboard. Messages can be cut or copied from a queue, and pasted into the original queue, another queue within the same queue manager or even to a queue on a different queue manager.
When pasting messages it is possible to replicate the messages exactly cut/copied, or to request new messageId's from the queue manager. Since messageId is often used as a key field, it is useful to be able to request new, unique keys.
Cut/Copy/Paste functions are available either from the context menu over the Browse Panel or from the main 'Edit' menu.
Message selections can be saved as either individual text files (where the suffix is configurable from the 'Settings' panel), or as a single binary archive. Binary archiving may be useful when groups of messages form single use-cases. E.G. you may have a testcase that consists of the messages: 'create trade', 'modify trade', 'cancel trade'. Here it is convenient to be able to restore all three messages in a single operation.
Back to topSpecial Copy
Special Copy allows the copying or moving of messages, with an optional 'Find/Replace' operation. If the target queue (selected at the top of the dialog) is the same as the source queue and all messages are selected and the 'Move' radio is selected, then this function behaves exactly as 'Find/Replace' in a text editor. MessageId's and header information is preserved.
Before executing the operation it is possibe to perform a 'Preview'. This preview will show how many occurances of the 'Find' term have been located in the selected messages. This gives an indication before-hand of the imapct of the 'Find/Replace' and is useful for spotting potential errors.
Special Copy is available either from the context menu over the Browse Panel or from the main 'Edit' menu.
Back to topInject Panel
The Inject Panel allows new messages to be created and injected onto a queue via the currently active connection.
Text can be pasted into the main content panel from the Windows clipboard. A context popup menu allows the text to be re-formatted and syntax highlighted if it's well formed XML. Also, XSL transformations can be applied to the text within the Inject panel (see following section).
MQMD header properties can be applied to the message.
For legacy Websphere MQ installations (pre-v7.0) a RFH version 1 or 2 header. The radio buttons in the MQMD section activate
the optional header section to the right, which exposes header specific fields.
When one of the 'Header Type' radio buttons is selected, RouteBLAZE™ automatically popuplates the MQMD with typical values for the 'Coded Character Set ID' 'Encoding' fields.
For Websphere MQ 7.0 and above, message properties are supported.
XSL Transforms
Selecting the XSL Transform option launches the following screen

Use the browse button to select the XSL style sheet from disk. The file can be added as a favourite if it to be frequently used. Right-click on a selected favourite to remove it from the list.
Either double-click a favourite in the favourites table or click the execute button to run the XSL script on the current contents of the Inject Panel contents.
Any errors are reported in the Message Panel.
Back to topMonitor Panel
The Monitor Panel provides information about Monitor Agents, their statuses and the resources they monitor. RouteBLAZE™ uses a traffic light system to indicate health. If a resource fails or exceeds a maximum specified depth, the status will change from green to yellow. If this state remains for a period of time (configurable on a per monitor basis) then the queue status will change from yellow to red.
Once a given monitored resource's status changes to red, then the Agent will send an email notification (configurable). If the state of the resource subsequently becomes healthy then it's status changes back to green.
Each Monitor Agent has its own database and records events for each resource it monitors. These include sample events, incident events, alert notification events etc. These data may be displayed graphically, and may also be exported as a CSV. This may be useful for SLA and worst case latency analysis.
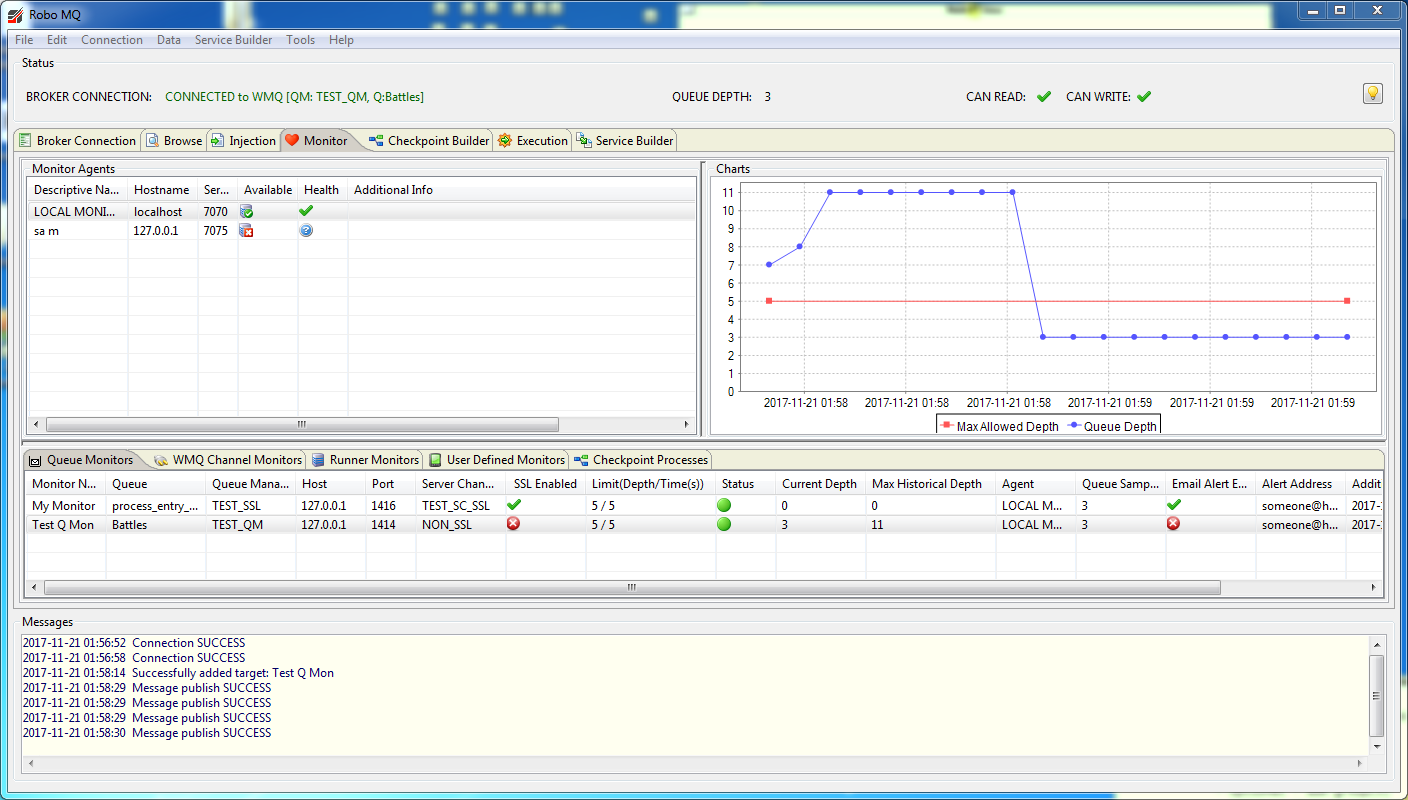
The Monitor Panel has three main sections:
- A list of Monitor Agents that RouteBLAZE™ has been configured to interact with
- Resources monitored by the selected Monitor Agent. Supported resources are:
- Queue Monitors
- Websphere MQ channel (of type: Server-connection)
- RouteBLAZE™ Runner processes
- Charting that graphically presents requested information
The Monitor Agents table at the top left of the panel lists all known Monitor Agents and their status. The 'Health' column will display a red 'X' if the agent is not able to operate properly. The 'Additional Info' column will provide a detailed explaination of the issues. For example, if an agent attempts to issue an email notification and has issues connecting to its SMTP server, the Monitor Agent status goes red, and the localized message from the underlying exception is displayed in the 'Additional Info' column. More detailed information may be available in the log file for the agent. This file is located at:
$ROBOAGENT_INSTALL_BASE\logs
Once the underlying reason for the failure is resolved (perhaps an erroneous SMTP configuration has been corrected), the warning status may be cleared. To do this, right click on the Monitor Agent and select 'Clear Warning'
Clicking on 'Refresh View' causes all the targets monitored by the selected Monitor Agent to be updated from the agent. This can be configured in the settings panel to automatically refresh periodically. 'Add Target Using Current MQ Connection' is covered in the following section.
Each Monitor Agent has a H2 database. The Manage Database option allows you to run queries and scripts on it. This can be useful for performing management reports, performing bulk inserts of monitors etc.If Monitor Agent security is enabled, then the admin authority on the connecting user is required to access this.

The lower section shows the queues monitored by the currently selected Monitor Agent. It shows various bits of information about the Monitor, including details about where it is, its depth, its current status, and the limits it has been set.
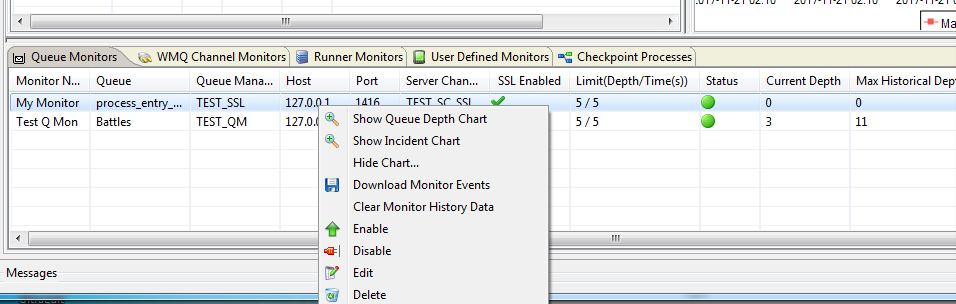
The context menu for monitor targets is shown above.
- Show Queue Depth Chart
This pulls queue depth events from the Monitor Agent and displays a graph in of depth against time in the top right of the Monitor Panel. The maximum events that will be plotted is configurable in the Settings Panel, as is an option to auto-refresh the chart. NOTE: Setting a high value for the max events on the plot may have a negative effect on performance.
- Show Incident Chart
This pulls incident events from the Monitor Agent and displays a graph of queue depth when incident reported against time in the top right of the Monitor Panel. The max events and auto-refresh settings in the Settings Panel also apply for this chart type.
- Hide Chart
This clears the Chart Panel. If chart auto-refresh is enabled in the Settings Panel, this will disable the polling thread until a new chart is requested. If the max number of chart events is high, clearing the Chart Panel when the chart is not in use will prevent unnecessary load on the Monitor Agent.
- Download Target Events
This allows the download of all target events as a CSV for the selected Monitor. If the required number of target events is very high, then periodically downloading the events for processing in a tools such as Excel may be preferable for performance reasons.
- Clear Target Events
Instructs the Monitor Agent to remove all events for this Monitor from its database.
- Delete Target
This removes the monitor from the Monitor Agent. All target event data is deleted from the Monitor Agent's database. This operation cannot be undone.
Adding Monitors
Selecting the Add Queue Monitor For Current MQ Connection context menu item on the Monitor Agent Panel (top left) causes the following dialog to be displayed:

The details needed for the connection to the queue are copied from the Configuration Panel. NOTE: To quickly create a Target Monitor load a pre-exiting connection from your Palette either from the Palette tree view on the Browse Panel or from the Palette dialog:
File->Load From PaletteThe connection settings from the Palette are copied to the Configuration Panel.
The editable fields on this form are:
- Max Depth
The maximum allowable depth. If the Monitor Agent samples the queue depth of the target queue and it exceeds this, then the queue's status is changed from green to yellow.
- Max Time Over (s)
The maximum time in seconds the queue is permitted to exceed its allowable depth before its status changes from yellow to red. Once its status is red, an Incident Event is raised against the Target Monitor. This may result in an email being issued notifying of this status.
- Descriptive Name
A meaningful nick name for the Target Monitor
- Q Sample Period
The time in seconds between samples of the queue depth. Each sample is recorded in the Monitor Agents database as a Sample Event, keyed against the Target Monitor in question.
- Email Address
The email address to which any notification should be issued.
- Send Email Alert
This box indicates if an alert should be issued in the event of an Incident Event being raised against this Target Monitor.
Once completed, the details will be sent across to the Monitor Agent that was highlighted in the top left panel. The Monitor Agent will then start polling queue depth on the specified queue, and continue while until the Monitor is not deleted.
The above procedure can be used to create monitors for WMQ channel useage, Execution Agent Runner health, and anuy User Defined Monitors (UDM) that have been installed.
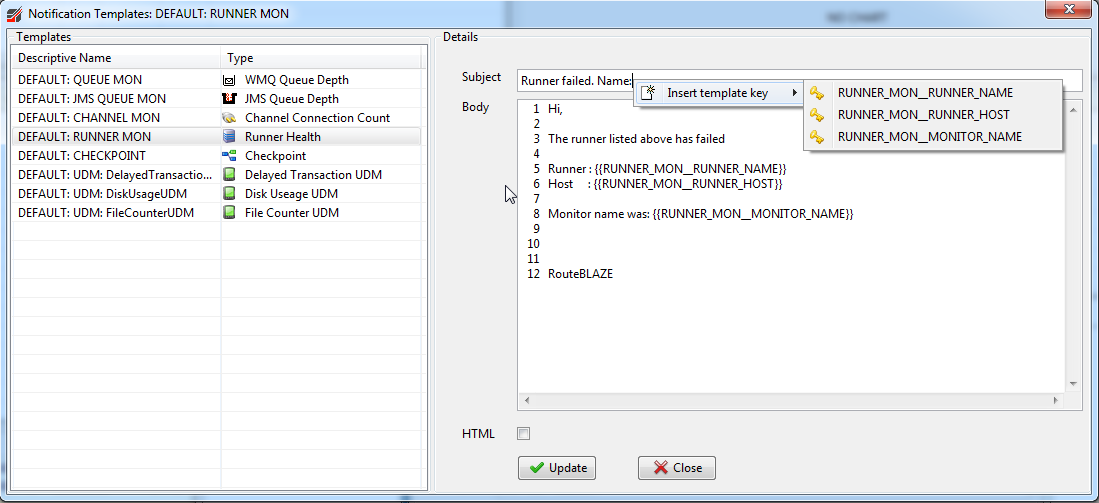
Each monitor type can have any number of email templates. Templates are used to format the alert messages sent out when the trigger condition for a given montior
are breached.
Templates can be accessed from either the context menu on the Montitor Agent, or from the button on the 'Add Monitor' dialog.
When an event is raised, the event itself has information that will be useful to the operator receiving the notification. The specific fields
available are dependent on the event type. For example a RunnerMonitor event would know the runner name and host on which it was executing.
A QueueMonitor event would know the queue name, current depth etc
These fields can be inserted into both the subject and body of the notification, and are accessed via the subject and body context menus.
The process for creating resource monitors for Websphere MQ server-connection channels, RouteBLAZE™ Runner processes and User Defined Monitors follows a similar process to the above.
These type of monitors are polled. This means the Monitor Agent, based on a configured frequency, will invoke the monitor to check the status of a particular resource.
The next section is concerned with event-driven monitors. These monitors essentially run in their own thread, monitor as required, and manage their notifications directly.
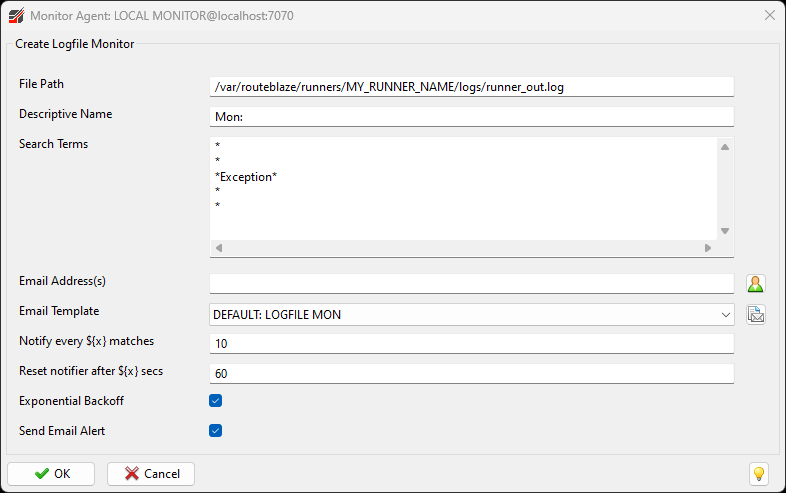
Back to topLogfile Monitors
Logfile Monitors track files in real time, looking for pattens that could be of interest - such as exceptions or other error conditions.
To use this monitor type, you need to specify the path to the file being monitored, and some search terms. The search terms can match multiple lines, and wildcard [*] is also supported.
For example, one may be interested in being notified if the following exception appeared in the logfile:
2024-12-27 18:12:23,235 [Thread-34] INFO  org.eclipse.jetty.server.Server
java.io.IOException: Failed to bind to 0.0.0.0/0.0.0.0:8080
	at org.eclipse.jetty.server.ServerConnector.openAcceptChannel(ServerConnector.java:344)
	at org.eclipse.jetty.server.ServerConnector.open(ServerConnector.java:304)
	at org.eclipse.jetty.server.Server.lambda$doStart$0(Server.java:402)
	at java.base/java.util.stream.ForEachOps$ForEachOp$OfRef.accept(ForEachOps.java:183)
I may want to match the exception, but also grab a few lines of context before and after the exception. In this case, the search term could be:
*
*
*IOException*
*openAcceptChannel*
*
*
Example screenshot is below.
Notification Parameters
The notification parameters allow control over how many notifications and under what circumstances they'll be sent. If the exception being tracked loops for example, you
might not want to receive thousands of mails.
The parameters below support being notified, while limiting duplicate information
- Notify every ${x} matches: If this is set equal to 10, then you will be notified the 1st time, 11th time, 21st time the search terms match.
- Exponential Backoff: If set true and the about param is 10, then you'll be notified the 1st time, 11th time, 101st time, 1001 time the search terms match
- Reset notifier after ${x} secs: If there have been no recurring exceptions for this period of time (in seconds), then the effects of exponential backoff and the notifiy modulus are reset. Once a flood of exceptions has been stopped, it is usually desirable to be notified immediately if the condition occurs again
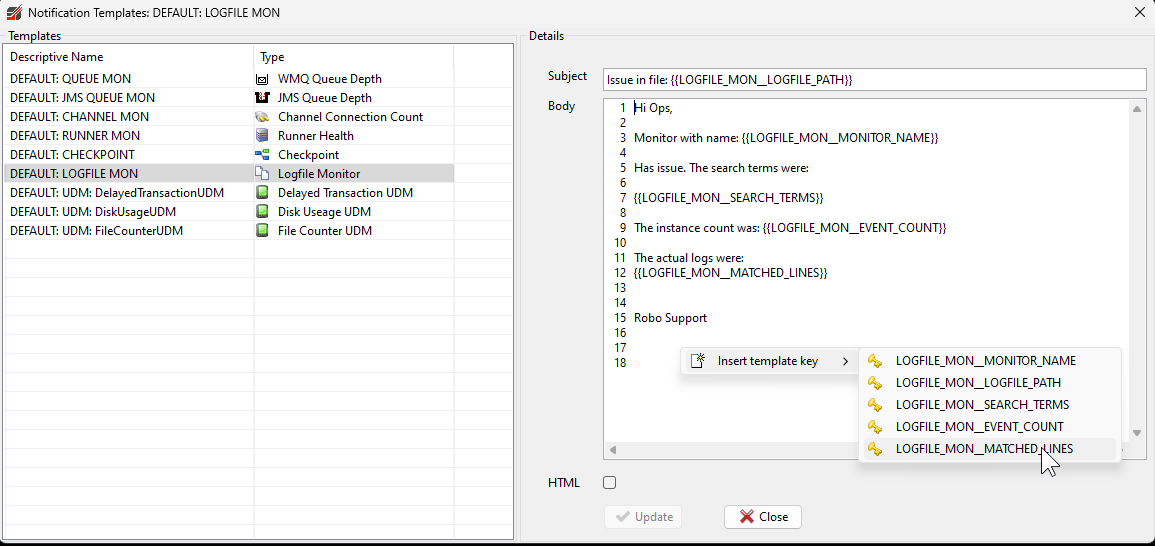
As to the notification itself, the logfile lines - with context - matched on the search terms can be inserted into the message.
Additionally, the event count template key (see below) is useful to see the number of exception notifications that have been suppressed.
Robo Checkpoint
Robo Checkpoint provides stateful transaction monitoring, where the concept of a successful transaction involves an arbitrary number of asynchronous messages collaborating in a business process. See the Programmers Guide for details on how to build applications of this type. Back to topCheckpoint Builder Panel
 Back to top
Configuring Monitor Agents
The Monitor Agent (with exception to the built-in LOCAL Monitor Agent) has a few options that can be configured. Since these need to be present at start-up (unlikle its email settings for example) they are not sett-able via the RouteBLAZE™ Settings Panel.
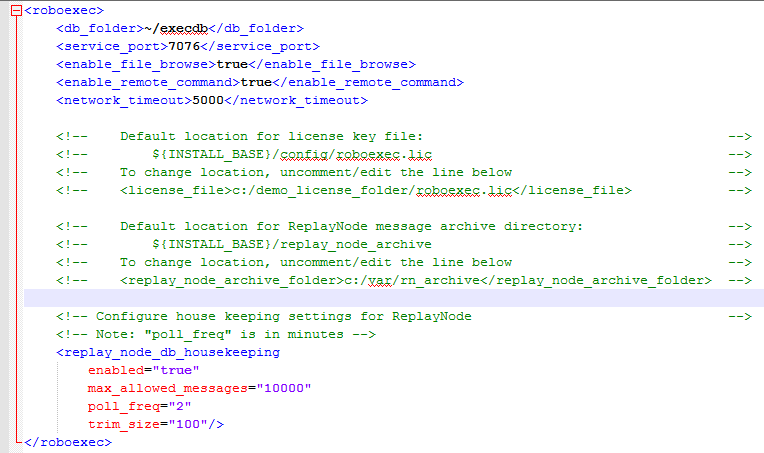
These options are set via a config XML file, that can be located at:
$ROBOAGENT_INSTALL_BASE\conf\robomon_conf.xmlA sample config example follows:

A description of each option and its implications follow:
- db_folder
The location on the server's hard drive that RouteBLAZE™ will place its database files. This folder must be permissioned with both read and write access for the agent to be able to function. In the case where there are multiple Monitor Agents running on the same host, then each must be configured with a separate, distinct location. Failure to ensure this would likely cause all manner of bad things to happen.
- service_port
The TCP port on which RouteBLAZE™ GUI will attempt to communicate with the agent. Upon start-up the Monitor Agent will attempt to listen on this port. If this port is already in use, then this binding will not succeed and the Monitor Agent will fail to start. Since the GUI uses this to communicate with the agent, the GUI will be unaware of the reason why the agent is unavailable. As such it may be necessary to check the log file of the monitor to be assured of the cause of failure.
- max_records_per_target
This defines the max number of records in the database that the Monitor Agent will record for a given target. RouteBLAZE™ has a house-keeping process that periodically checks to see if this max value has been exceeded for any of the targets that the monitor is managing. In the event of this happening the House-Keeper will trim a chunk of the oldest records. This process is there to prevent the database expanding in an un-bounded fashion.
Starting and Stopping the Monitor Agent
Scripts to start and stop the MonitorAgent can be found in
$ROBOAGENT_INSTALL_BASE\scripts/To start the agent, either run the start bat file or start shell script file, depending on your operating system. Back to top
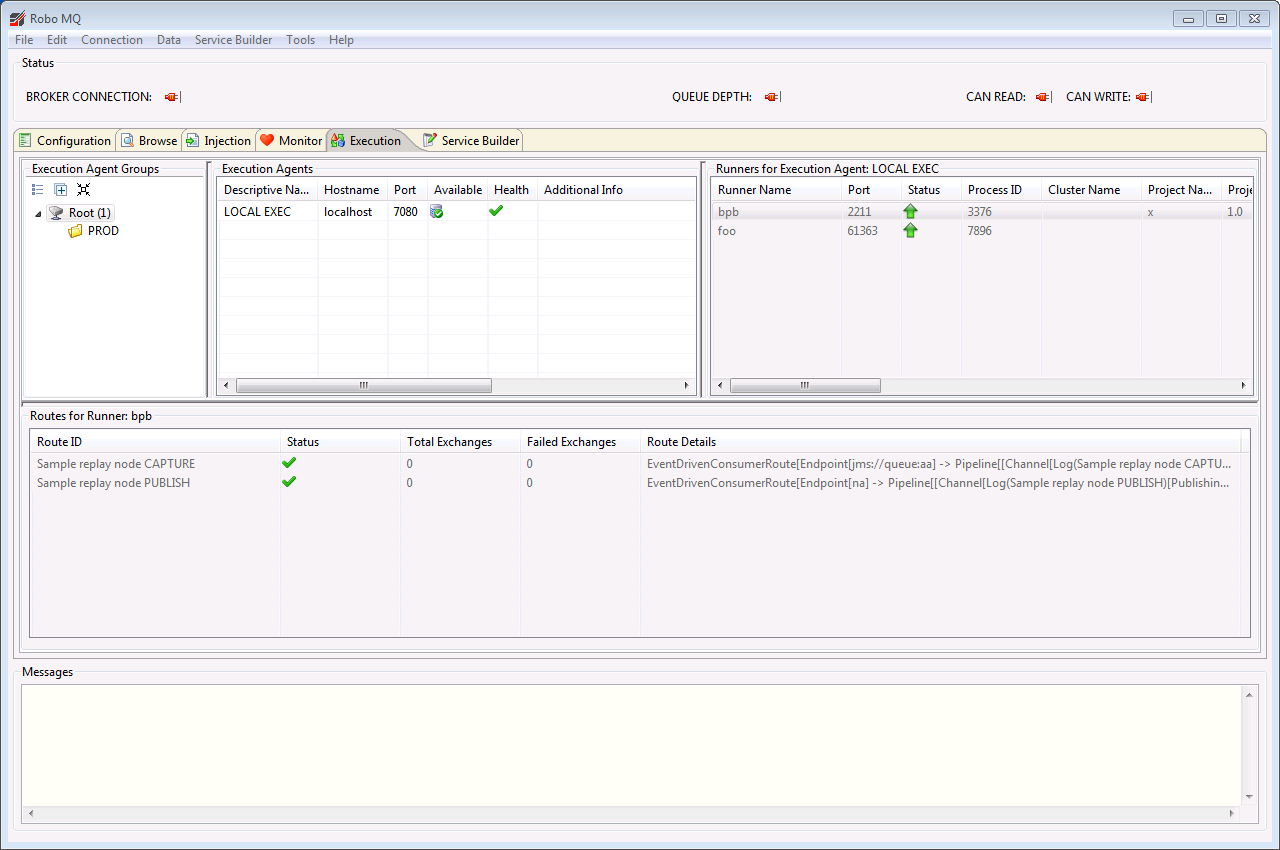
Execution Panel
The Execution Panel provides access to RouteBLAZE™'s runtime features. The table at the top left is 'Execution Agents' table. This lists all the Execution Agents RouteBLAZE™ is aware of. Execution agents are responsible for managing the lifecycle of its associated runners. In addition it also manages remote file access to and from its host server.
The table to the top right is the 'Runners' table. Runners are distinct processes that act as service containers. Each Runner can wrap a CamelContext instance, along with whatever support resources are required - e.g. beans for dependency injection into the Camel Context from the Spring Context (in the case where the service is configured as a Spring DSL project), or JARs containing various bits of bespoke logic or services (predicates, processors, components etc). The runners do the actual work.The 'Status' column shows the status of the runner: 'Started' (green), 'starting' (yellow) or 'down' (red). Once the Runner is up, the green icon may be decorated either with yellow or red at its base. This refers to the state of the routes within the Camel Context of the Runner.
- All routes up: Solid green
- Some routes up: Yellow at the base of the icon
- All routes down: Red at the base of the icon
The table at the bottom of the tab is the 'Routes' table. Selecting an active runner will cause this table to display any routes configured within that Runners Camel Context.
 Back to top
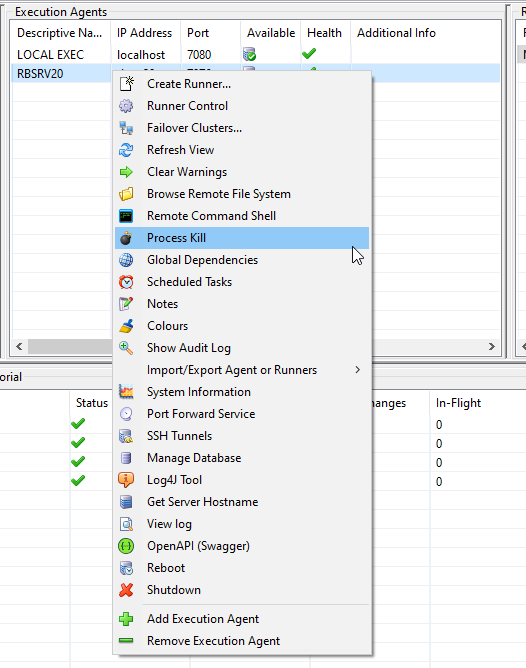
Execution Panel Agent Menu
This menu provides for creating new Runners, browsing the remote file system and shutting down the agent.
-
Create Runner causes the agent to create a new runtime container on its host.
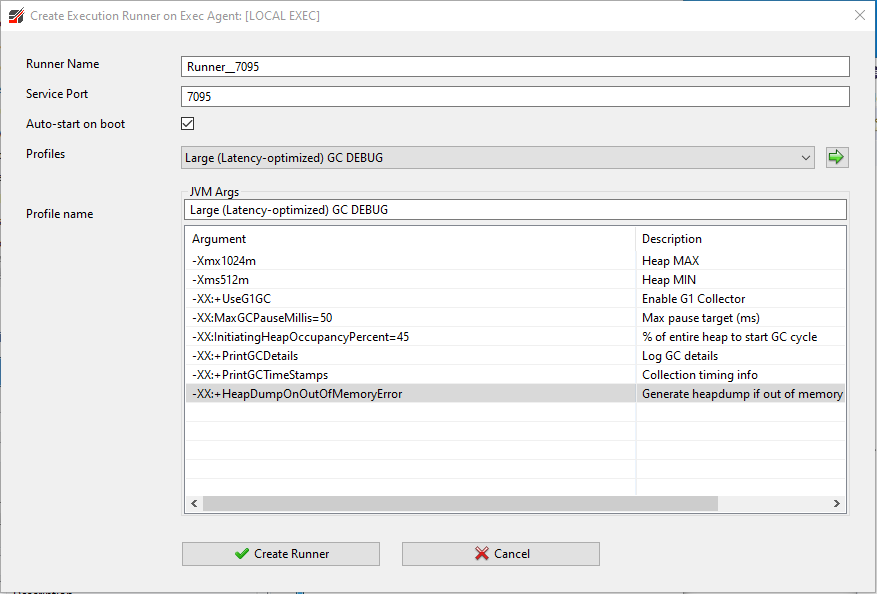
A descriptive name and service port must be specified. On the host the agent creates the necessary support files at location:
$ROBOAGENT_INSTALL_BASE/runners/$RUNNER_NAME/config
When a Camel application is deployed, it's state is written here. The 'config' folder contains details of the project, any Spring DSL files, log4j configuration etc.
'Performance Profile' allows you to tune the underlying JVM for the Runner. RouteBLAZE™ ships with a number of of default profiles. Each may be customised as necessary, or new profiles may be created.
Right-click on the 'Argument'/'Description' table to edit/delete a profile, or create new profiles.
Once the a profile has been editted here, selectSavefrom the context menu to persist your changes within RouteBlaze Studio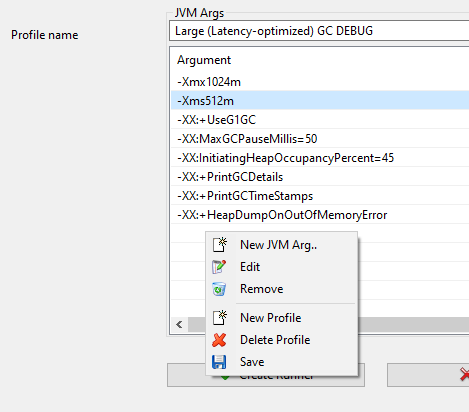
-
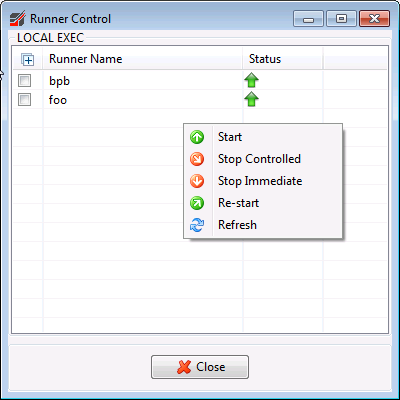
Runner Control provides the ability to start, stop or restart multiple runners:
- Failover Clusters.... option allows for the creation and management of groups of Runners operating in fail-over mode, providing for high-availability and business continuity. See this section for details on useage.
- Refresh View causes RouteBLAZE™ to check the status of the listed Execution Agents and the status of the runners for the selected agent.
- Clear Warnings behaves exactly as per the equivalent Monitor Agent function. The warning flag on the agent is cleared
- Browse Remote File System allows access to files on the host on which the agent is installed. See this section for details on useage.
-
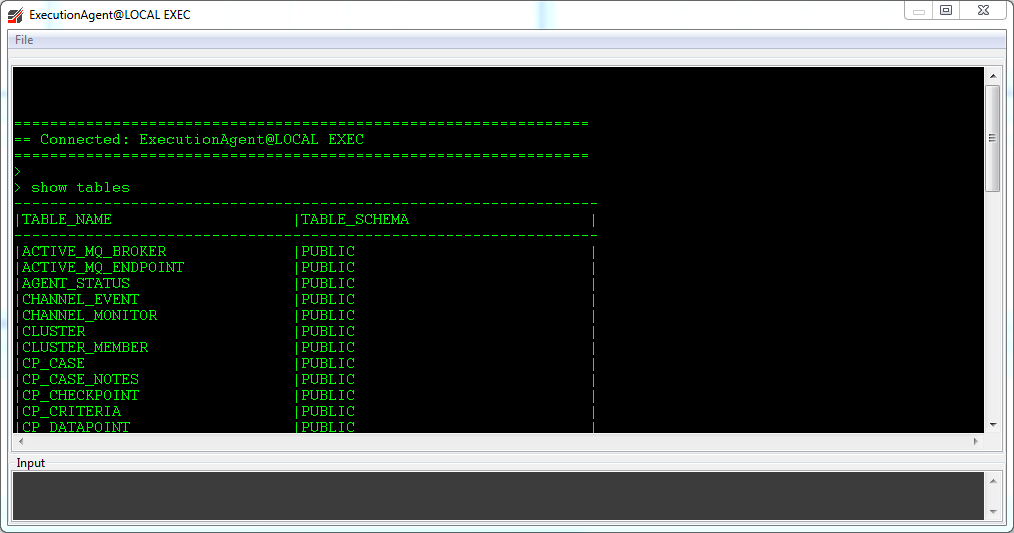
Remote Command Shell creates a command shell on the execution host which can be controlled from the GUI client. On Windows machines
this shell is
CMD.EXE
, and on Linux/UNIX it is/usr/bin/bash
. See here for more info.
-
Process Kill terminates a native process on the host. The following commands are executed:
For *nix machines:kill -KILL ${process_id}
For Windows machines:taskkill /PID ${process_id} /F -
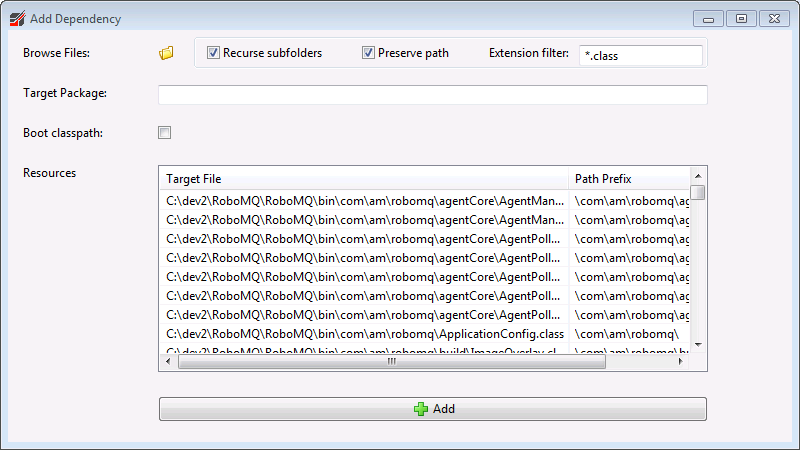
Global Dependencies provides support for system-wide dependency management. Dependencies specified
here are scoped at the Execution Agent level, and so
are applied to all Runners managed by the agent in question.
Note: On Linux, all global classpath folders will be added to$LD_LIBRARY_PATH. This is to support the loading of any native library dependencies. The 'bootstrap' option relates to the order in which JARs are loaded at runtime. If a dependency is marked as 'bootstrap', then it will be loaded before RouteBLAZE™'s dependencies. This provides a mechanism to override the version any particular API being used by RouteBLAZE™. Note: care must be taken when using this facility, as it may well result in system instability or failure.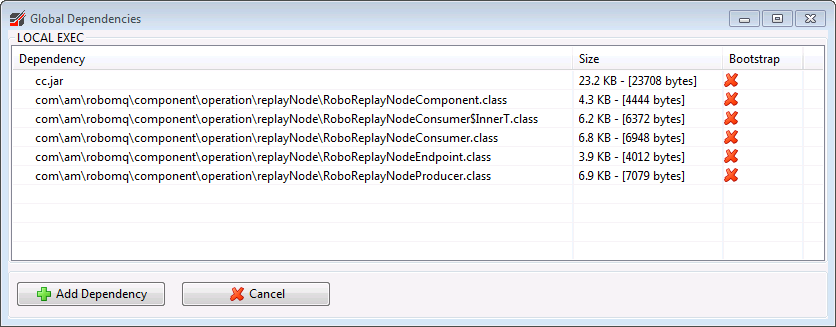 When adding dependencies, it is possible to recurse through a parent folder. If it were individual .class files to be added, then
'Preserve Path' should be checked. This will replicate the path to the resource relative to the selected parent.
When adding dependencies, it is possible to recurse through a parent folder. If it were individual .class files to be added, then
'Preserve Path' should be checked. This will replicate the path to the resource relative to the selected parent.
For JAR files, however, you may not want to preserve the path, since they should all be in the root and always added.
In addition to preserving the relative path, can also then apply a master prefix (Target Package). This is useful for partitioning resources by environment. So you may have a sets of resources for PROD, UAT and DEV, and could prefix each set with a Target Package of that name. Then in your project, use an environment variable to prefix whatever is loading your resource, where the values for each of your environments would match the relevant Target Package. A context menu on the Global Dependencies table allows you to:- Delete. The selected dependencies will be removed from the server. This cannot be undone
- Download. Selected dependencies will be downloaded to the client PC. Folder structure is preserved, and any necessary folders will be created as required.
-
Scheduled Tasks provides automation support for common tasks. Supported tasks are:
- STOP/START RUNNER
- STOP/START ALL RUNNERS
- STOP/START CLUSTER
- STOP/START ROUTE
- STOP/START ALL ROUTES
- STOP EXECUTION AGENT
- ENTER/EXIT MAINTENANCE MODE
- SENT SMTP MAIL
- RUN SCRIPT
- REPLAY NODE: ARCHIVE AND CLEAR ALL
 The scheduler fire time can either be configured as a simple one-shot trigger. Clicking on the 'Target Date/Time' field causes a date-time picker
dialog to appear.
The scheduler fire time can either be configured as a simple one-shot trigger. Clicking on the 'Target Date/Time' field causes a date-time picker
dialog to appear.
 If more complex scheduling is required (e.g. recurring events), then Quartz Cron expressions may be used. A tutorial regarding the use of
the Quartz Cron Trigger can be found here.
If more complex scheduling is required (e.g. recurring events), then Quartz Cron expressions may be used. A tutorial regarding the use of
the Quartz Cron Trigger can be found here.
Once the task is created, the time-to-next-fire is calculated and displayed. This is particularly useful when using the Cron trigger, ensuring events will fire as expected! - Notes provides a convenient way to hold per-agent documentation. Anything written here is stored in the agent's database, so updates will become immediately visible to all users that have access to the agent. Maximum data size is 131072 characters.
- Colours allows colour coding of Execution Agents (e.g. red for production, green for development)
-
Show Audit Log provides an audit trail for all operations performed on the selected Exec Agent: Who did what, when and from where. The log can
be cleared via a context popup.
- Import/Export Agent or Runners option allows a partial or complete backup of the selected Execution Agent. This includes its global dependencies and runners. Note: If security is enabled on the agent, then the user executing the operation must be granted 'Admin' authority.
-
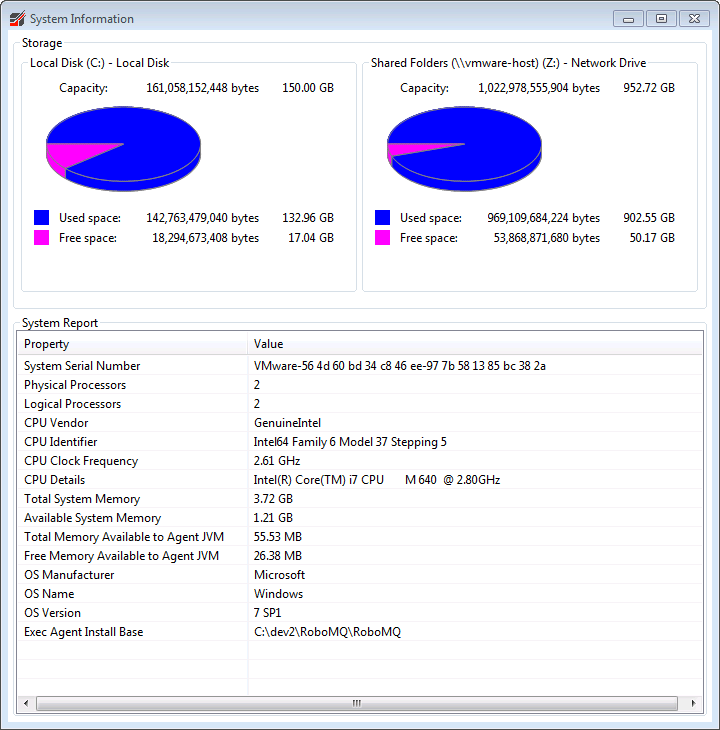
System Info provide information regarding the Execution Agent host. It shows CPU details, memory details/useage, and mass storage device status.
-
Port Forwarder allows you to define port forwards (local source port, and target IP:port) on the Execution Agent).
The behaviour is much like SSH local port forwading. When something connects to
the source port, a connection is immediately created to the target IP:port, and data is transparently routed in both directions.
This is useful if you need a direct TCP/IP connection for some service (e.g. JMS/JDBC etc), but network topology means the only possible route is via a 3rd server. In addition to the basic port forwarding, the this feature allows you to:- Snoop a connection. This can be useful when trying to diagnose/debug protocol or client/server issues
- Filter the data. Search patterns can be created (either basic or regexp). Matched data can then be replaced. The directionality of the filters can be set to either REQUEST, RESPONS or BOTH. This can be useful when trying to diagnose/debug protocol or client/server issues
Port Forward Example
Lets say, for example we want to examine the protocol between RouteBLAZE™ Studio and its LOCAL EXEC agent. Assuming LOCAL EXEC is listening on its default port (7080), then on LOCAL EXEC, create a port forward as follows: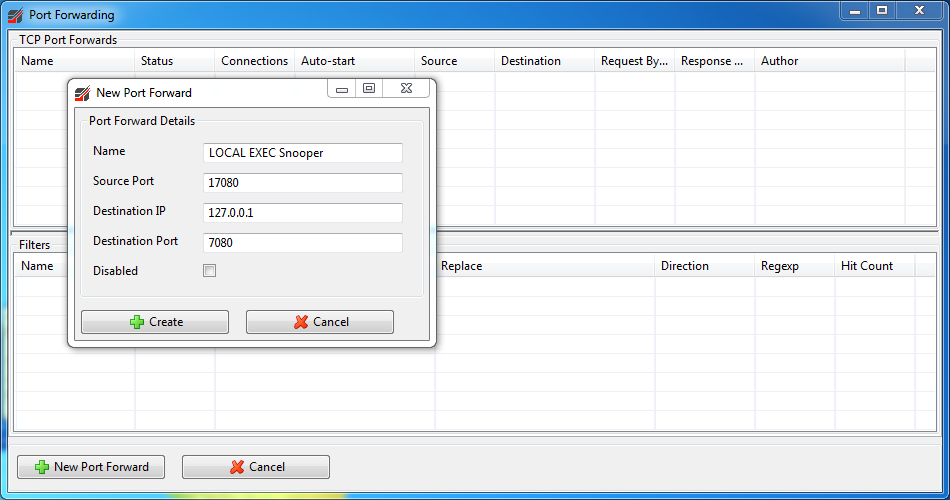
Now go to File->Settings...->Agents->Agent Config.
Right-click on the agents table and select Add Agent. Set
Agent Host to 127.0.0.1, and
Agent Port to 17080.
Leave Agent Type as EXECUTION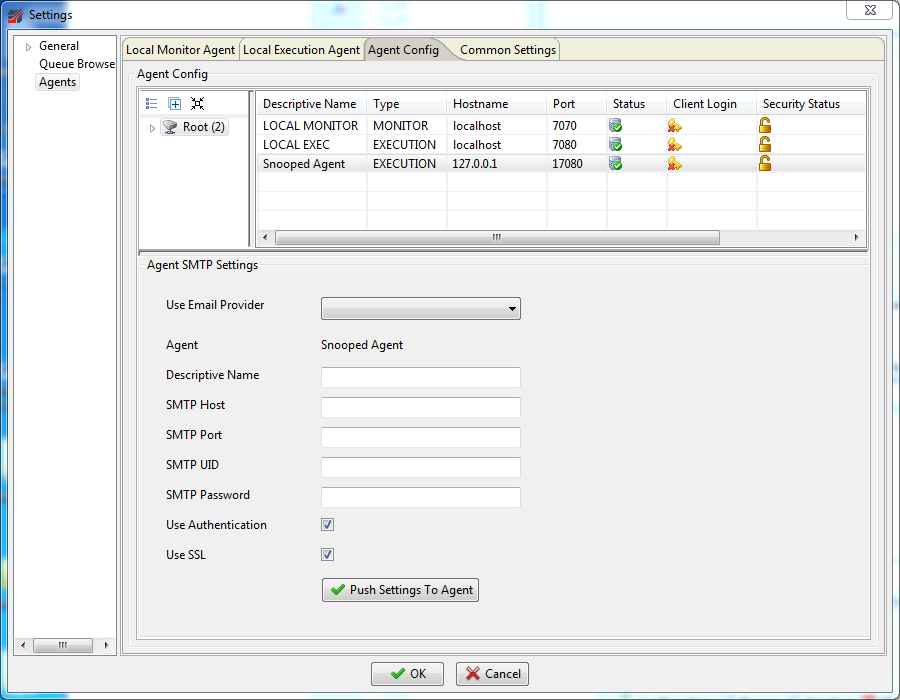
Notice that in the settings window the status of Snooped Agent is green. This means that RouteBLAZE™ Studio has tried to connect the agent on port 17080, the Port Forwarder has accepted the connection and forwarded to the actual service port for the agent: 7080.
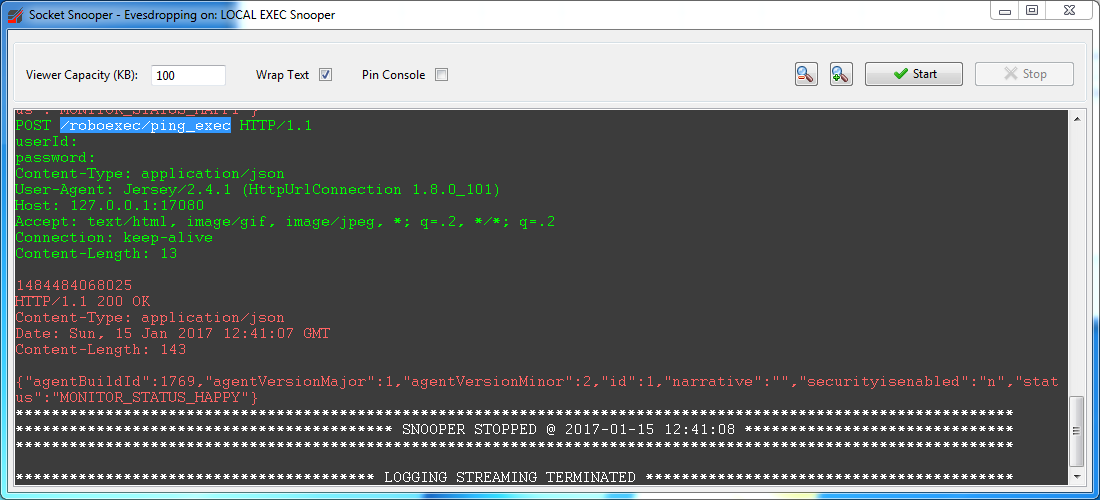
Now go to the Execution Tab view and open the Port Foward service for LOCAL EXEC. Right-click on the LOCAL EXCEC Snooper and select Snoop. You should see the traffic between RouteBLAZE™ Studio and LOCAL EXEC in real time. Notice that the client is continually issuing ping requests to LOCAL EXEC
POST /roboexec/ping_exec HTTP/1.1
Now, lets say that the service we need to call is called pong rather than ping. Here we could create a filter to fix this. On the port forward window right-click on the filters table, and select New Filter...: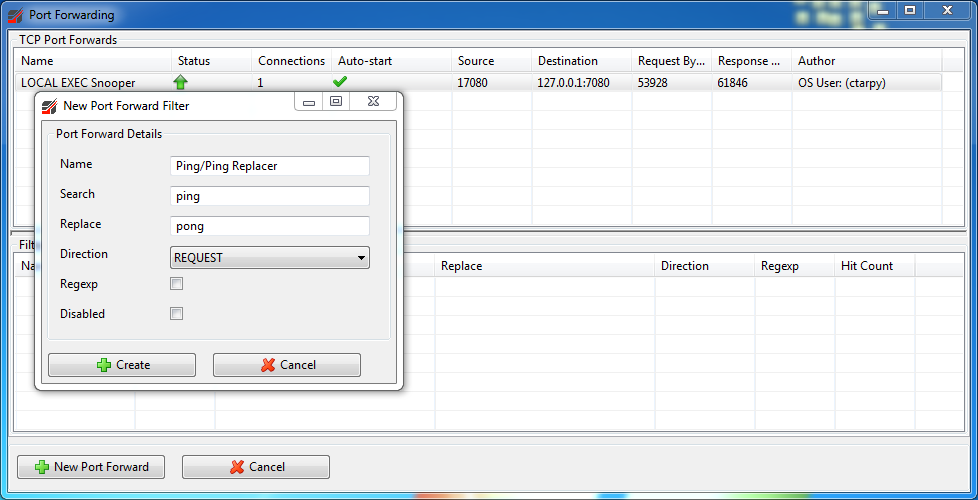
Once this is added, check the Execution tab. Snooped Agent should no longer be available - since RouteBLAZE™ Studio can no longer receive valid responses to its ping.
On the Port Forward window, again snoop the connection. You should notice that now the request from the client has been modified as per our filter, and since LOCAL EXEC does not have a service called pong, it does not respond has the client would expect.
Disable or delete the filter to retore the connection.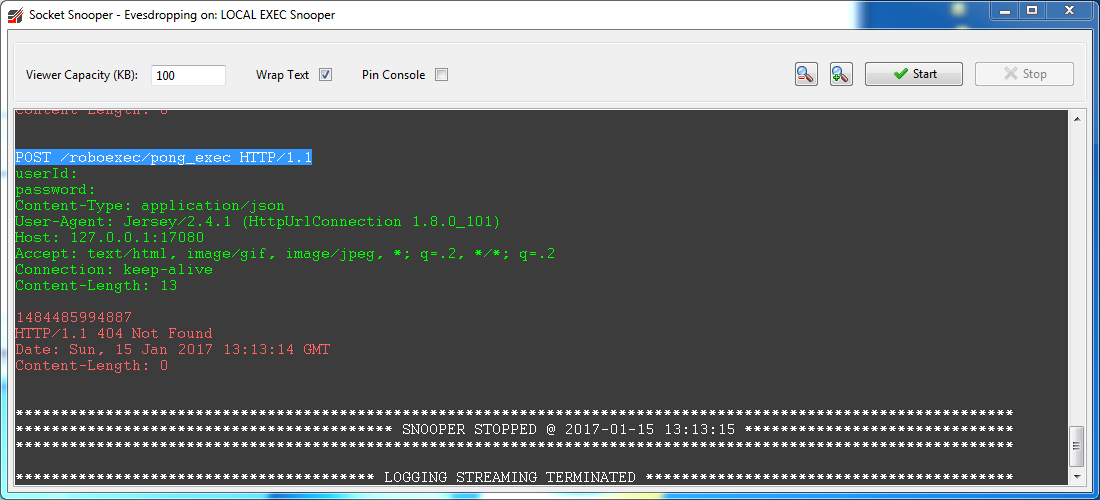
-
SSH Tunnels lets you create local and remote SSH tunnels. Uses same authentication key as for Port Forward from RouteBLAZE's security perspective.
Tunnels will be automatically started when the Exec Agent comes up providedAuto Starthas been enabled. To create a new tunnel: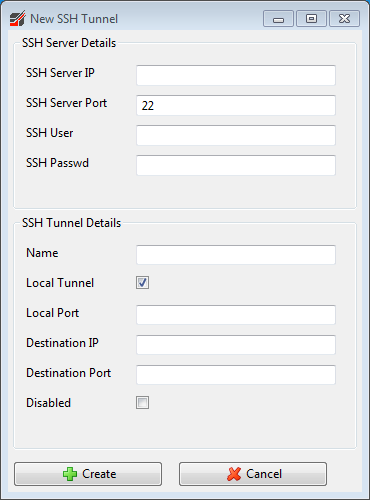
Tunnel view appears as follows:
- Log4J Tool lets you configure log settings at runtime on the Exec Agent. Individual
- Get Server Hostname shows the value for hostname on the target machine exactly as RouteBlaze sees it. This value would then be used to configure hostname settings like Service Builder -> Project Properties -> Automapper , or Tools -> Keystore Password Encrypter
- View Log streams the Exec Agent's logfile realtime into a window
-
Manage Database allows queries and scripts to be run on the Execution Agents underlying H2 database. If Execution Agent security is enabled,
then the admin authority on the connecting user is required to access this.
- Reboot causes the Execution Agent to reboot. Any runtime process started by the agent will remain unaffected. If a log window is open (for browsing the runtime's log) it will also close, since this function is managed by the Execution Agent rather than the Runner.
- Shutdown causes the Execution Agent to terminate. Any runtime process started by the agent will remain unaffected. If a log window is open (for browsing the runtime's log) it will also close, since this function is managed by the Execution Agent rather than the Runner.
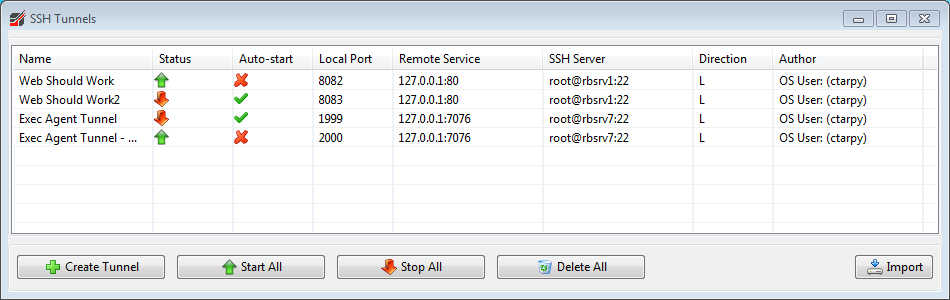
Note: SSH passwords are encrypted and stored in the internal database of the Execution Agent you are connected to. Should your SSH password expire it will be necessary to update. You can change both the SSH user and password from the context menu on each of your tunnels. Multiple tunnels can be updated at the same time if the credentials are the same.
Import/Export of groups of tunnels is supported. NOTE: User information is not persisted during export. Once you have imported a tunnel(s), it will be necessary to set the necessary SSH username and password. Imported tunnels are allways disabled on import.
Execution Panel Runner Menu
This popup provides for operations on the selected Runner:
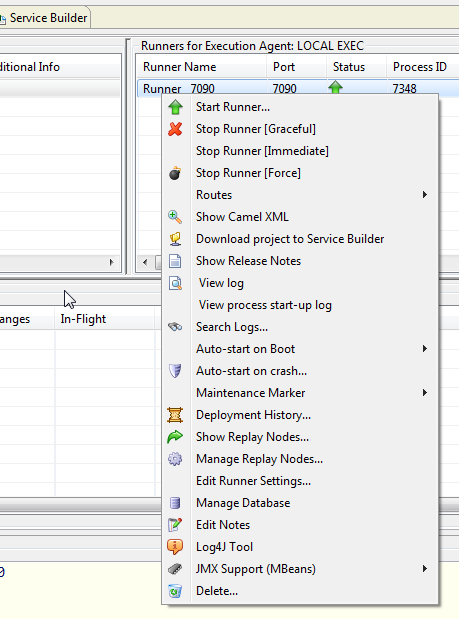
- Start Runner is processed by the parent Execution Agent and starts the Runner. Each Runner runs within its own JVM and manages a Camel Context.
- Stop Runner [Graceful] causes the Runner process to perform a graceful shutdown. Any in-flight Camel exchanges will be completed before the Runner goes down.
- Stop Runner [Immediate] forces the Runner process to terminate immediately.
WARNING: This has the potential to cause
loss of data.
NOTE: The above start/stop functions should not be used if the Runner is a participant in a cluster. In that case, the cluster itself should be started/stopped. Using the above will not change the target state of the cluster, and so the Cluster Manager running on the Exec Agent in question will reverse any action taken. - Stop Runner [Force] kills the Runner process using the Execution Agents PID KILL function. This should only
be usinged in the event of the Runner becoming unresponsive.\n
WARNING: This has the potential to cause loss of data.
-
The 'Routes' submenu appears as follows:
- Start/Stop All Routes causes all routes to either start or gracefully shut down. 'Graceful' means all in-flight transactions will be given the chance to complete; no further transactions will being.
- When defining a route in Camel it is possible to specify the default state the route should be in upon startup. 'Route Default Start-up Policy on Runner Start' causes this to be respected.
- The remaining options can be used to override the default config, forcing the route either up or down upon Runner start-up.
- Show Camel XML is supported for Spring DSL projects only. This option retrieves the original project XML used to configure the Camel Context on the runtime.
-
View Log (double-click Runner to launch) opens the Log Viewer. Log data is streamed by the Execution Agent into it,
effectively providing a remote:
tail -f ${log_file}.
-
View process start-up log opens the log viewer for STDOUT & STDERR from the JVM process for the Runner. This view is useful if a Runner
refuses to start. The reason would be reported here. The underlying file this
operates on is:
$INSTALL_BASE/runners/$RUNNER_NAME/logs/start_runner_$RUNNER_NAME_stdout.log
-
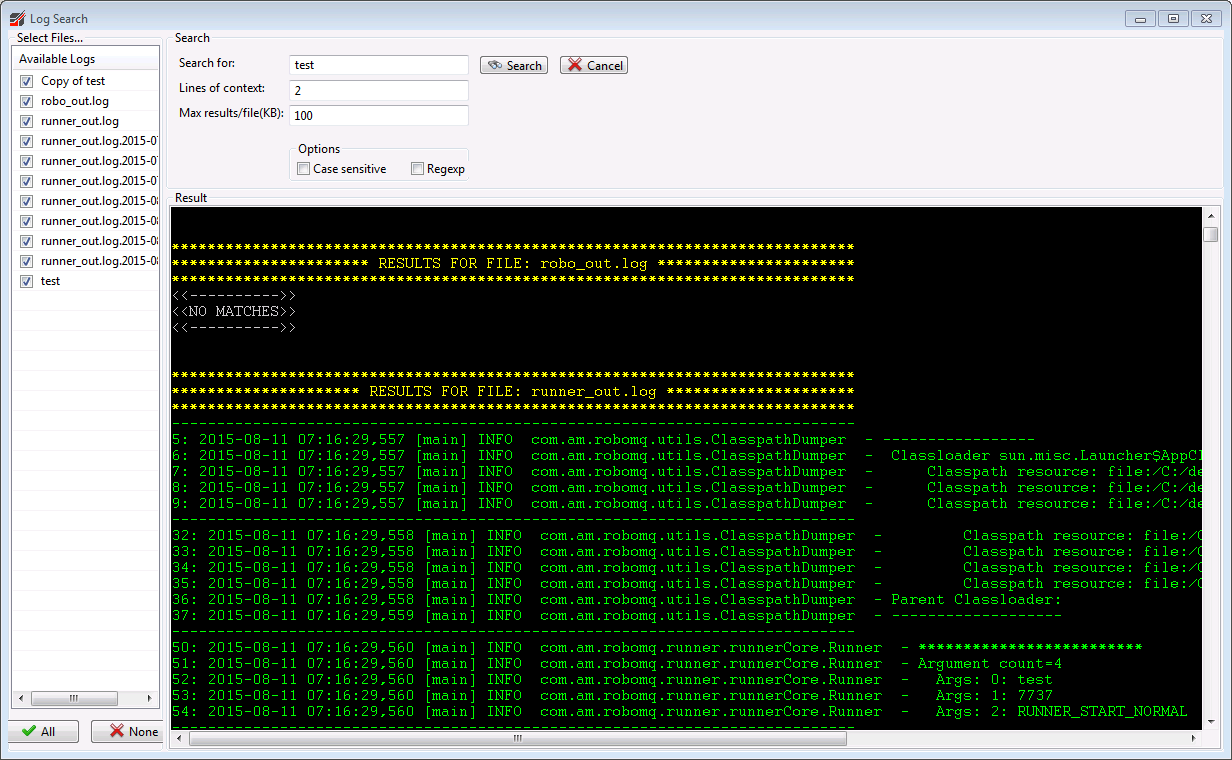
Search Logs opens the dialog shown below. It allows the searching for a given Runner of all its log files. The left-hand table
shows the files available, and the right shows search options and results. There is also a context menu on the log-files table
that allows selected log files to be downloaded to the client machine.
 RouteBLAZE™ uses Log4j, and by default is configured to use the RollingDailyFileAppender. The Log Viewer operates on the
currently active file. If older log files are required, then these can be downloaded using the remote File Browser.
RouteBLAZE™ uses Log4j, and by default is configured to use the RollingDailyFileAppender. The Log Viewer operates on the
currently active file. If older log files are required, then these can be downloaded using the remote File Browser.
The Log Viewer loads a number of context lines when it's opened. If more context is required, then the viewer must first be stopped and the new number of lines entered. Once the view has been stopped, the window buffer size can also be adjusted. Be aware that large capacity sizes may lead to out-of-memory issues.
The context menu on the viewer allows the contexts of the window to be routed to the XML Editor, or cleared.
- Enable/Disable Autostart relates to whether the runtime is launched when its parent Execution Agent comes up. Typically in a production environment this should be enabled.
-
If Crash Restarter is enabled, then the Execution Agent will restart the runner if it dies for any reason. If the runner is
manually stopped using the 'Stop Runner' menu option it is added to an exclusion list and auto-restart will not fire. NOTE: This
option is not available if the runner is a participant in a cluster. In that case its lifecycle is under the control of the Cluster
Manager running on the Execution Agent. Selecting this option causes the following dialog to appear:
 In addition to enabling crash restart, it can be configured to either attempt restart indefinitely or give up after a fixed number
of tries. If the runner is restarted and stays up for 60 seconds or more, then the crash restarter deems the process stable and
resets the fail counter.
In addition to enabling crash restart, it can be configured to either attempt restart indefinitely or give up after a fixed number
of tries. If the runner is restarted and stays up for 60 seconds or more, then the crash restarter deems the process stable and
resets the fail counter.
-
Maintenance Marker. The main purpose of placing a runner into maintenance mode is to indicate to any other observers that the
its potentially unstable state is deliberate, perhaps for deployment purposes. Additionally, once in maintenance mode all routes are
forced down. If the runner is a participant in a cluster, then other cluster participants will see the runner as unavailable. The
next highest priority participant will then attempt to start.
- Show Release Notes. Retrieves any release notes packaged with the currently active project on the selected runner
-
Deployment History. RouteBLAZE™ maintains a historical archive of every deployment. This dialog shows every archived release for the selected runner, including
the date it was initially installed, which user performed the deployment, the date it was archived and any supplied release notes.
It also provides the facility to rollback to any given release. If this is invoked, then the current project is also archived.
NOTE: 'Original Release Date' is the date the project was intially deployed. If the project is archived and then subsequently rolled back to, the 'Original Release Date' will not be updated.
NOTE: In order to perform a rollback operation: if runner-level security is enabled then supplied user credentials (see: settings->agent->agent config->Agent Login) must have deploy authority granted. See 'Security Guide' under help for more information.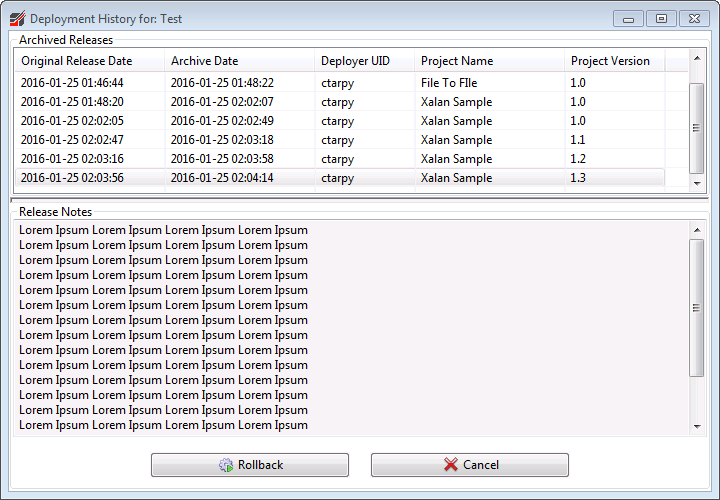
-
Show ReplayNode™s.... RouteBLAZE™ provides the facility to record and playback messages at any required points in your Camel routes. Please see the
Programmers Guide for details on how to configure routes to utilize this.
All messages that either pass through a
CAPTUREnode or are issued from aPLAYBACKnode are persisted to a database maintained by the Runner managing the containing Camel Context.This allows the application developer to easily implement 4-eyes, 6-eyes or n-eyes governance controls.
Again, more information about the Maker/Checker feature is available in the Programmers Guide.
Messages can be filtered at the SQL level either using the SQL builder, or by directly entering a WHERE clause from the Direct SQL tab.
-
Mapper Class ReplayNode™s can define a Mapper Class. A Mapper Class is implemented by the route developer (in Java). It must implement
the interface:
com.am.robomq.sdk.componentSupport.replayNode.MessageKey
This interface defines three methods to generate three keys (primary, secondard, tertiary). When a message is captured or replayed, if a Mapper Class has been specified, RouteBLAZE™ instantiates it, calls each method with every message Exchange. The idea is that the developer would extract up to three key data items from their messages (e.g. Trade Ref, Customer Id, Instrument Type etc) that are then inserted into the message record on the Runners database. These can then be queried via the SQL builders. -
Storage. For performance reasons message payloads are not stored in the database. They are held as
plain-text files at:
$ROBOAGENT_INSTALL_BASE\runners\${runner_name}/data/replayNode/message_archive -
Full Text Search. To further narrow down a set of messages, a full text search may be applied to the current query result. The maximum number
of messages that could be scanned can be configured in RouteBLAZE Settings (Agents->Common Settings).
From here the search limit may be disabled. Care should be taken in this instance, since performance will be adversely affected should be query size be very large.
- Note: You can match on multiple search terms using the OR operator|to separate the terms. For example:1234|5678will match any messages that contain either1234or5678or both. -
Message Headers. The 'Message Headers' tab shows all the headers in the Exchange at the point it was captured. If a message is published, then the headers
listed are applied when the message is written.
- Note: Messages that have already been captured or replayed are, as far as ReplayNode is concerned immutable; modifying the value of headers does not persist back to the original message stored in the Replay Node database. Rather, the point of the being able to change the header values is so that when new messages are published to a Playback Node they will reflect the new header values.
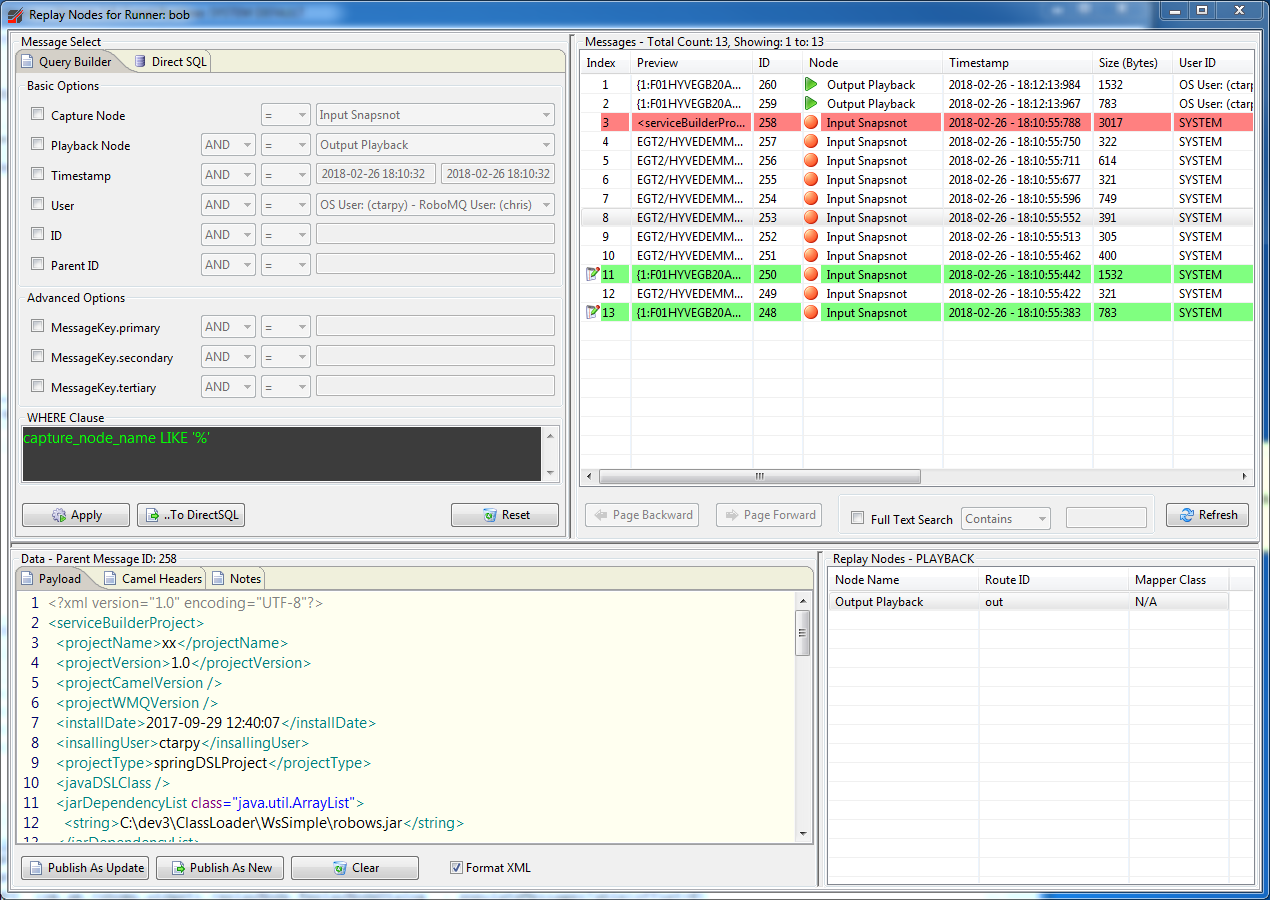
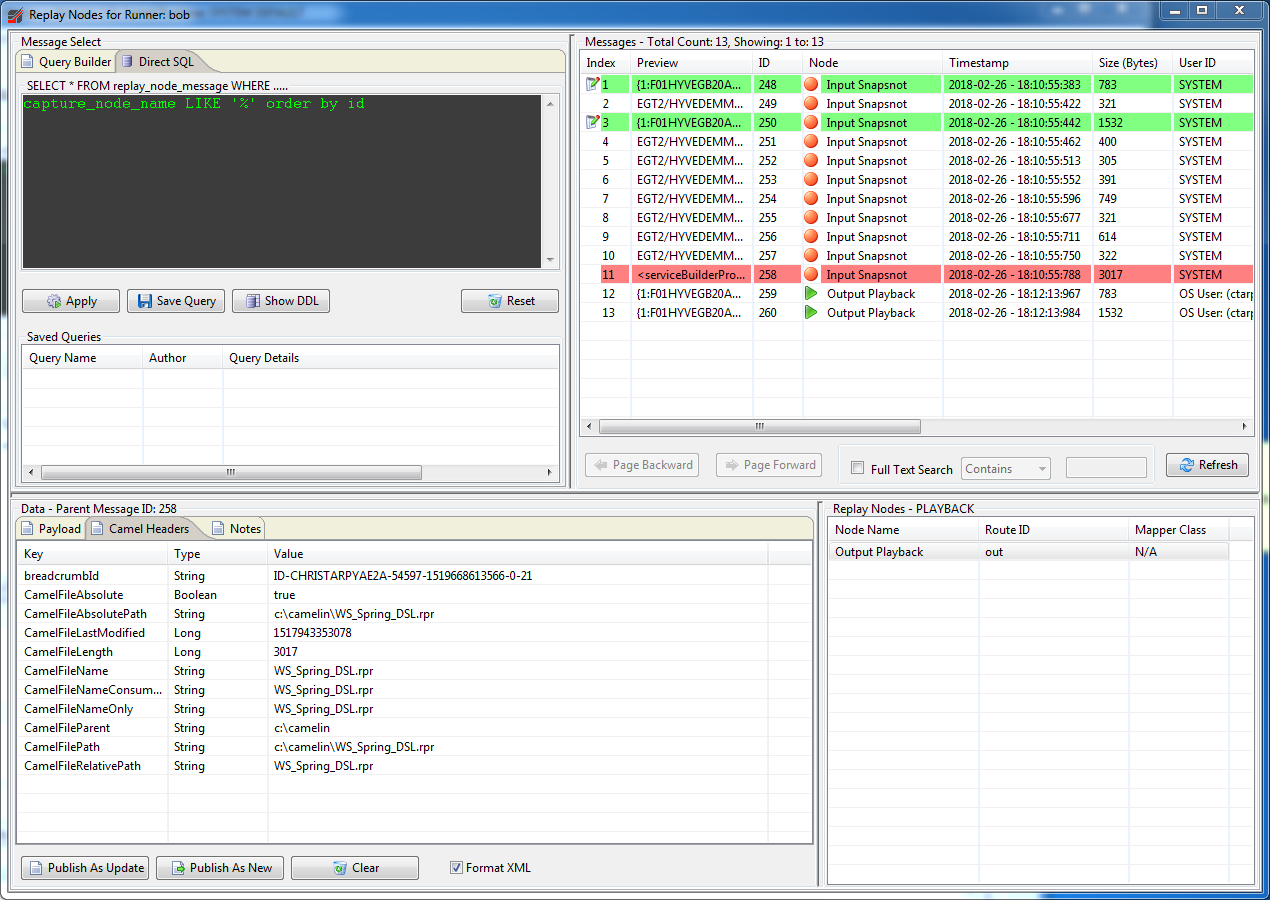
A query that has been started using the Query Builder can be copied to the Direct SQL screen for refinement. Also, queries can be saved for easy reuse. The queries are saved into the Runner's database, so other users that access that Runner's ReplayNode™s functions can make us of them.
NOTE: Access to ReplayNode™ functionality can be restricted under the Execution Agents security settings. They are Runner scoped security settings, providing either: No Access, View Only, Full Access.
Messages can either be replayed based on an existing captured message, or published as a brand new message. Messages that are based on an existing messages are tagged with the parent's message ID. There is a context menu on the messages table that shows all messages in a family, or message chain.
Messages being published can have a note attached. This is useful for audit purposes. In addition, any message publishing will cause a record to be created in the Execution Agents Event Log.Maker / Checker Mode
In addition, ReplayNode™ supports a third node type:
MAKER_CHECKER. Messages sent into this type of node are held until either authorized or rejected by a user(s) with the appropriate entitlements. The name of this node refers a workflow definition. This workflow definition must be added to a file named:replaynode.xmlwhich must be added a project dependency - see Programmers GuideThe logic contained in the workflow definition specifies:
- The list of users able to authorize a message
- The destination (Endpoint URL) if the message is approved
- The destination (Endpoint URL) if the message is rejected
- The number of authorizations required to approve a message
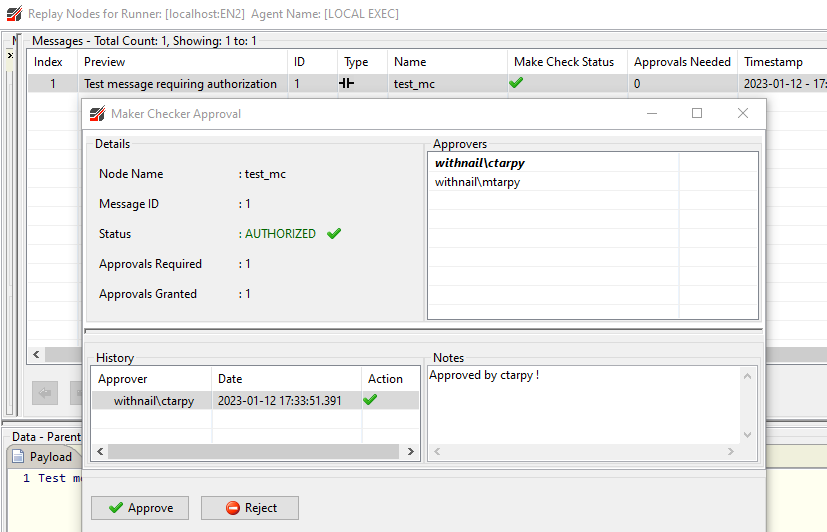
When a message is sent into a MAKER_CHECKER node, Replay Node viewer will display it as follows:

- Type: Note the icon indicating a discontinuity
-
Name: This is the name of the Maker Checker node - and also the name of the workflow defined in
replaynode.xml- see Programmers Guide - Make Check Status: Can be Pending, Approved or Rejected
- Approvals Needed: The number of authorizations needed before the message is considered 'Approved' and released.
To authorize or reject, right-click on the message:

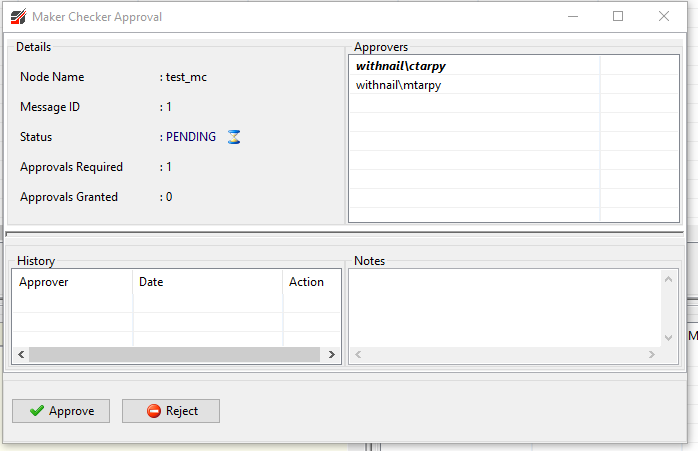
Authorize or reject the message. The list of authorizers are displayed in the top-right of the window. Your user is highlighted. Optionally you may leave an explanatory note indicating why was auth'ed or rejected
Openning the Maker Checker dialog again allows you to review the audit history on any given message:
-
Mapper Class ReplayNode™s can define a Mapper Class. A Mapper Class is implemented by the route developer (in Java). It must implement
the interface:
-
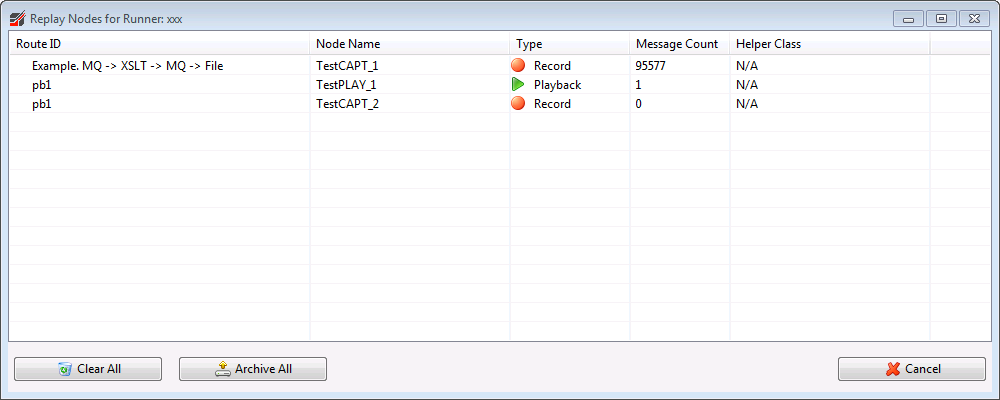
Manage ReplayNode™s lets you archive or clear messages contained within any or all replay nodes. For message archiving the messages are stored
on the host running the execution agent. The exact location is configured from:
${INSTALL_BASE}/config/roboexec_conf.xml
The default location however, is:${INSTALL_BASE}/replay_node_archive
- Edit Runner allows you to change the runner name, service port and auto-start options.
-
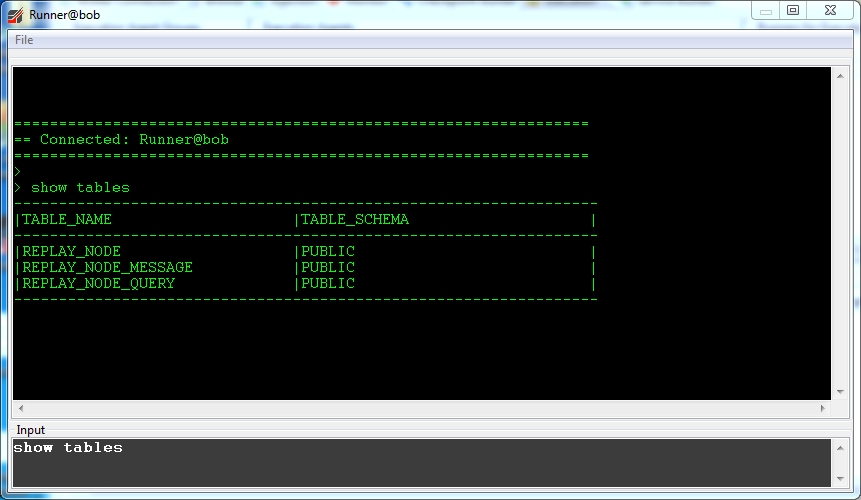
Manage Database allows run queries and scripts on the Runner's underlying H2 database. This DB is primarily used to support
ReplayNode functionality. If Runner level security is configured on the parent Execution Agent, then the Can Modify Database
authority is required for the connecting user.
- Edit Notes allows you to attatch notes to the runner. Notes are held server side, so are visible to all other RouteBLAZE Studio instances connected to that Runner
- Log4j Tool allows you to configure log4j levels at runtime without the need for a Runner restart.
-
JMX Support adds JVM options to the Runner's JMV necessary to support remote JMX. This
means you can then connect to the Runner with tools like jconsole or jvisualvm. Only 1 port is required,
as the same port is used for both JMX and the Runner RMI registry.
NOTE: These settings can be managed from the 'Edit Runner' function. - Delete Runner completely removes the runtime and all its state from the host file system. This operation cannot be undone. The runner must first be stopped before this operation is permitted. Also, the runner cannot be deleted if it is a participant in a cluster. It must first be removed from its cluster and then deleted.
Execution Panel Routes Menu
The table at the bottom of the tab provides information and control at the individual route level. All operations here are supported for both Spring and Java DSL projects.
- 'Start/Stop Route' allows individual routes to be started and stopped.
-
'Show Route Definition' extracts a Spring DSL XML fragment from the Camel Context that describes the selected route.
The context menu on the popup allows the definition to be sent to the XML Editor.
-
'Show Route Stats' extracts all available status information from the Camel Context for the specified route and display it
as follows.

Inject Into Route
This tool is very useful for dev + test. It allows you to create a test exchange and trigger the route in question. You can define a body and a collection of headers, then inject in as though the route had been externally triggered.
Additionally, these test workloads can be persisted, to make test replay more convenient.

Failover Clusters
The 'Failover Clusters....' option allows for the creation and management of groups of Runners operating in fail-over
mode, providing for high-availability and business continuity. The clustering service makes no assumptions about the
applications executing on the Runners, only that at exactly one Runner should be available at any given time.
Typically the same application would be deployed on each of the Runners in the cluster.
 This shows a test cluster consisting of two participant runners, each with a unique priority assigned. Any number of runners
can participate in a cluster; fail-over will proceed in priority order. There are a few things to note when managing
a clustered application:
This shows a test cluster consisting of two participant runners, each with a unique priority assigned. Any number of runners
can participate in a cluster; fail-over will proceed in priority order. There are a few things to note when managing
a clustered application:
- The 'Auto-start' and 'Crash Restart features become unavailable for all participant runners. This is because the life-cycle of each participant is managed by its parent Cluster Manager housed within the respective Execution Agent.
- Direct attempts to start/stop participant runners, although not dis-allowed, will generate warnings. If a runner is manually shut down, and the Cluster Manager sees no reason for this it will immediately re-start the runner. Generally, this is not helpful.
- Starting and stopping the runners should be done at the cluster level, using the menu options in the above dialog. This will synchronize the desired cluster state (i.e. UP or DOWN) will all participating agents and runners.
- There is no central cluster controller. Rather, the Exec Agents operate as a swarm. Each participating agent periodically polls every other in the cluster to obtain their cluster definitions and settings. Each time an agent receives instructions from the RouteBLAZE™ GUI this is timestamped. Each agent checks to see if more up-to-date instructions are available - and if so synchronizes accordingly. This mechanism prevents cluster sync issues that would otherwise occur if, say for example, a given cluster participant was down when new instructions are sent from RouteBLAZE™ GUI.
- Putting an active runner into maintenance mode will signal to all other participants that this runner is unavailable, and so the next highest priority participant will come on-line. Taking the runner out of maintenance mode will cause it to start and the fail-over to shut down. NOTE: Putting a runner into maintenance mode forces all its routes to perform a gracefull shutdown! This means that all in-flight transactions will run to completion, but no new ones can start.
From the menu above, select 'New...'
 Add participants from the available runners displayed in the top-right panel, in priority order. Participants can be removed via the
context menu as shown below.
Add participants from the available runners displayed in the top-right panel, in priority order. Participants can be removed via the
context menu as shown below. NOTE: When creating clusters, the concerned Execution Agents should be organized in the same folder.
 Similarly, clusters can be deleted via the context menu on the main cluster fail-over dialog. NOTE: Deleting a cluster does not delete
its underlying members.
Similarly, clusters can be deleted via the context menu on the main cluster fail-over dialog. NOTE: Deleting a cluster does not delete
its underlying members.
Once a runner is added to a cluster, the cluster name is displayed in the Runners table on the Exec Tab:
Cluster Security
NOTE: If security is enabled on any of the Execution agents in a proposed cluster:All participating Execution agents must be provided the proper credentials (set under 'Settings'->'Agent Config'). This means that the supplied user logins must be configured on the respective Execution agents to have the necessary authorities to create or delete clusters, as the Browser will use the configured user logins to execute the required cluster operations. Back to top
Configuring Execution Agents
The Execution Agent (with exception to the built-in LOCAL Execution Agent) has a few options that can be configured.
These options are set via a config XML file, that can be located at:
$ROBOAGENT_INSTALL_BASE\conf\roboexec_conf.xmlA sample config example follows:
In addition to the basic parameters described for the monitor agent, you may configure access to the network file brower and command processor along with other system defaults. RouteBLAZE™'s ReplayNode™ housekeeping and archiving features are configured from here. When requesting ReplayNode™ is requested to archive its messages, the default location on the server is set here. The housekeeping settings expose control over how ReplayNode™ manages capacity on its internal database.
Once the agent is configured it can be invoked from the command line or installed as a service. In order to install as a service administrative permissions are needed.
The scripts used to do this are:
     			$ROBOAGENT_INSTALL_BASE\scripts\startExecAgent.bat

     			$ROBOAGENT_INSTALL_BASE\scripts\install_exec_agent_as_service.bat
Back to top
Remote File Browser
This feature allows browsing, and access to files on the host on which the selected Execution Agent is running. In order for this to work, the agent must be configured to allow this.
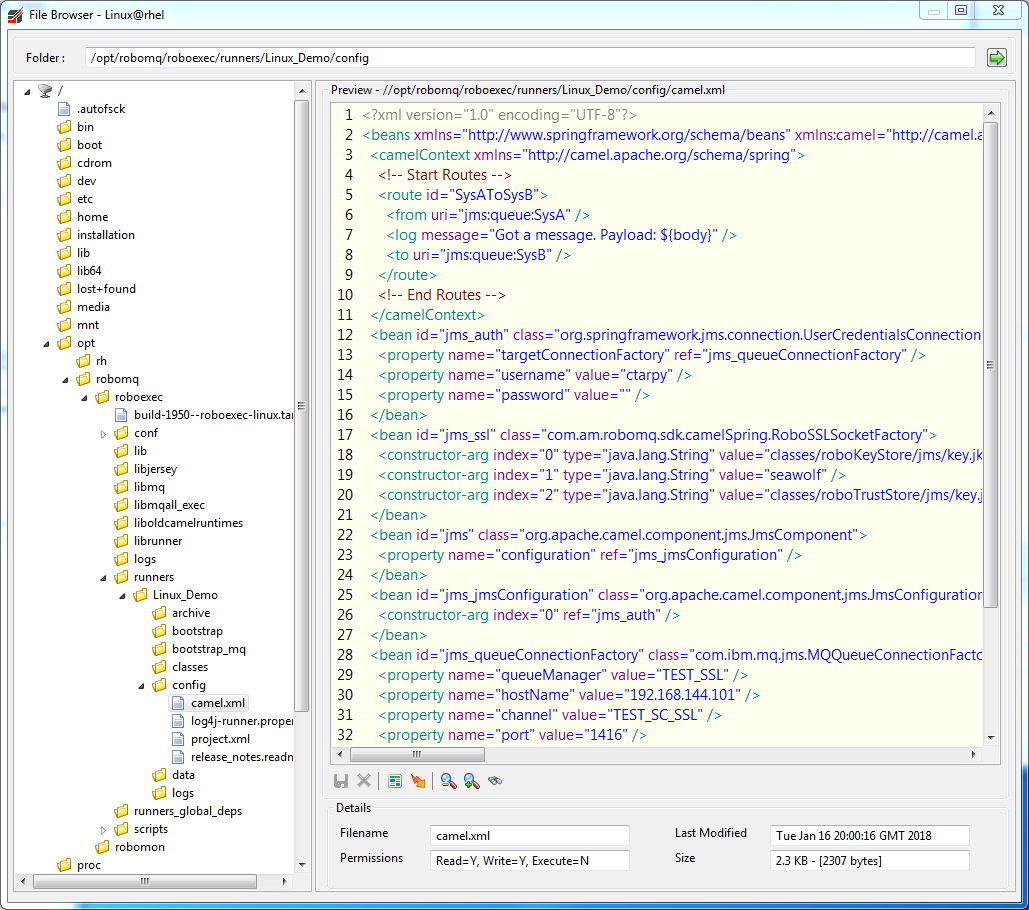
All file operations are performed by the Execution Agent, and all communication between the RouteBLAZE™ Studio and the Execution Agent is over the agent's TCP/IP serivce port; no additional ports are required to support file operations.
The following shows the available operations. Note, double click on a file will attempt a preview. Preview is only available for text files.
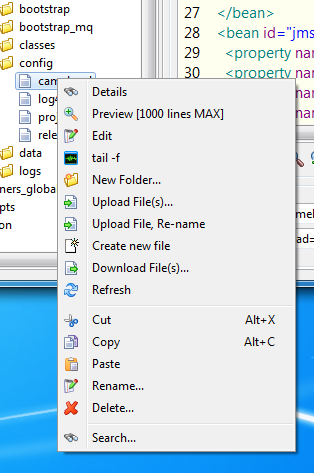
- Details. Without attempting a preview, this operation retrieves file size, permissions and last-modified date
- Preview. This operation downloads a preview of the file into the right hand pane of the browser window. The maximum size of preview can be configured in the common settings window.
- Edit. Provided the user account the Exec Agent is running as has sufficient authority, it is possible to edit files directly on the Exec Agent server.
- tail -f. Operates in similar fashion to the Unix tail command. If a text file is selected with this option, then any updates to the file will be streamed in real time to RouteBLAZE Studio.
- Cut/Copy/Paste/Rename/Delete. All these functions operate on the remote server without a round-trip to RouteBLAZE Studio. So for example, it is possible to copy/paste a file from 1 remote folder to another without first downloading the file to the client PC.
- The remaining options are self-explanitory.
System Information
This feature shows statistics about filestore, CPU and memory on the Execution Agent's host server.
Password Encrypter
Accessible from the 'Tools' menu, this utility allows you to encrypt passwords. This prevents the need to have those passwords held in clear in various configs. In addition, you may also optionally specify which hosts this encrypted password can be used on and also an expiry time.
This utility can be used to encrypt passwords for keystores, and any RouteBlaze SDK classes (e.g. auto-generated MQ Series or ActiveMQ connectors) will automatically recognose the
_ENCRYPTED suffix from a credential, and decrypt at runtime.
It can also be used for Any other password requirements. There are several options when it comes to using this feature.
Managing Passwords via Headers
If you need to manage credentials held in the header map:You would use the Passord Encrypter Tool utility to encrypt your credentials and then set headers as appropriate. Then when you want to unencrypt at runtime:
Use the
HeaderDecrypter Processor as shown below. This processor scans all the headers in the current Exchange, looking for any header values with _ENCYPTED
suffix. The values are decrypted and set on the header, so the header value is now in clear.Here is a sample project:
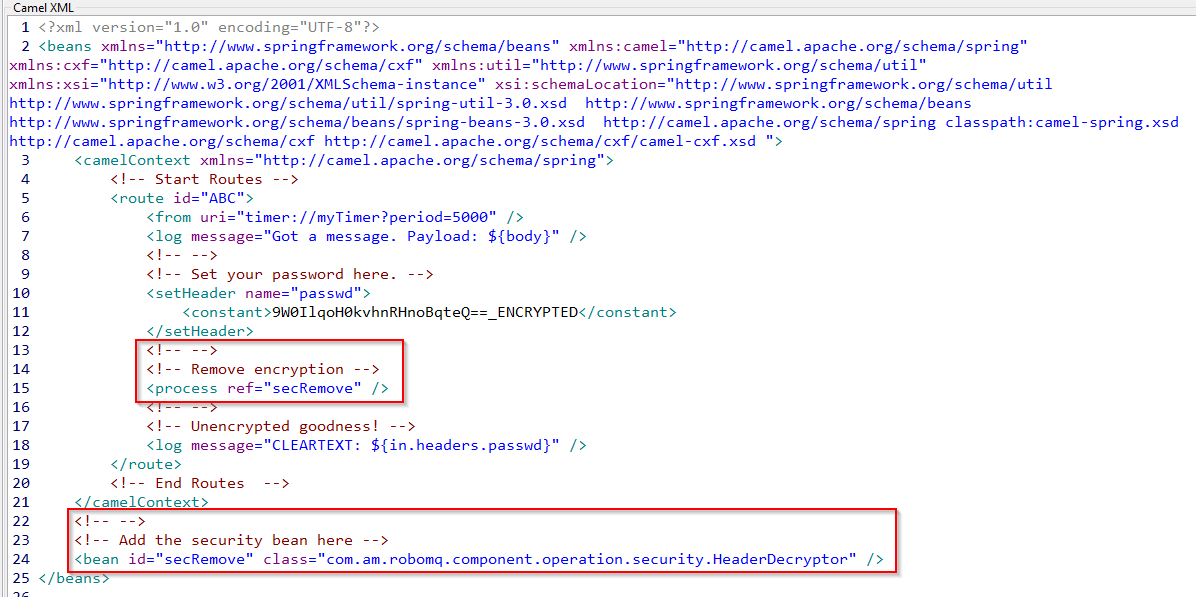
NOTE: To use the bean: com.am.robomq.component.operation.security.HeaderDecryptor you need to add the CamelComponents support JAR to your project -
either locally or at globe
Example useage of the encryption tool looks like the below:
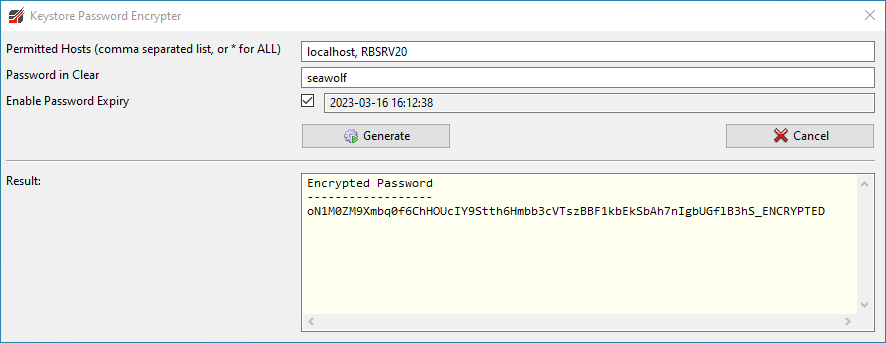
* is specificed in the Permitted Hosts field, then the password will successfully be decrypted on any
machine.However, you may want to apply restrictions on your passwords, such that PROD passwords can only be used on PROD machines, similarly for UAT and DEV passwords
The Password Expiry feature is to support the use case where you need to temporarily give access to someone, maybe for Ops to address a specific issue. Then access is withdrawn once the alloted time to complete the task has expired.
Managing Passwords with Message Broker tools
Encrypted passwords can be used within the Broker tab as follows. Encrypted key can also be persisted into the Palette. This means that a sys admin can authorize a specific machine to be able to use a specific key - e.g. Ops may require browse access to PROD, Devs to UAT etc.
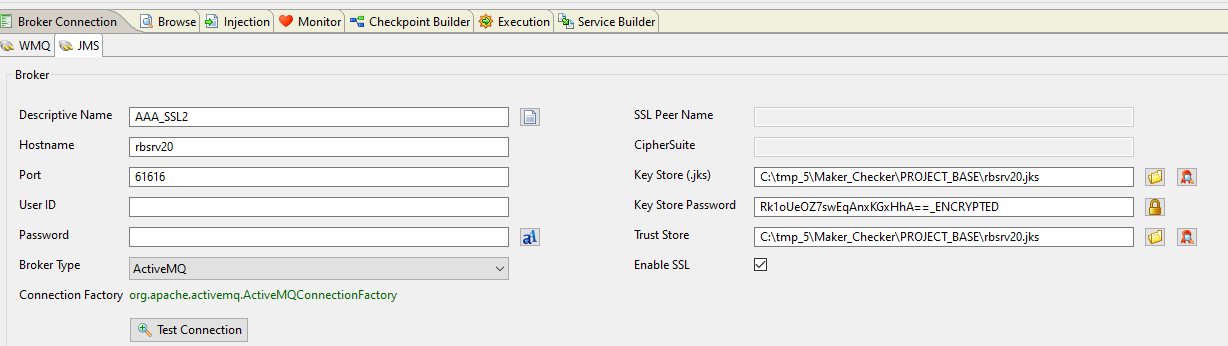
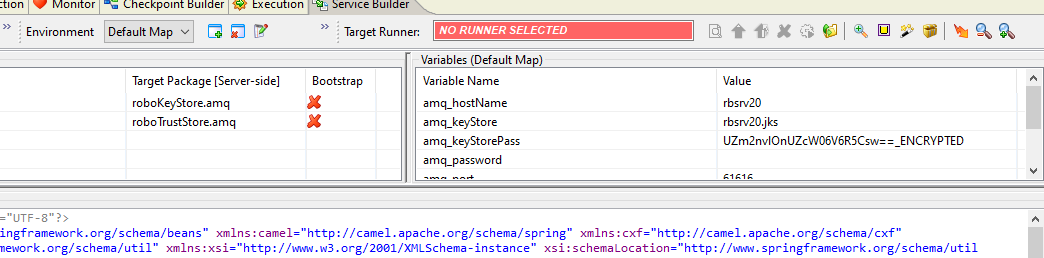
Managing Passwords with Keystores and RouteBlaze SDK classes
They can also be used within Service Builder projects. This means that the real key is never held in clear. Also, if PROD keys are locked to PROD machines - it would not be possible for someone to download the PROD project and run it elsewhere (e.g. on LOCAL EXEC).
NOTE: RouteBlaze will treat passwords as encrypted if they are suffixed with _ENCRYPTED. Passwords
which do not have this suffix will be assumed to be in clear.
As such, encrypting keystore passwords is recommended, but not mandatory.
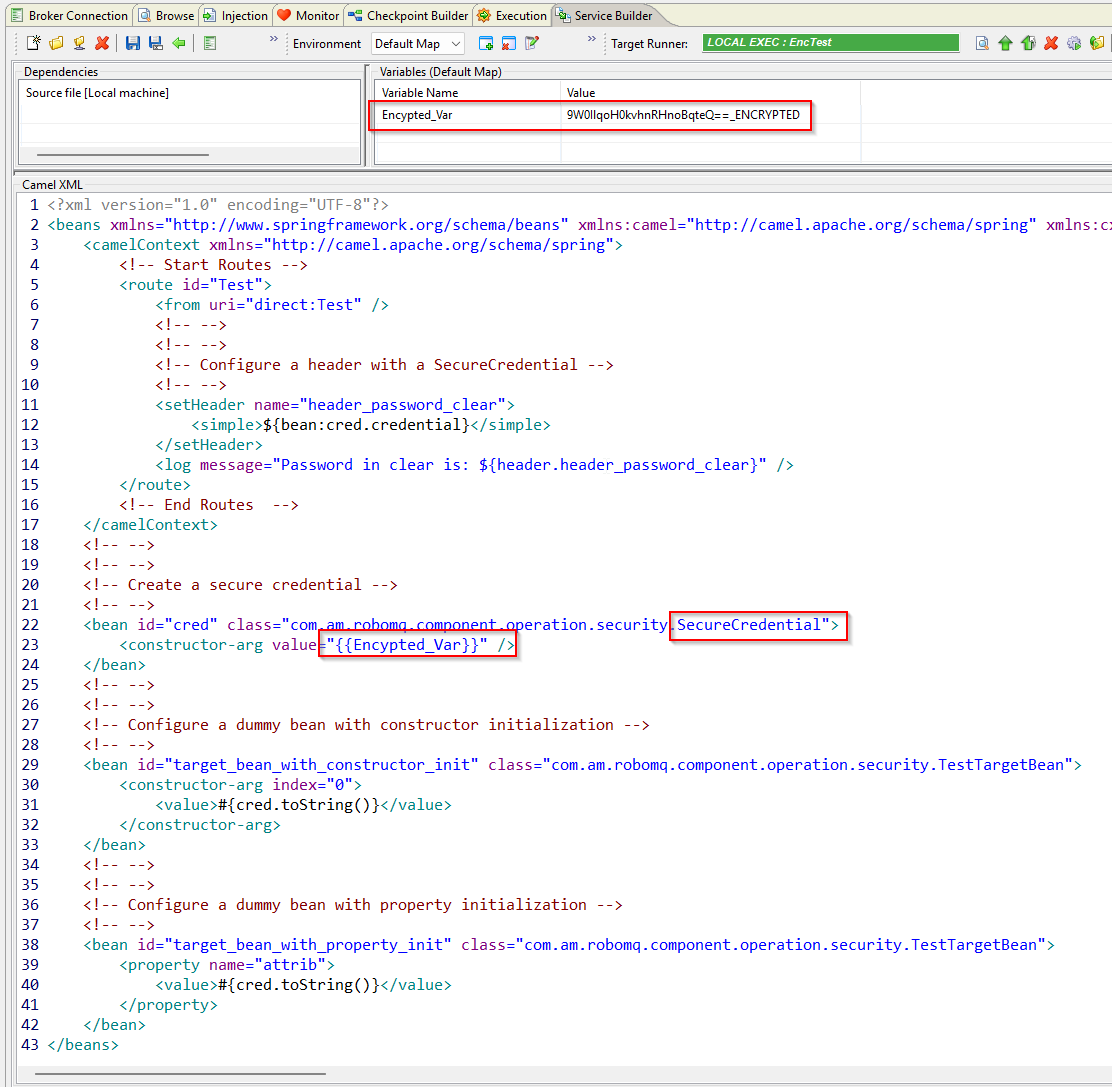
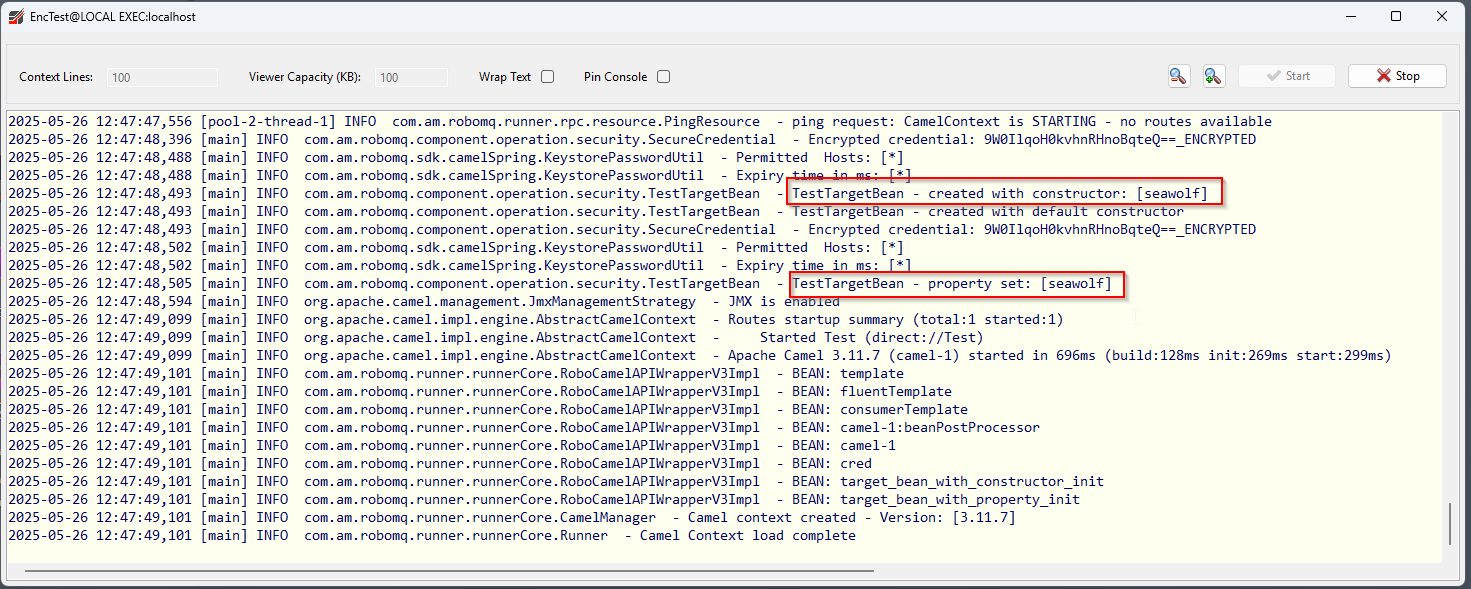
Managing Passwords with SecureCredential
SecureCredential : com.am.robomq.component.operation.security.SecureCredential acts as a wrapper
for a single credential, and a provides a simple mechanism for stripping encryption at runtime.
The unencrypted credential can be accessed by either calling toString() or getCredential(), and so can be easily wired
into any bean that requires it.
The example below shows a test bean TestTargetBean being parameterized with SecureCredential, both via constructor args
and property setters.
The Test route also illustrates how to set a header value from the SecureCredential instance.
Back to top
TCP Connection Tester
Accessible from the 'Tools' menu, this utility allows you to determine the state of TCP connectivity. It is able to port-scan up to 2000 ports at a time, and can distinguish between: 'Port Open', 'Port Closed' - because of firewall, or 'Port Closed' - because of 'Connection Refused' - i.e. no service listening.
In addition, it is able to delegate the test to any Execution Agent available in RouteBLAZE Studio, allowing to the connection source to be any of those servers - rather than the PC on which RouteBLAZE Studio is running.

AtlasMap Data Mapping Tool
Accessible from the 'Tools' menu, this utility allows you to create drag/drop mappings, between JSON, CVS, Java, XML - or any combination of source and target. Consider a simple JSON to JSON transformation, where source and target formats follow:
Source
{
	"name":"chris",
	"phone":"075999999"
}
Target
{
	"my_name":"chris",
	"my_phone":"075999999"
}
A mapping in AtlasMap to implement this transformation would look as follows:
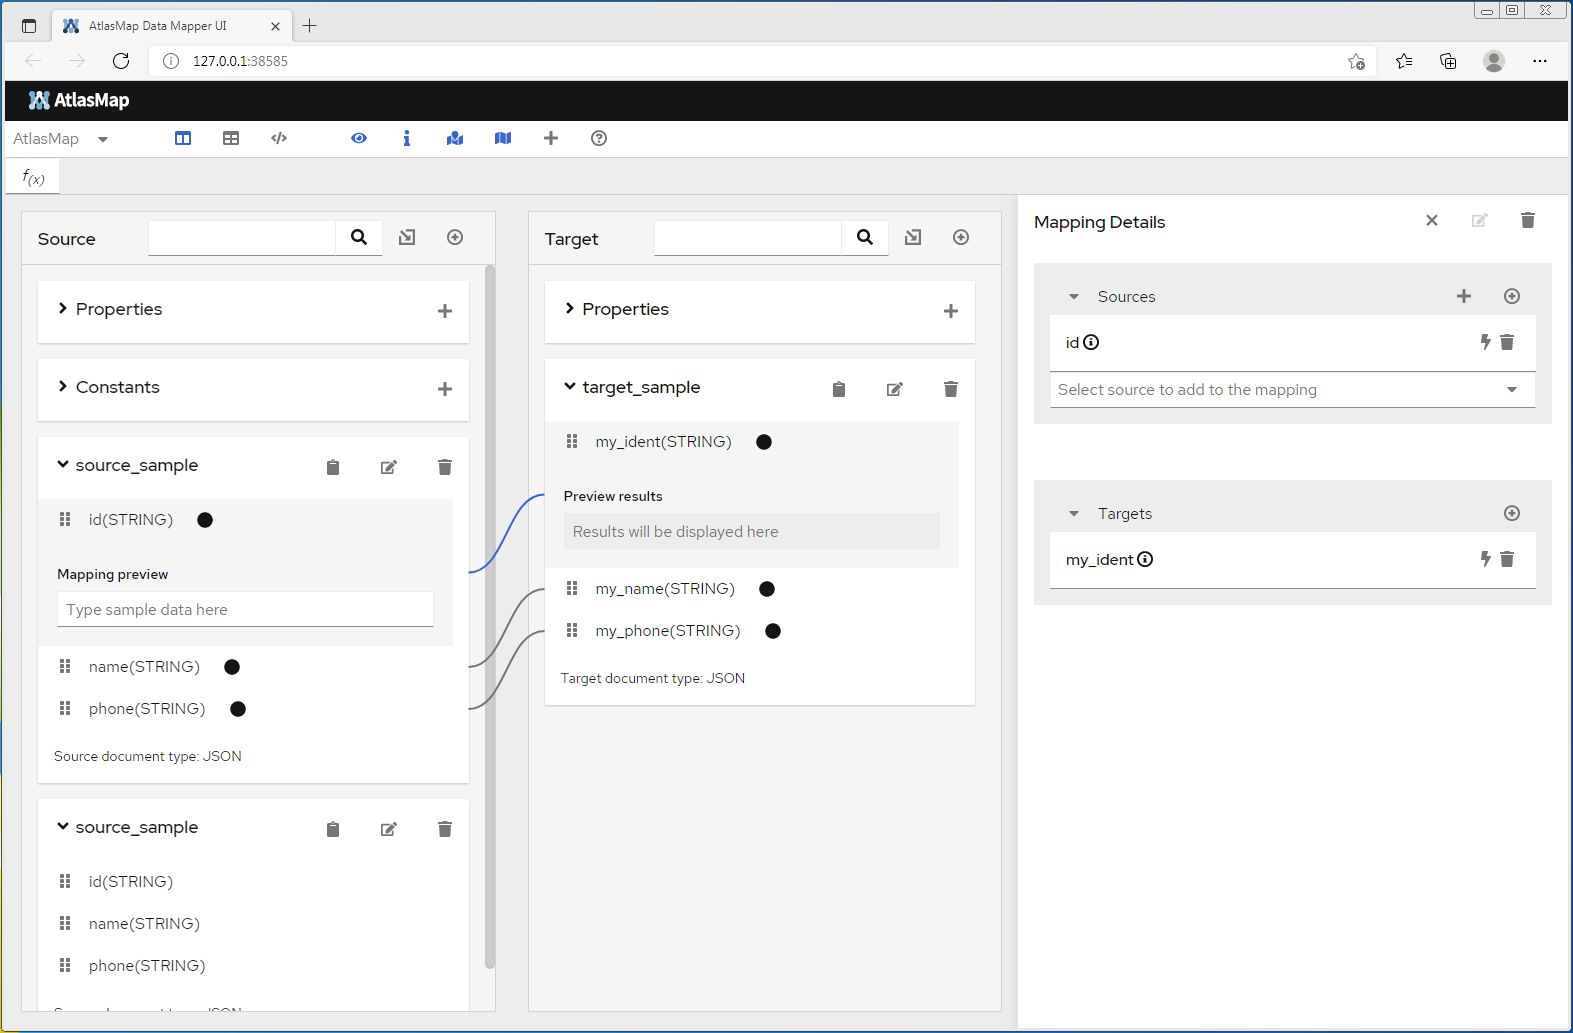
Both schema's and source/target samples (instances) can be imported into the GUI. Fields from source/target can be dragged on top of each other, creating a mapping.
Transformations can be defined as necessary, support for collection is also available.
Once the mapping definitions are complete, they can be exported from the tool as a 'ADM' file. This 'ADM' file can then be used to configure the runtime AtlasMap component, which
acts as a standard Camel processor.
Camel Route
        <!-- Start Routes -->
        <route id="Atlas Transform">
            <from uri="mq:queue:in" />
            <to uri="atlasmap:classpath:atlasmap-mapping-chris3.adm" />
            <to uri="mq:queue:out" />
        </route>
        <!-- End Routes -->
Note: Full documention for AtlasMap can be found at: AtlasMap Docs
Back to top
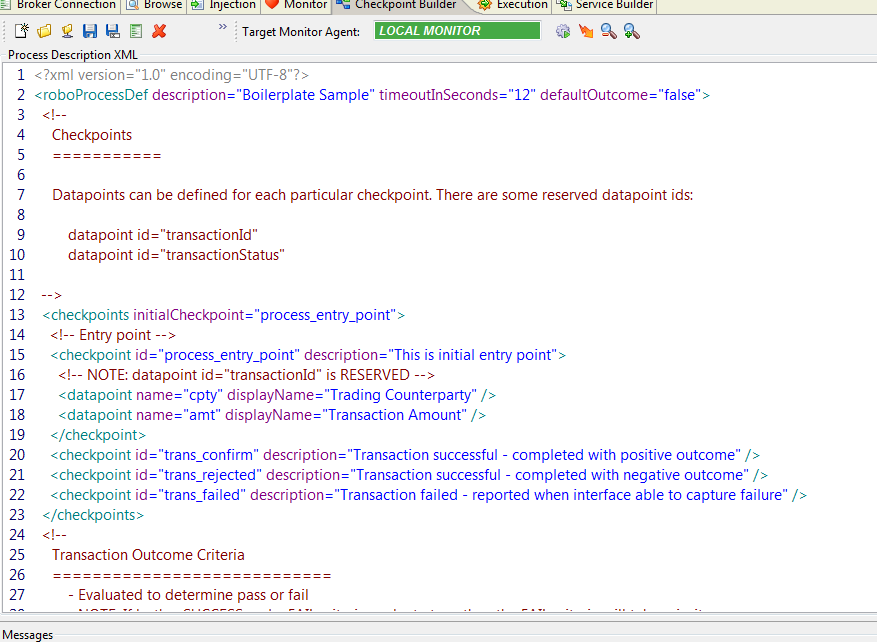
Checkpoint Builder Panel
This panel allows you to create business process models, which are deployed into your Monitor Agent. You express these models as a series of checkpoints. Checkpoints
can be invoked from your runtime flows via the checkpoint RouteBlaze Camel extension.
A checkpoint transaction is created once the first checkpoint in the process is invoked. After a configurable period of time, outcome predicates are executed to determine
if the business transaction was successful.
Back to top
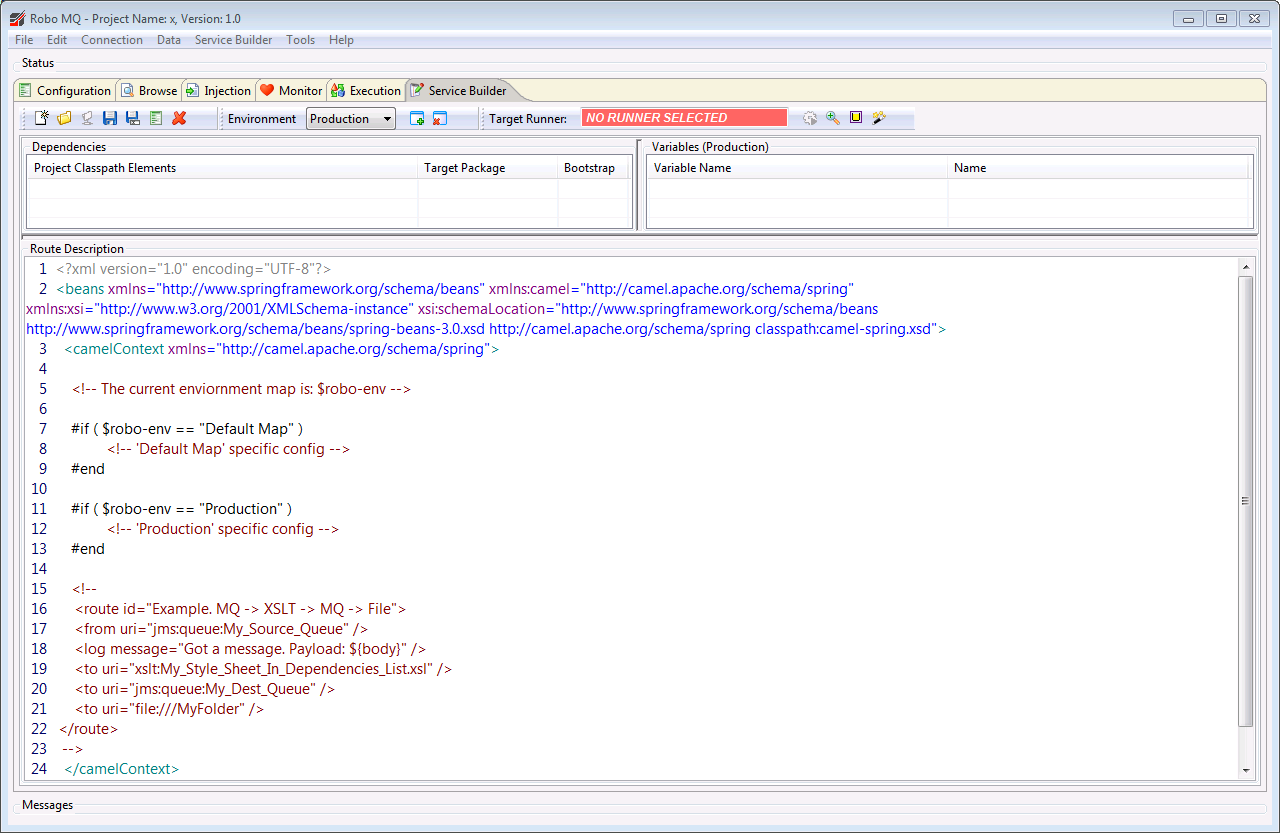
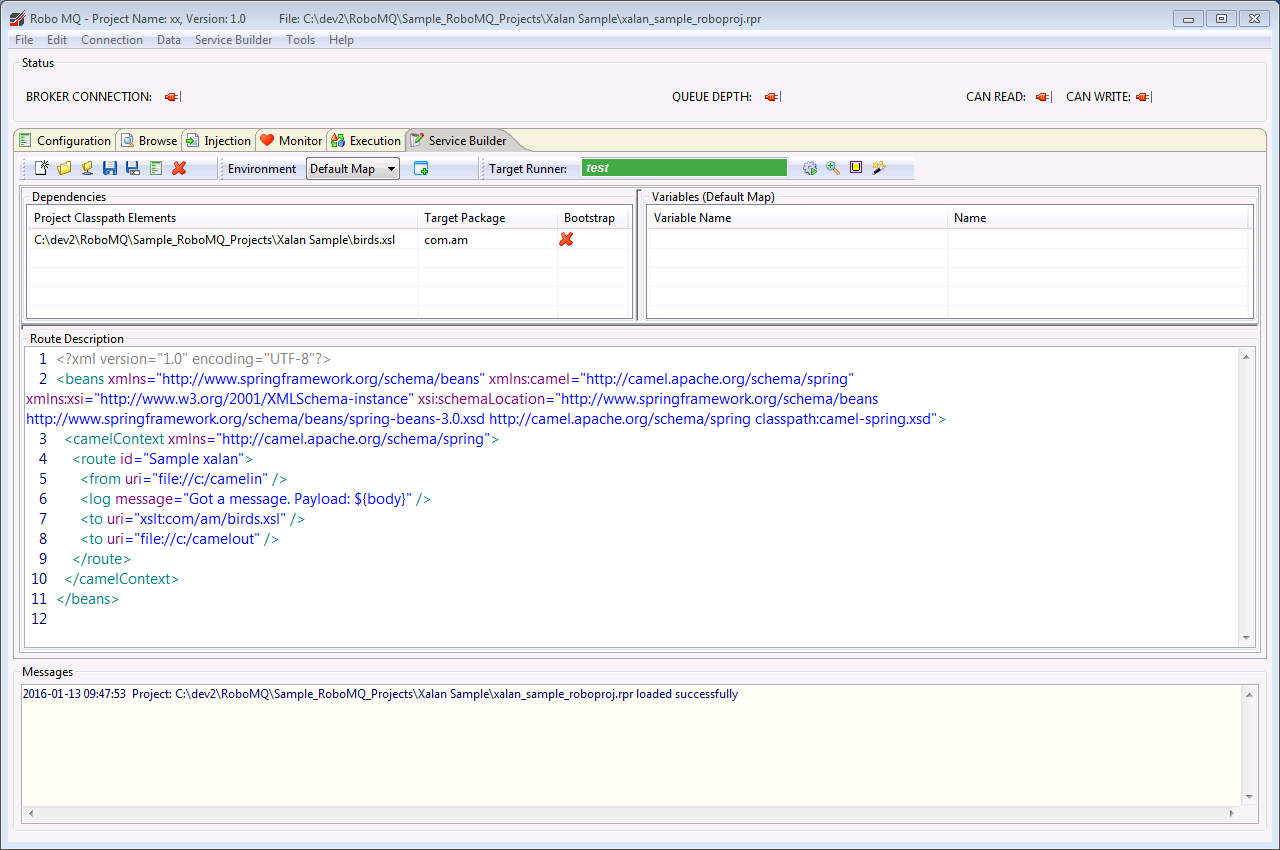
Service Builder Panel
This panel provides a set of tools for creating Camel applications that can be deployed onto the RouteBLAZE™ runtime. The panel is split into three regions: dependencies, variables and route description.
- Dependencies. This table shows all the dependencies for the current project. The popup-menu here allows for create/update/delete
of entries. When the project is deployed to a RouteBLAZE™ runtime the dependencies are serialized to the target host/runner. When the
runtime is started, the Execution Agent arranges that all specified dependencies are on the runtime classpath.
Note: On Linux, all classpath folders will be added to$LD_LIBRARY_PATH. This is to support the loading of any native library dependencies. - Add Resources
This dialog is accessed from the 'Dependencies' table's context menu.
You can add resources either by browsing for the target file (file icon), or by manually entering the full path (adjactent alpha icon).
The manual entruy icon also allows for substitution of RouteBLAZE™ variables (see below) to be inserted. For example:C:/data/{{environment_name}}/my_stuff.jar
The Target Package column should usually be left bank - certainly if the resource being deployed is a JAR file. If a package is specified (e.g. com.foo), then the folder structure:
${classpath_root}/com/foo
will be created. This is useful if discrete class files are to be deployed, or to allow partitioning of other resources.
Again this section has a pop to manage create/update/delete of variables. Variables defined here can be inserted anywhere in the route description. The syntax for using a variable is:
{{variable_name}}
Variables are used in conjuction with the 'Environment' dropdown so that environments can be parameterized.In addition, Java methods may be used to manipulate variables. For example:
{{variable_name.java.io.File.getName()}}
will construct a new java.io.File object with the value of the variable, and then execute File.getName() on it.NOTE: It is possible to parameterise dependencies. By this we mean specifying
{{var_name}} as a dependency, and then defining
{{var_name}} as a variable with multiple values. The dependency that will be uploaded to the Runner will now depend upon the
selected environment map.
This section contains Spring DSL. This includes the Spring definitions for any required beans (such as component definitions, predicates, processors etc) and also the actual Camel route definitions.
-
All variables of the form:
{{var_name}}are substituted with their values from the currently selected environment map. -
All variables of the form:
{{var_name.Class.method()}}are substited and evaluated. -
The current environment map name is inserted into the Velocity context as:
$robo-env
-
The whole camel document in the "Route Description" area is treated as a Velocity template and evaulated. This pre-processing allows, for example bits
of config to switch on or off depending on the environment:
NOTE: If Velocity is enabled, and there are conflicts between Camel DSL and Velocity, the offending Camel directives can be escaped using #[[ ignored by Velocity ]]# as follows:
Will be parsed as Velocity #[[ will be ignored by velocity ]]#
The following shows the Serivce Builder configured for a Spring DSL Camel project:
In order to use the Java DSL, the RouteBLAZE™ runtime must be able to obtain a your configured Camel Context. To enable this it is necessary to implement the interface:
com.am.robomq.sdk.javaDsl.RoboCamelContextWhen your JavaDSL project is deployed and the runtime started, RouteBLAZE™ will call the the single method defined in this API to obtain the Camel Context:
Once the concrete class is complete it should be put in a JAR and added to the dependency list (top left of tab).
Copy the fully qualified name of the class (including package prefix, NOT including either .java or .class suffix!) into the text box: 'Class (type: RoboCamelContext)'.
Click the 'Update' button. This will cause RouteBLAZE™ to interate through the JARs in the dependencies looking for the class you specified. If it finds it, RouteBLAZE™ will display the JAR in which it was found, and also determine that it has properly implemented the RouteBLAZE™ API interface (shown above).
Project Settings for Eclipse (or other IDE)
In order to avoid dependency conflicts with the RouteBLAZE™ runtime, ensure that the following JAR is listed first in your classpath when compiling your Java DSL project:
$ROBOAGENT_INSTALL_BASE/librunner/roborunner-dependencies-1.0.jarThis JAR will be on the Runner's classpath by default, so it is not necessary to add it to the Service Builder project dependencies list (top left of the window). It contains all the necessary support for the Camel API, so again you should not add it to the dependency list.
NOTE: Your JAR file containing your Java DSL route may contain source files, but MUST contain compiled Java (.class files) for it to work. RouteBLAZE™ cannot compile your code.
File Toolbar
The 'File' toolbar (shown below) is provides for creating/deleting/saving/configuring projects.
Note the third icon from the left. If a valid runtime has been selected from the Execution tab, so that the Runner
name is displayed in green on the toolbar, then this operation will download the whole project state from the Runner
into the Service Builder. This also includes the list of dependencies, the variables and all the environments.
File Toolbar -> Propject Properties
This dialog allows you to set the project name and version. This information is deployed along with the project to
the target Runner.
NOTE: From here it is possible to configure the Apache Camel runtime version that will execute on the target runner.
NOTE: The WMQ Client version can also be configured here. Currently supported versions include WMQClient 7.5 and 9.0.0
NOTE: This controls only the WMQ Client version for the Runner inside which your project will be deployed. It applies to that
Runner and that Runner only.
In order to set the WMQ Client version for the Queue Browser, first RouteBLAZE™ Studio must be shut down (along
with any Runners managed by LOCAL EXEC.
Then, run
RoboWMQClientMgr.exeThis allows you to select the required MQ Client version for the Queue Browser.
- Enable Velocity. This switches on the Velocity Template features discussed in the section above. It allows you to embed Velocity expressions directly in your application.
- Enable Relative Deps. If this is set, then all dependencies added made relative to the base path. This can be used to aid project portability. For example: check in all dependencies into a SCM. Then, set the base path to the root of the source tree. Now all dependencies are relative to top od source tree. When a new developer wants to work on the project, she checks out the code locally, and sets her base path to that location.
-
Ignore Undefined Variables. RouteBLAZE allows you to define project variables which can be inserted anywhere in your
project via the syntax
{{my_variable_name}}. Usually, throwing an error if an attempt has been made to use an undefined variable is a good thing.
There are situations however (for example when using PropertyPlaceholders), where you might want to not have this expansion happen. Select this option tells RouteBlaze to ignore any undefined variable errors. -
Enable Auto-map. RouteBlaze has the concept of Environemnt Maps, allowing you to parameterize your application
depending on the environment you're deploying to. So you might have maps for Dev, UAT and PRODUCTION, where the values of your
variables would be specific to that map. For example, if you are using ActiveMQ, its likely that you'd be using separate message brokers
for UAT and PRODUCTION. The IP address of the ActiveMQ broker is something you might want to handle in this way.
What the Auto Mapper does is allow you to define, up front, which map you want to use on which server. You might have a map calledPROD, which you would bind to your Prod server.
Now when you deploy your project, the variable map is automatically configured depending which server you're deploying to.
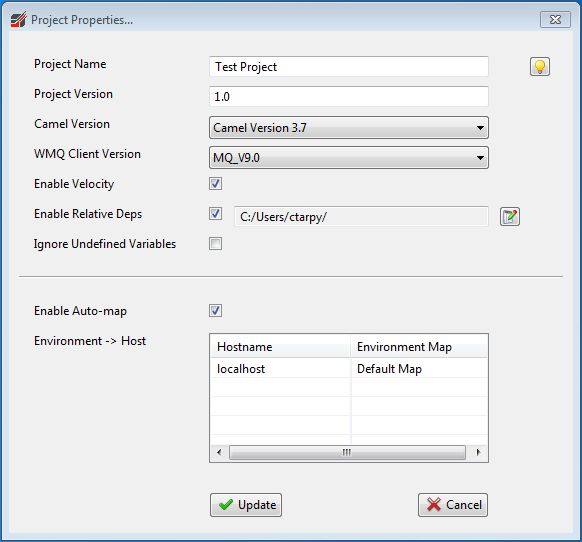
Environment Toolbar
The 'Environment' toolbar provides for parameterising environments (e.g. dev, UAT, Pre PRODUCTION, PRODUCTION etc).

Clicking on the create button shows the 'Create New Variables Map' dialog shown below.
This lets you create a new environment map. Each map contains an instance of every defined variable, and on creation lets you copy the values for the variables in your new map from an existing map; selecting a source map with least differences from your new environment will make configuring the new environment map easier.
Once the map has been created it can be selected from the dropdown, and then the values for each variable can be editted via the variables table. Once the routes have been created and the variables set, when you want to deploy your project select the environment map that corresponds to the runtime you want to deploy to - so UAT map for UAT runtime, PRODUCTION map for your PRODUCTION environment.
Wizard Toolbar

The wizard toolbar maps the following operations:
Deployment
In order for the deployment button to work, a valid runtime must be selected, and it must be available. This is done by selecting a Runner from the Execution tab. Once successful, the Runner name will be displayed in green immediately to the left of the deploy icon.When selected, the following dialog is presented:
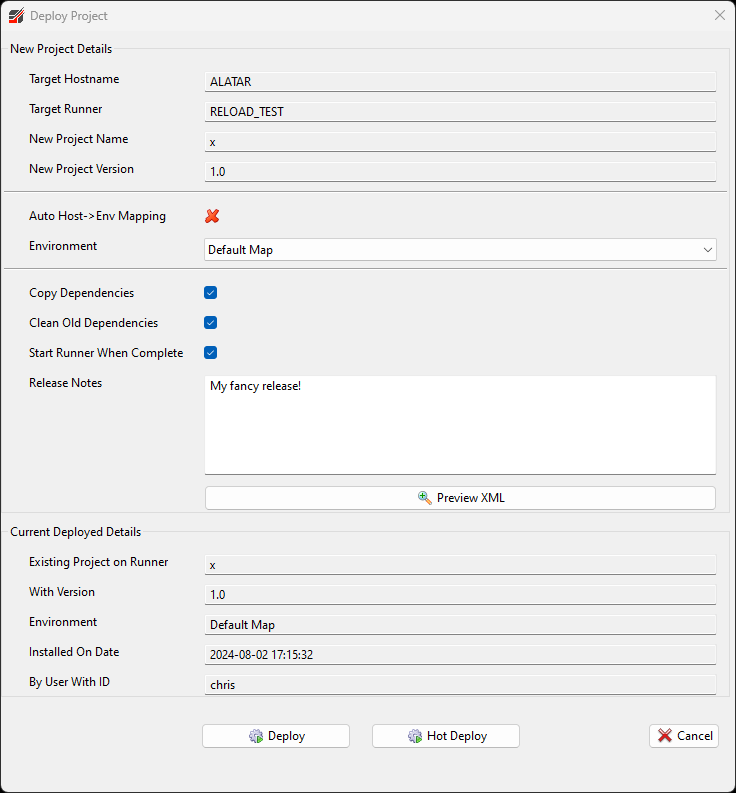
Note the dropdown for the environment. This will be set to mirror the setting on the main Service Builder tab, but can be
changed at this point immediately before deployment. If the automapper is enabled then the drop-down will be disabled. This is because
the correct map to apply should have been defined in the project settings. In the project settings environment maps can be bound to
server hostnames. So for example DEV_MAP -> my_dev_server, PROD_MAP -> my_prod_server.
Using this means that the correct map is always applied to the correct server - and you dont accidentally end up deploying PROD to DEV etc.
The 'Preview XML' button will display the Spring DSL document that is to be deployed, complete with all variables expanded in accordance with the selected enviornment.
Clicking 'Deploy' (ALT-D) will cause the deployment to execute. This will publish the project along with its dependencies to the selected
runner.
Note: Previous versions of the project are archived, and can be viewed, editted or restored from the 'Deployment History' dialog available on the
runner's context menu in the 'Execution' tab.
'Hot Deploy' publishes the Service Builder project as above - however it does not to a JVM restart - only the Camel Context is rebuilt. This
speeds up the dev/re-test cycle when you're working on the Camel XML in Service Builder - but be aware that any Java dependencies will not be
refreshed. If you need to test code changes involving Java Processor's for eaxmple a full restart is required.
NOTE: This funcion is only available for the Camel DSL version of Service Builder project. Java DSL projects are not supported.
Preview
This behaves as per the 'Preview XML' button on the deploy dialog.
Websphere MQ Connection Wizard
Selecting this icon causes the following dialog to appear:
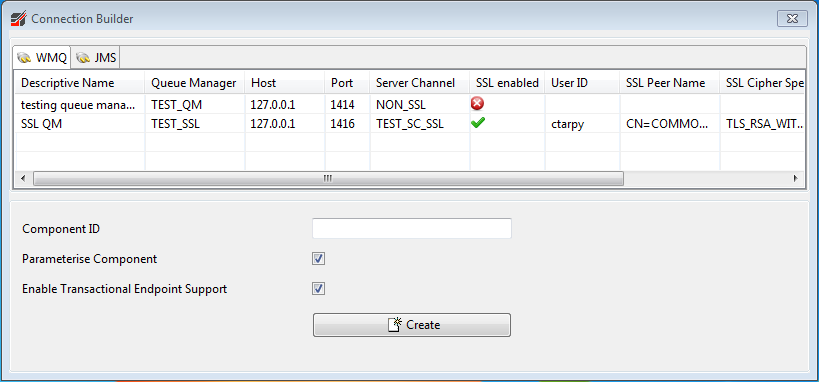
The table show all distinct pairs of queue manager and channel that RouteBLAZE™ knows about - from the connection palette. This wizard provides for taking the connection details and creating the necessary Spring beans so that the connection can be used in the Camel routes.
For example, if a connection were selected and the component ID was set to 'secure_factory', then this could be used in Spring DSL as follows:
<from uri="secure_factory:queue:my_queue"/>
Options:
-
Parameterise Component: a variable for each connection parameter is created, and values set in the currently selected environment map. -
Enable Transactional Endpoint Support: JMS endpoints have configured for transactions. Specifically, will use Spring'sJmsTransactionManagerto perform local transactions.
Note: If this option is enabled, then apply the following immedately after consumingfromthe endoint:
<transacted ref="{{component id}}_PROPAGATION_REQUIRED" />
Global Transactions - Two Phase Commit
The code that the above step will generate uses global transactions - i.e. 2 phase commit.
RouteBLAZE comes bundled with the Atomikos transaction manager, which is wired into the default project. The Atomikos bean
definitions must be present in the Camel project for the connection code to work.
The Atomikos configuration wired into the default project contains a very basic setup, which you may wish to customize. For a more comprehensive configuration - which also takes account of SQL datasource in addition to JMS - see below. This example was sourced from: Camel In Action - Chapter 12
It will also be necessary to use XA versions of the endpoint connection factories.
i.e. for IBM MQ: MQXAQueueConnectionFactory and for ActiveMQ: ActiveMQXAConnectionFactory
The config for Atomikos is included here for convenience:
<?xml version="1.0" encoding="UTF-8"?>
<beans xmlns="http://www.springframework.org/schema/beans"
       xmlns:xsi="http://www.w3.org/2001/XMLSchema-instance"
       xmlns:broker="http://activemq.apache.org/schema/core"
       xsi:schemaLocation="http://www.springframework.org/schema/beans http://www.springframework.org/schema/beans/spring-beans.xsd
       http://activemq.apache.org/schema/core http://activemq.apache.org/schema/core/activemq-core.xsd">

  <!-- Important:
       note we must have Spring startup the embedded broker first, which we must do using
       depends-on attribute in the spring bean tags
  -->

  <!-- setup Atomikos for XA transaction -->
  <bean id="atomikosTransactionManager"
        class="com.atomikos.icatch.jta.UserTransactionManager"
        init-method="init" destroy-method="close" depends-on="my-broker">
    <!-- when close is called, should we force transactions to terminate or not? -->
    <property name="forceShutdown" value="false"/>
  </bean>

  <!-- this is some atomikos setup you must do -->
  <bean id="atomikosUserTransaction" class="com.atomikos.icatch.jta.UserTransactionImp" depends-on="my-broker">
    <property name="transactionTimeout" value="300"/>
  </bean>

  <!-- this is some atomikos setup you must do -->
  <bean id="connectionFactory"
        class="com.atomikos.jms.AtomikosConnectionFactoryBean" depends-on="my-broker">
    <property name="uniqueResourceName" value="amq1"/>
    <property name="xaConnectionFactory" ref="jmsXaConnectionFactory"/>
  </bean>

  <!-- this is the Spring JtaTransactionManager which under the hood uses Atomikos -->
  <bean id="jtaTransactionManager"
        class="org.springframework.transaction.jta.JtaTransactionManager" depends-on="my-broker">
    <property name="transactionManager" ref="atomikosTransactionManager"/>
    <property name="userTransaction" ref="atomikosUserTransaction"/>
  </bean>

  <!-- Is the ConnectionFactory to connect to the JMS broker -->
  <!-- notice how we must use the XA connection factory -->
  <bean id="jmsXaConnectionFactory" class="org.apache.activemq.ActiveMQXAConnectionFactory" depends-on="my-broker">
    <property name="brokerURL" value="tcp://localhost:61616"/>
  </bean>

  <!-- define the activemq Camel component so we can integrate with the AMQ broker below -->
  <bean id="activemq" class="org.apache.activemq.camel.component.ActiveMQComponent" depends-on="my-broker">
    <!-- must indicate that we use transacted acknowledge mode -->
    <property name="transacted" value="true"/>
    <!-- refer to the transaction manager -->
    <property name="transactionManager" ref="jtaTransactionManager"/>
    <!-- important: enable caching as we are using ActiveMQ which safely can do this -->
    <!-- see more at: http://camel.apache.org/jms -->
    <property name="cacheLevelName" value="CACHE_CONSUMER"/>
  </bean>

  <!-- setup a local JMS Broker for testing purpose -->
  <broker:broker id="my-broker" useJmx="false" persistent="false" brokerName="myBroker">
    <broker:transportConnectors>
      <broker:transportConnector uri="tcp://localhost:61616"/>
    </broker:transportConnectors>
  </broker:broker>

  <!-- this is the JDBC data source which uses an in-memory only Apache Derby database -->
  <!-- as we use the embedded database we use Atomikos to wrap it for XA support
       if you use an external database, then you can configure the XADataSource of that database without wrapping using Atomikos -->
  <bean id="myDataSource" class="com.atomikos.jdbc.AtomikosDataSourceBean" init-method="init" destroy-method="close">
    <property name="uniqueResourceName" value="partner"/>
    <property name="xaDataSourceClassName" value="org.apache.derby.jdbc.EmbeddedXADataSource"/>
    <property name="minPoolSize" value="1"/>
    <property name="maxPoolSize" value="5"/>
    <property name="xaProperties">
      <props>
        <prop key="databaseName">memory:partner;create=true</prop>
      </props>
    </property>
  </bean>

</beans>
Local Transactions - One Phase Commit
For 1 phase commit (local transactions, within the same endpoint), an external JPA transaction manager - such as Atomikos - is not required.
In this case, you should consider using JmsTransactionManager instead. The example below shows 1 phase commit policy for
two separate endpoints within the same project.
<?xml version="1.0" encoding="UTF-8"?>
<beans xmlns="http://www.springframework.org/schema/beans" xmlns:camel="http://camel.apache.org/schema/spring" xmlns:cxf="http://camel.apache.org/schema/cxf" xmlns:util="http://www.springframework.org/schema/util" xmlns:xsi="http://www.w3.org/2001/XMLSchema-instance" xsi:schemaLocation="http://www.springframework.org/schema/util http://www.springframework.org/schema/util/spring-util-3.0.xsd  http://www.springframework.org/schema/beans  http://www.springframework.org/schema/beans/spring-beans-3.0.xsd  http://camel.apache.org/schema/spring classpath:camel-spring.xsd http://camel.apache.org/schema/cxf http://camel.apache.org/schema/cxf/camel-cxf.xsd ">
    <camelContext xmlns="http://camel.apache.org/schema/spring">
        <!-- Start Routes -->
        <!-- -->
        <!-- IBM MQ -> Active MQ -->
        <route id="Test Transaction WMQ to AMQ">
            <from uri="sec:queue:a" />
            <transacted ref="sec_PROPAGATION_REQUIRED" />
            <log message="Test Transaction WMQ to AMQ" />
            <!-- -->
            <!-- Kill the Runner when this delay freezes the route. Message should roll back to queue:q -->
            <delay>
                <constant>10000000000</constant>
            </delay>
            <!-- -->
            <to uri="amq:queue:b" />
        </route>
        <!-- -->
        <!-- Active MQ -> IBM MQ -->
        <route id="Test Transaction AMQ to WMQ">
            <from uri="amq:queue:a" />
            <transacted ref="amq_PROPAGATION_REQUIRED" />
            <log message="Test Transaction AMQ to WMQ" />
            <!-- -->
            <!-- Kill the Runner when this delay freezes the route. Message should roll back to queue:q -->
            <delay>
                <constant>10000000000</constant>
            </delay>
            <!-- -->
            <to uri="sec:queue:b" />
        </route>
        <!-- End Routes -->
    </camelContext>
    <!--         -->
    <!-- IBM WMQ -->
    <!--         -->
    <bean id="sec_transactionManager" class="org.springframework.jms.connection.JmsTransactionManager">
        <property name="connectionFactory" ref="sec_queueConnectionFactory" />
    </bean>
    <bean id="sec_PROPAGATION_REQUIRED" class="org.apache.camel.spring.spi.SpringTransactionPolicy">
        <property name="transactionManager" ref="sec_transactionManager" />
    </bean>
    <bean id="sec_auth" class="org.springframework.jms.connection.UserCredentialsConnectionFactoryAdapter">
        <property name="targetConnectionFactory" ref="sec_queueConnectionFactory" />
        <property name="username" value="ctarpy" />
        <property name="password" value="" />
    </bean>
    <bean id="sec_ssl" class="com.am.robomq.sdk.camelSpring.RoboSSLSocketFactory">
        <constructor-arg index="0" type="java.lang.String" value="classes/roboKeyStore/sec/key.jks" />
        <constructor-arg index="1" type="java.lang.String" value="seawolf" />
        <constructor-arg index="2" type="java.lang.String" value="classes/roboTrustStore/sec/key.jks" />
        <constructor-arg index="3" type="java.lang.String" value="TLSv1.3" />
    </bean>
    <bean id="sec" class="org.apache.camel.component.jms.JmsComponent">
        <property name="configuration" ref="sec_jmsConfiguration" />
        <property name="transacted" value="true" />
        <property name="transactionManager" ref="sec_transactionManager" />
    </bean>
    <bean id="sec_jmsConfiguration" class="org.apache.camel.component.jms.JmsConfiguration">
        <constructor-arg index="0" ref="sec_auth" />
    </bean>
    <bean id="sec_queueConnectionFactory" class="com.ibm.mq.jakarta.jms.MQQueueConnectionFactory">
        <property name="queueManager" value="TEST_SSL" />
        <property name="hostName" value="127.0.0.1" />
        <property name="channel" value="TEST_SC_SSL" />
        <property name="port" value="1416" />
        <property name="transportType" value="1" />
        <property name="SSLPeerName" value="CN=COMMONNAME" />
        <property name="SSLCipherSuite" value="TLS_RSA_WITH_AES_256_CBC_SHA" />
        <property name="SSLSocketFactory" value="#{sec_ssl.sslSocketFactory}" />
    </bean>
    <!--           -->
    <!-- ACTIVE MQ -->
    <!--           -->
    <bean id="amq_transactionManager" class="org.springframework.jms.connection.JmsTransactionManager">
        <property name="connectionFactory" ref="amq_queueConnectionFactory" />
    </bean>
    <bean id="amq_PROPAGATION_REQUIRED" class="org.apache.camel.spring.spi.SpringTransactionPolicy">
        <property name="transactionManager" ref="amq_transactionManager" />
    </bean>
    <bean id="amq_queueConnectionFactory" class="org.apache.activemq.ActiveMQConnectionFactory">
        <property name="brokerURL" value="tcp://127.0.0.1:61616" />
    </bean>
    <bean id="amq" class="org.apache.camel.component.activemq.ActiveMQComponent">
        <property name="transacted" value="true" />
        <property name="transactionManager" ref="amq_transactionManager" />
        <property name="connectionFactory" ref="amq_queueConnectionFactory" />
    </bean>
</beans>
Service Designer Wizard
Selecting this launches the Service Designer Wizard.
Snippets
The Snippet Manager lets you define parameterisable code fragments that can be quickly inserted into your Spring DSL project. The screenshot below shows an example snippet for embedding an ActiveMQ message broker in your application. Note that 'Broker Name', and 'Service Port' are parameters; when the snippet is inserted, a dialog will be generated requiring values for values for those parameters.
New snippets can be created from the context menu on the Catalog table. Snippets can be grouped together using the 'Folder' field when creating or editting snippets.
Snippets can be parameterized via inserting {{some parameter}} into the snippet text. In the example below,
Broker Name and Service Port are defined as parameters.
When a snippet is inserted, if there are parameters to account for, a dialog is dynamically generated to allow values to be applied (see below)
Since the {{ }} synatx is also used for Camel Properties, it is necessary to enter an escape sequence
if your template requires Camel Property functionality (i.e. Routeblaze templating should be ignored).
To acheive this, in the template: \{\{My_Property\}\}. This will evaluate to: {{My_Property}} without any substitution.
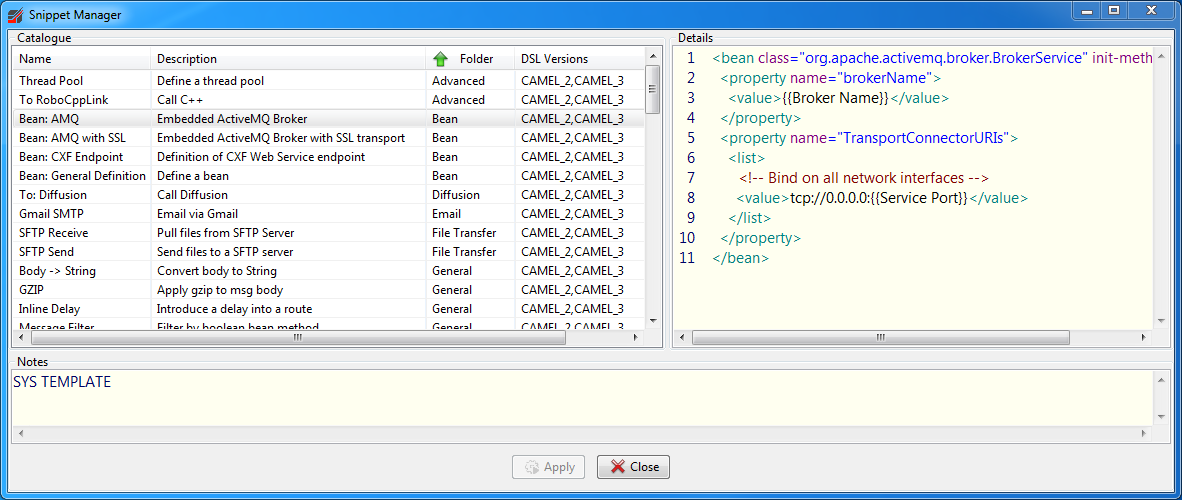
To insert a snippet, open the context menu on the Spring DSL window and select 'Snippet'. If the snippet you want to insert has parameters, then a dialog opens allowing the values to be specified. For the snippet shown above:
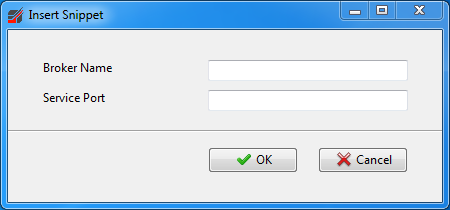
Note: Snippets can be defined to be relevant to Camel 2.x DSL, Camel 3.x DSL or both. Service Builder will display snippets appropriate to your currently selected Camel runtime version.
To view/change the current runtime version, access the 'Project Properties' dialog either from the toolbar in the Service Builder tab, or
via the top-level menu: Service Builder->Project Properties...
XML Editor
RouteBLAZE™ comes with a multi-document XML aware editor. It also has XSLT support, providing the ability to run XSL transformations within the
editor. In RouteBLAZE™ all text-based information windows have a context menu for sending their content to the editor, and the editor windows have
a context menu allowing their data to be sent to any text area that is capable of receiving input.
The triangle icon the the tool bar allows you manage favourite stylesheets.

XPath queries can be generated either for a selected element or for the entire document. For the XPath for a single element, right-click on the element's opening definition and select: 'Show XPath for selection'.
If you select for the entire document, output looks as follows:
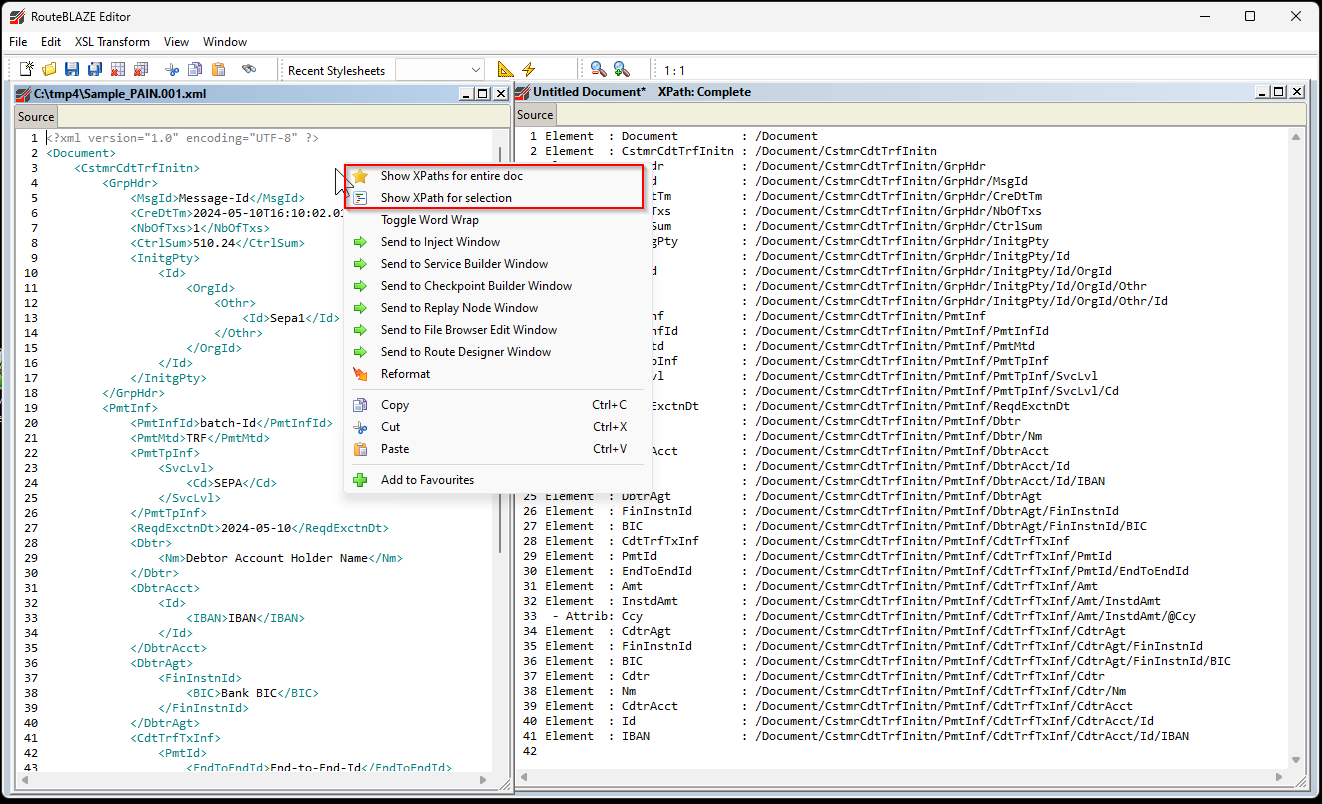
Robo Command
Robo Command provides shell access to a server managed by an Execution Agent. To launch a command window, open the context menu for the Execution Agent managing the server you can and select 'Remote Command Shell'. This function is OS dependent: On windows it will remote launchCMD.EXEOn *nix systems:
/usr/bin/bash
NOTE: The default command processor can be overriden via system property: ROBO_OVERRIDE_REMOTE_CMD_SHELL_EXE.
So for example to use the csh shell:
ROBO_OVERRIDE_REMOTE_CMD_SHELL_EXE=/usr/bin/csh
Internal SQL Database Manager
This tool allows direct manipulation of RouteBLAZE™'s internal database (H2). This is primarily intended as a support tool, and bypasses all application-level validation. This should be used with caution, since misuse could cause application instability.
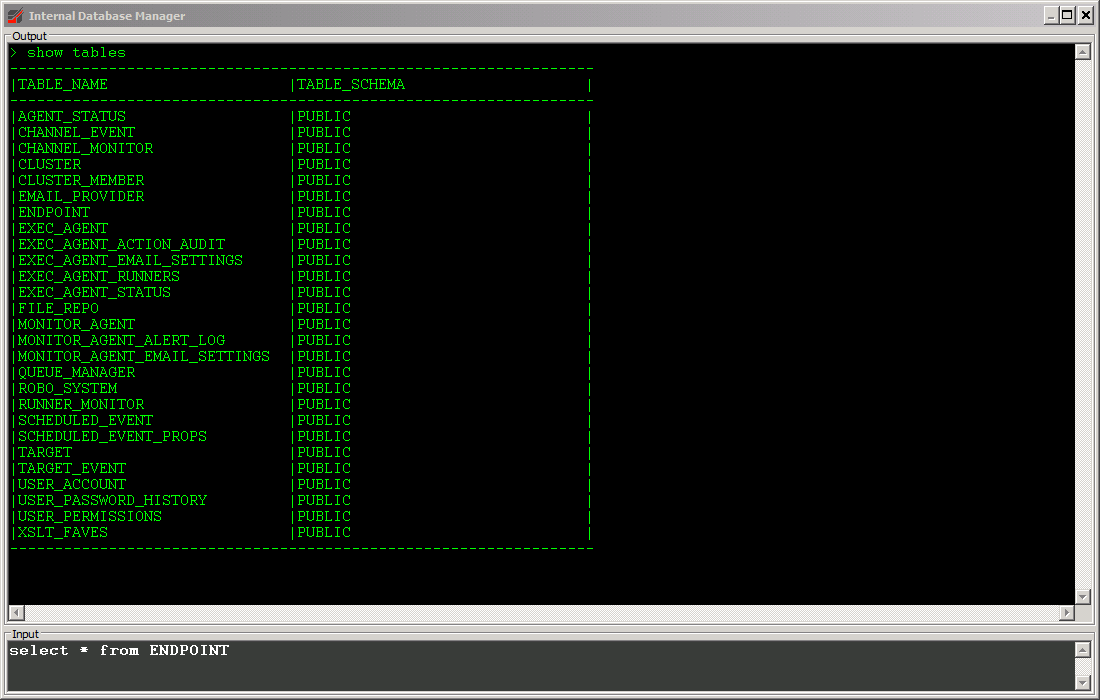
Application Logs
Each RouteBLAZE™ component uses the Apache Log4j framework to output logs. These are:- RouteBLAZE™ Studio
- Execution Agent
- Monitor Agent
$COMPONENT_INSTALL_BASE/conf/log4j.properties
Configuration of insances of the runtime are created from a template held at:
$EXEC_AGENT_INSTALL_BASE/conf/log4j-runner.properties
When new instances of the runtime are created, this is copied to:
$EXEC_AGENT_INSTALL_BASE/runners/$RUNNER_NAME/config/log4j-runner.properties
This means that any changes to the template in the Execution Agents conf folder will affect all runtimes created after. To change the log setup for a particular runtime, you must edit the properties file in the runners conf folder.
The 'View Logs' feature available for the Runners expects the relevant log file to be specifically located at:
$EXEC_AGENT_INSTALL_BASE/runners/$RUNNER_NAME/logs/runner_out.logChanging this will render the 'View Logs' feature inoperable!
It is possible to modify log level settings for any RouteBLAZE™ component on-the-fly, without the need to stop/start. Access this feature from the context menu of the desired component (or from the 'Tools' menu for RouteBLAZE™ Studio).
Supported levels are:
- DEBUG
- INFO
- WARN
- ERROR
- FATAL
- OFF
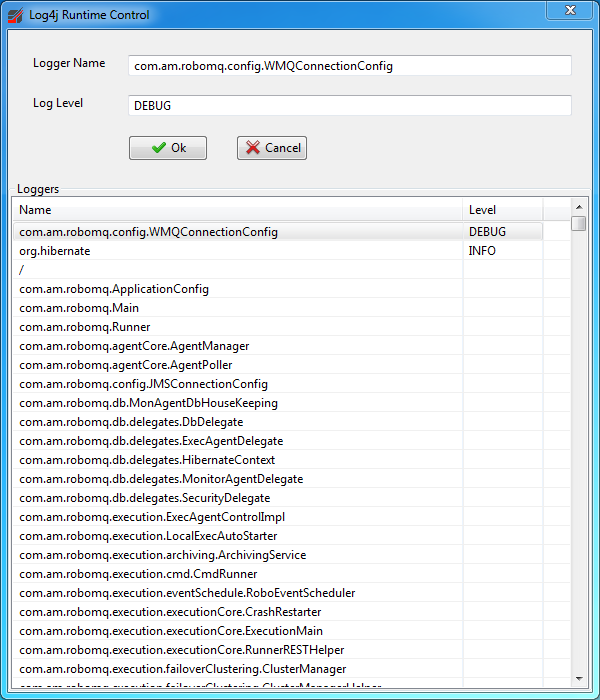
Service Designer Wizard
This wizard provides graphical tools for creating and editting routes. It also helps to organize the routes by analysing the full route description XML document and separating them out so they can be individually managed.
The table at the top left shows all the individual routes from the main Spring DSL document. Its popup menu allows the details of the route to be copied into the designer.
Once copied in, the details of the route will appear in both the text area to the top-right, and the graphic view to the bottom right.
The route can be editted using either the popup menu on the lower graphical window (to create/delete/edit components) or directly into the top-right text window. The bottom-left area shows the element attributes for each component when selected, and also the controls to insert the new route back into the main Spring DSL context.
If no 'Route ID' is specified, then RouteBLAZE™ will generate a GUID for it.
Click the 'Insert New Route' button to add your route to the main context
Settings Dialog
Configuration of RouteBLAZE™ is managed via the Settings Panel.
File->Settings...The following sections detail the various options and their uses
General Settings
- DB Path (default: home dir)
The location the database file used by both RouteBLAZE™ GUI and its inbuild LOCAL Monitor Agent. If no value is specified, then the default location is the home folder of the currently logged in user. The selected folder must have both read and write permissions granted for the user under which RouteBLAZE™ will execute.
Email Settings
This section allows the definition of SMTP connections. These can then be used as templates when configuring Monitor Agents. Monitor Agents at separete network locations (e.g. Production, UAT, Staging, Development) may not be perkmitted to use the same SMTP server.
RouteBLAZE™ supports standard username/password SMTP authentication, and also SSL as required.
SMTP providers can be created, edited or deleted. Once defined here, they can then be utilized in the Monitor Agent config screens.
Back to topBrowser Settings
- Auto-refresh message browser
Periodically refresh the Browse Panel. If this is not set, then the user will have to manually refresh (right-click option on the Browse Tab message table) the message view to see new messages
- Auto-refresh period
The time period between Browse Tab refresh operations. Note: if the above setting is not checked then this value has no effect
- Auto-connect on load config
If set RouteBLAZE™ will automatically connect to whatever is loaded from file. If not set, then the user will have to click the 'Connect' button.
- Confirm on 'delete message'
When deleting messages in the Browse Panel, if this option is checked then a confirmation box appears, providing the option to cancel the operation
- Confirm on 'delete ALL message'
When selecting the option to delete all messages from the currently connected queue, if this option is checked then a confirmation box appears, providing the option to cancel the operation
- Messages per page
RouteBLAZE™ supports pagination when viewing messages. This option sets the max number of messages per page. Note: Performance issues may arise if this value is set high and the network is slow or the server loaded.
- Filename suffix, 'save selected'
This sets the filename suffix RouteBLAZE™ should use when saving selected messages as individual files. For exmaple, it is convenient to save XML data in a file ending in ".xml"
- Max search depth
This parameter applies when doing a text search. It relates to the maximum number of hits that can be returned before the search gives up.
Local Agent Settings
Local Monitor and Local Execution Agent screens control the built-in agents. These exist primarily for development purposes, providing for rapid application development with little or no configuration necessary to provision a runtime environment.
The agent status (running | not-running) is displayed, along with the TCP port used to communicate with it. The TCP port selected must not be in use by any other process, or the agent will be unable to start. The agent is started or stopped from here.
The auto-start field causes the Monitor Agent to start automatically when RouteBLAZE™ is launched.
Back to topAgents Config
This screen controls settings for the agents that RouteBLAZE™ interacts with. From here new agents can be federated into the cluster and managed appropriately
The table titled 'Agent Config' at the top of the dialog contains a list of all the agents that RouteBLAZE™ is aware of. This table has a context menu (right-click on the table to expose) as shown:
- Add Agent
The dialog below is displayed. 'Descriptive Name' is a nickname for the agent. 'Agent Host' is the hostname or IP address of the server the agent is running on. 'Agent Port' is the service port the agent was configured with. Clicking 'Add Agent' will create an entry in the 'Agent Config' table. Also, the new agent will be listed in either the Monitor Panel or the Execution Panel, depending on the type of agent selected.
- Test Email
A dialog appears asking for a test email address. RouteBLAZE™ GUI will dispatch the request to the currently selected agent, which will attempt to send the mail with its existing SMTP settings.
- Refresh
RouteBLAZE™ GUI will attempt to verify the status's of each of the agents it is aware of. The status of the agent is displayed in the table.
- Login Password
This password is to allow the client to access a secured agent. If the 'Password Required' field for the agent in question has a 'closed lock' icon, then providing a password here is necessary so that RouteBLAZE™ can access the services of the agent.
To un-set the password, enter a blank password.
- Configure Agent Security
This is used to enable or disable security on a selected agent. If the agent has already been configured to require a password, then to change it will require knowledge of the old password.
To disable security on the agent, set the password to be blank - after which the agent's 'Password Required' field should display an open pad lock.
- Delete
This will cause RouteBLAZE™ to 'forget' the selected Monitor Agent. There is no impact on the agent itself any Target Monitors it is configured with will still run, emails sent out and so-forth. However it will be invisible to RouteBLAZE™ GUI. The agent can be re-added if necessary
The lower portion of the dialog ('Monitor Settings') is concerned with the SMTP settings for the selected Monitor Agent. SMTP settings can be entered manually, or a template may be used, if defined.
Once happy with the settings, then they can be pushed out to the Monitor Agent. Note: the email test function described above will use the SMTP settings currently configured in the Monitor Agent. Changes made on this dialog have no effect until they are deployed to the agent.
Back to topCommon Settings

- Auto-refresh targets (and chart)
The Monitor Targets displayed in the Monitor Panel will auto-refresh their data if this is set. Also, if a chart is requested, it will be also be periodically refreshed
- Auto-refresh period
This setting has no effect if the above is not checked. This parameter sets the frequency at which the targets and charts are refreshed.
- Max Graph Points
When plotting a chart of target event, this parameter limits the number of events RouteBLAZE™ GUI will request from the Monitor Agent. High values can cause performance issues. Beyond a certain size of data set, it may be preferential to download the events as a CSV file for off-line processing
- Max Preview Size (File Browser)
The Execution Agent has the facility to remote-browse the file system, with an interface similar to the windows explorer file browser. Double-clicking a file will cause RouteBLAZE™ to request a preview of the file (text files only). This setting defines the maximum number of lines RouteBLAZE™ will attempt to retrieve in this process.
- Network Timeout
This controls the time in milliseconds the client will wait for a response from a server component once a request has been issued. Under heavy load conditions it may be necessary to increase this value.
WMQ Client Versioning
RoboWMQClientMgr.exeNOTE: This is distinct from the WMQ Client version that will be applied to Runtime components (i.e. Execution Agent Runners containing the business application).
NOTE: In order for this application to be successful, RouteBLAZE™ Studio and any local Runners (i.e. Runners started by the 'LOCAL_EXEC' Execution Agent) must be
terminated. Failure to do this will render the Client Versioning application unable to switch WMQ versions, since the current version will be locked by
the running JVMs.
The settings governing the WMQ Version that will be applied to the Runtime is configured in the Service Builder Panel, under 'Project Settings'
Back to top
JVM System Properties
For all components (RouteBLAZE™ Studio, Execution Agent and Monitor Agent) is it possible to configure additional JVM System Properties. To to this edit:$COMPONENT_INSTALL_BASE/conf/system.propertiesAny properties defined in here will be read at startup and added to the System Properties object for the JVM. This applies to Studio, Execution and Monitor Agents.
RouteBLAZE™ Studio System Properties
The following system properties are meaningful to RouteBLAZE™ Studio:ROBO_IGNORE_EXEC_AGENT_VERSION=trueRouteBLAZE™ Studio will attempt to connect Execution Agents, regardless of mismatched version
ROBO_IGNORE_MON_AGENT_VERSION=trueRouteBLAZE™ Studio will attempt to connect Monitor Agents, regardless of mismatched version
ROBO_CONFIG_CNF=C:/RouteBLAZE™/robo_config.cnfRouteBLAZE™ Studio will use this as its config file in preference to ~/.robomq.cnf
This file contains user preference information accessed via the settings panel, such as the location of the H2 database, license key, etc
ROBO_RPC_TRACE=trueRouteBLAZE™ Studio will trace all RPC traffic
EDITOR_MAX_FILE_SIZE=512The maximumn file size (in KB) the XML Editor will open
COMPONENT_PING_TIMEOUT=2100The max time in ms that RouteBLAZE will wait when pinging a component. If this timeout expires before a response is received from the component, RouteBLAZE will stop waiting and deem the component unavailable
RUNNER_RESTART_TIMEOUT=10000Max time in millis for 'Stop' portion of a runner restart to complete. Studio will abort the operation after expiry
BROKER_CONNECTION_TIMEOUT=10000Timeout when attempting to connect to a JMS or WMQ message broker
FONT_LOG_SEARCH=Consolas
FONT_LOG_VIEWER=Consolas
FONT_SERVICE_BUILDER=Segoe UI
FONT_QUICK_VIEW=Segoe UI
FONT_MESSAGE_VIEWER=Consolas
FONT_MESSAGE_INJECTION=Consolas
FONT_XML_EDITOR=Consolas
These keys control fonts used in various places.
REQUIRE_SERVICEBUILDER_PROJECT_SAVED_ON_DEPLOYForce user to save ServiceBuilder project before deployment is allowed.
FEATURE_QUEUE_BROWSER_ENABLE=true
FEATURE_QUEUE_BROWSER_PUBLISH_ENABLE=true
FEATURE_SERVICE_BUILDER=true
FEATURE_CHECKPOINT_BUILDER=true
FEATURE_MONITOR_AGENT=true
FEATURE_EXEC_AGENT=true
These keys control which views are available. Note: At least one view should be enabled.
FEATURE_LOCAL_EXEC=true
FEATURE_LOCAL_MON=true
These keys control if the internal test environments are available for Execution and Monitor Agents.
ROBO_JETTY_ENABLE_SSL=false
ROBO_JETTY_KEYSTORE=C:/keystore_folder/keystore.jks
ROBO_JETTY_KEYSTORE_PASSWORD=my_keystore_password
These control the SSL setup for the Monitor Web App built into the Monitor Agent. If SSL is to be enabled, then a Java Keystore containing a certificate must be provided.
ACTIVEMQ_USE_JMX=falseIf this is set true, the Embedded ActiveMQ instance will start listening on port 1099 for JMX clients.
DELEGATE_API_THROUGH_EA=trueIf this is set true, communication requests from Client to Runner will be delegated to the Execution Agent, rather than the Client making direction connections to the Runner's service port. This is useful for when running the Docker distro for Execution Agent.
ATLAS_MAP_GUI_HTTP_PORT=38585Service port for AltasMap GUI.
RouteBLAZE™ Execution and Monitor Agents System Properties
The following system properties are meaningful to RouteBLAZE™ Execution Agent, Monitor Agent & Runners:ROBO_OVERRIDE_REMOTE_CMD_SHELL_EXE=${my_shell} RouteBLAZE™ Exec Agent will use ${my_shell} in preference to the operating system default. This
relates to the "Remote Command Shell" feature accessible from the Studio.
For Windows: C:\Windows\System32\cmd.exe
For Unix: /usr/bin/bash
ROBO_DEBUG_RUNNER_PERFORMANCE=trueRouteBLAZE™ Runners will dump debug information to its log by default every 5 mins
ROBO_DEBUG_RUNNER_POLL_FREQ=xOverride: RouteBLAZE™ Runners will dump debug information to its log every x mins.
ROBO_RPC_TRACE=trueRouteBLAZE™ will trace all RPC traffic
ROBO_RPC_SO_TIMEOUT=7000Internal RPC timeout
ROBO_RPC_FAST_FAIL=trueRouteBLAZE™ Runners will terminate as soon as it becomes apparaent that there are serious issues commiunicating with either Studio or command line tools.
ROBO_RPC_RETRY_COUNT=8RouteBLAZE™ RPC will attempt to retry if connectors are broken Studio or command line tools.
ROBO_RPC_THREADPOOL_SIZE=10RPC threadpool for acceptor/dispatcher. Maybe necessary to increase under heavy load
BROKER_CONNECTION_TIMEOUT=10000Timeout when attempting to connect to a JMS or WMQ message broker
ACTIVEMQ_USE_JMX=falseIf this is set true, the Embedded ActiveMQ instance will start listening on port 1099 for JMX clients.
JETTY_SESSION_TIMEOUT=180Session timeout for Monitor Web App
ROBO_JETTY_ENABLE_SSL=false
ROBO_JETTY_KEYSTORE=C:/keystore_folder/keystore.jks
ROBO_JETTY_KEYSTORE_PASSWORD=my_keystore_password
These control the SSL setup for the Monitor Web App built into the Monitor Agent. If SSL is to be enabled, then a Java Keystore containing a certificate must be provided.
DELEGATE_API_THROUGH_EA=trueIf this is set true, communication requests from Client to Runner will be delegated to the Execution Agent, rather than the Client making direction connections to the Runner's service port. This is useful for when running the Docker distro for Execution Agent.
Back to top
RouteBLAZE Command Line Interface (robomqcli)
RouteBLAZE™ comes complete with a powerful command line utility. It is available for RouteBLAZE™ studio, and for the Execution Agent. The following manual is available directly from robomqcli:$ robomqcli --manual
---------------------------------------------------------------------------------------------------------------

                                       RoboMQCLI
                                       =========

Overview
========

RoboMQCli provides command-line access to RoboMQ Execution Agent management features, and is available for
both client and stand-alone Execution Agents.

The executable can be found at:

    $ROBO_INSTALL_LOCATION/scripts

It may be advisable to add this path to your execution path so can be run regardless of the current working
directory of your shell.

To display this manual
        | C:\> robomqcli --manual

The following operations are supported:

  --startroute
  --stoproute
  --startallroutes
  --stopallroutes
  --startrunner
  --restartrunner
  --stoprunner
  --startallrunners
  --stopallrunners
  --shutdown
  --listrunners
  --listroutes
  --routedetail
  --routeperf
  --createrunner
  --autostartrunner
  --deleterunner
  --tailrunner
  --tailfile
  --importagent
  --exportagent
  --importconrefs
  --exportconrefs
  --importproject
  --sysinfo

To reduce the amount of terminal output:
  --quiet | -q


Connection References and Configuration
=======================================

robomqcli mantains a database of Execution Agent connection references. By default the location of the database is
at:
    ~/.robo_home/

A connection reference is contains the details necessary to connect to a particular Execution Agent (and its Runners).
This includes
    - * Exec Agent Host
    - * Exec Agent Port
    - User login
    - Password

(* == Mandatory)

This can be overridden by setting $ROBOMQ_HOME environment variable. If so overriden, then it should be set to
a folder that both exists and is readable by the executing user.

When using robomqcli to execute an operation: if a default connection has not been defined then it must be supplied with
either a pre-created connection reference or the individual parameters to connect. So either:

    > robomqcli --conref myconref  [Action and any parameters]
or
    > robomqcli --host exec_agent_host --port exec_agent_port --user my_user_id --password my_password  [Action and any parameters]

[NOTE: Add '--tls' if the Execution Agents has TLS enabled]

Optiopns relating to connection reference management:
  --createconref
  --deleteconref
  --listconrefs
  --deleteallconrefs
  --setdefaultconref
  --importconrefs
  --exportconrefs

To create a connection reference:
        | C:\>
        | C:\>robomqcli --listconrefs
        |
        | ======================
        | RoboMQ Command Utility
        | ======================
        |
        | Action: [listconrefs]
        | No connections defined in: [C:/Users/ctarpy/.robo_home/robo_conref.xml]
        | C:\>robomqcli --createconref local --host 127.0.0.1 --port 27080 --user chris --password mypassword
        |
        | ======================
        | RoboMQ Command Utility
        | ======================
        |
        | Action: [createconref] [local]
        | Connection Ref: [local] successfully added


** NOTE: For a TLS secured agent:
        | C:\>robomqcli --createconref local --host 127.0.0.1 --port 27080 --user chris --password mypassword --tls
        |
        | ======================
        | RoboMQ Command Utility
        | ======================
        |
        | Action: [createconref] [local]
        | Connection Ref: [local] successfully added


** NOTE: If a user is specified, then the the password MUST be correct - even if security is disabled in the
         Execution Agent and/or Runners.


To list all configured connection references:
        | C:\>robomqcli --listconrefs
        |
        | ======================
        | RoboMQ Command Utility
        | ======================
        |
        | Action: [listconrefs]
        |
        | Connections
        | ------------------------------------------------------------------------------------------------------------------
        | Name                           Host                                Port  UserID               Password    TLS
        | ------------------------------------------------------------------------------------------------------------------
        | local                          127.0.0.1                           27080 chris                *****       false
        | C:\>

To set a connection as default:
        | C:\>robomqcli --setdefaultconref win
        |
        | ======================
        | RoboMQ Command Utility
        | ======================
        |
        | Action: [setdefaultconref] [win]
        | Connection Ref: [win] successfully updated
        | C:\>robomqcli --listconrefs
        |
        | ======================
        | RoboMQ Command Utility
        | ======================
        |
        | Action: [listconrefs]
        |
        | Connections
        | -------------------------------------------------------------------------------------------------------------------
        | Name                           Host                                Port  UserID               Password    TLS
        | -------------------------------------------------------------------------------------------------------------------
        | local                          127.0.0.1                           27080 chris                *****       false
        | win [DEFAULT]                  127.0.0.1                           17076                                  false
        | rhel                           rhel                                7076                                   false
        | C:\>


Connection references can be imported/exported and used interchangeably between other CLI instances and also with RouteBLAZE GUI. The only caveat
is that login information is not handled in the RBA file for Studio. So if RBA file is exported from the GUI, username/password if set will not
be included.

To import a RBA file:

        | C:\>robomqcli --importconrefs TEST.rba
        |
        | ======================
        | RoboMQ Command Utility
        | ======================
        |
        | Action: [importconrefs] [TEST.rba]
        | Connection reference [SA] exists and will be overwritten
        | Connection Ref: [SA] successfully added
        | C:\AAAAA - SSL and Non-SSL Palette>


To export a RBA file:

        | C:\>robomqcli --exportconrefs TEST.rba
        |
        | ======================
        | RoboMQ Command Utility
        | ======================
        |
        | Action: [exportconrefs] [TEST.rba]
        | Writing file: [C:/AAAAA - SSL and Non-SSL Palette/TEST.rba]
        | Request complete


RoboMQCLI Actions
=================

In all cases for actions detail below, client/server timeout can be specified with

    --timeout


Execution Agent
---------------
Shutdown:
    Shutdown the Execution Agent and all Runner processes:

        |  C:\>robomqcli -c local --shutdown


Runners
-------

List Runners:
    List all the Runners on an Execution Agent:

        | C:\>robomqcli -c local --listrunners
        |
        | ======================
        | RoboMQ Command Utility
        | ======================
        |
        | Action: [listrunners]
        |
        | -------------------------------------------------------------------------------------------------------
        | Runner Name                    Port     Status                    Startup Type    Project
        | -------------------------------------------------------------------------------------------------------
        | BOB                            7090     TARGET_UP                 Auto Start      [springDSLProject:x]
        | Runner__7091                   7091     TARGET_UP                 Auto Start      [springDSLProject:Foo]
        | Runner__7092                   7092     TARGET_UP                 Auto Start      [springDSLProject:x]
        | Runner__7095                   7095     TARGET_UP                 Auto Start      NO DATA
        | harmony                        7094     TARGET_UP                 Manual Start    [springDSLProject:x]
        | C:\>


Delete Runner:
    Runners must be down before deletion can be completed. Wildcard supported in Runner name:

        | C:\>robomqcli -c local --deleterunner "Runner_*"


Create Runner:
    To create a Runner with name [my_runner], using service port [3455]:

        | C:\>robomqcli -c local --createrunner my_runner:3455
        |
        | ======================
        | RoboMQ Command Utility
        | ======================
        |
        | Action: [createrunner] [my_runner]
        |
        |         [JVM Profile] not specified. Will use default: [C:/dev2/RoboMQ/RoboMQ/scripts/jvmprofiles/general_purpose.profile]
        | Adding JVM option: [-Xmx384m]
        | Adding JVM option: [-Xms128m]
        | Request complete
        | C:\>

    My default Runners will be created with JVM profile: [general_purpose.profile]. JVM profiles are key/value pairs used to configure
    JVM settings that will be applied when the Runner JVM is launched. This controls stuff like heap size, garbage collection settings etc.

    RoboMQ comes bundled with profiles optimized for low latency, high throughput, lean, and general purpose. See:

        $ROBO_INSTALL_LOCATION/scripts/jvmprofiles

    To apply a specific profile when creating a Runner:

        | C:\>robomqcli -c local --createrunner low_latency_runner:3456 --jvmprofile C:\dev2\RoboMQ\RoboMQ\scripts\jvmprofiles\large_latency_optimized.profile
        |
        | ======================
        | RoboMQ Command Utility
        | ======================
        |
        | Action: [createrunner] [low_latency_runner] [JVM Profile] [C:\dev2\RoboMQ\RoboMQ\scripts\jvmprofiles\large_latency_optimized.profile]
        | Adding JVM option: [-Xmx1024m]
        | Adding JVM option: [-Xms512m]
        | Adding JVM option: [-XX:+UseG1GC]
        | Adding JVM option: [-XX:MaxGCPauseMillis=50]
        | Adding JVM option: [-XX:InitiatingHeapOccupancyPercent=45]
        | Request complete
        | C:\>


Enable/Disable Runner Auto-start:
	To enable auto-start on a Runner - so that the Runner is automatically started by the Execution Agent on boot:

        | C:\>robomqcli --autostartrunner my_runner:true
        |
        | ======================
        | RoboMQ Command Utility
        | ======================
        |
        | Using default connection: [local]
        | Action: [autostartrunner], Runner Name: [Runner_*], Should Enable: [false]
        | C:\>

NOTE: Wildcards are supported on Runner Name


Start Runner:
    To start a Runner[s]. Wildcard supporting in Runner name.

        | C:\>robomqcli -c local --startrunner "Runner__*"
        |
        | ======================
        | RoboMQ Command Utility
        | ======================
        |
        | Action: [startrunner] [Runner__*]
        | Including runner: [Runner__7091]
        | Including runner: [Runner__7092]
        | Including runner: [Runner__7095]
        | Issuing start request for runner: [Runner__7091]
        | Issuing start request for runner: [Runner__7092]
        | Issuing start request for runner: [Runner__7095]
        | Request complete
        | C:\>

Stop Runner:
    As per --startrunner, use --stoprunner instead. Wilcard supported in Runner name.

Start/Stop all Runners
        | C:\>robomqcli -c local --stopallrunners
    or
        | C:\>robomqcli -c local --startallrunners

Re-start Runner:
	To re-start a Runner[s]. Wildcard supporting in Runner name.

        | C:\>robomqcli -c local --restartrunner "Runner__*"
        |


Routes
------

List Route:
    To list Routes deployed to a Runner[s]. Wilcards are supported for the Runner name

        | C:\>robomqcli -c local --listroutes "*70*"
        |
        | ======================
        | RoboMQ Command Utility
        | ======================
        |
        | Action: [listroutes] [*70*]
        | Including runner: [Runner__7091]
        | Including runner: [Runner__7092]
        | Including runner: [Runner__7095]
        |
        | ----------------------
        | Runner: [Runner__7091]
        | ------------------------------------------------------------------------------------------------------------------------------------------------------------------------------------------------
        | Route ID                       Status       Route Detail
        | ------------------------------------------------------------------------------------------------------------------------------------------------------------------------------------------------
        | FOOOO                          Started      EventDrivenConsumerRoute[file://C:/camelin -> Pipeline[[Channel[Log(FOOOO)[Got a message. Payload: ${body}]], Channel[sendTo(file://C:/camelout)]]]]
        | ------------------------------------------------------------------------------------------------------------------------------------------------------------------------------------------------
        |
        |
        | ----------------------
        | Runner: [Runner__7092]
        | -----------------------------------------------------------------------------------------------------------------------------------------------------------------------------------------------------
        | Route ID                       Status       Route Detail
        | -----------------------------------------------------------------------------------------------------------------------------------------------------------------------------------------------------
        | Fill Me Up                     Started      EventDrivenConsumerRoute[file://C:/camelin -> Pipeline[[Channel[Log(Fill Me Up)[Got a message. Payload: ${body}]], Channel[sendTo(file://C:/camelout)]]]]
        | -----------------------------------------------------------------------------------------------------------------------------------------------------------------------------------------------------
        |
        |
        | Runner: [Runner__7095] - Exception: No routes available
        |
        | C:\>


Start a Route:
    To start Route [TEST_MOVE] on Runner [clob]
        | C:\>robomqcli -c local --startroute clob:TEST_MOVE

Stop a Route:
    To stop Route [TEST_MOVE] on Runner [clob]
        | C:\>robomqcli -c local --stoproute clob:TEST_MOVE


Start all Routes:
    To start all Routes on Runner [clob]
        | C:\>robomqcli -c local --startallroutes clob


Stop all Routes:
    To stop all Routes on Runner [clob]
        | C:\>robomqcli -c local --stopallroutes clob


Get Route details
Pulls a XML version of the Route configuration (Camel DSL). Wilcards supported for both Runner name and Route ID.

C:\>robomqcli -c local --routedetail "clo*" --routeid "TE*"

        | ======================
        | RoboMQ Command Utility
        | ======================
        |
        | Action: [routedetail] [clo*]
        | Including runner: [clob]
        |
        | --------------
        | Runner: [clob]
        | RouteID: [TEST_MOVE]
        | ---- START ----
        | <>xml version="1.0" encoding="UTF-8" standalone="yes">>
        | <route xmlns="http://camel.apache.org/schema/spring" customId="true" id="TEST_MOVE">
        |     <from uri="file://C:/camelin"/>
        |     <log id="log1" message="Got a message. Payload: ${body}"/>
        |     <to id="to1" uri="file://C:/camelout"/>
        | </route>
        | ---- END ----
        |
        | RouteID: [TEST_MOVE2]
        | ---- START ----
        | <>xml version="1.0" encoding="UTF-8" standalone="yes">>
        | <route xmlns="http://camel.apache.org/schema/spring" customId="true" id="TEST_MOVE2">
        |     <from uri="file://C:/camelin2"/>
        |     <log id="log2" message="Got a message. Payload: ${body}"/>
        |     <to id="to2" uri="file://C:/camelout"/>
        | </route>
        | ---- END ----
        | C:\>


Get Route Performance Stats
Pulls all available performance metrics out of the Camel runtime.


        | C:\>robomqcli -c local --routeperf "clo*" --routeid "T*2"
        |
        | ======================
        | RoboMQ Command Utility
        | ======================
        |
        | Action: [routeperf] [clo*]
        | Including runner: [clob]
        |
        | --------------
        | Runner: [clob]
        | RouteID: [TEST_MOVE2]
        | ---- START ----
        | <routeStat id="TEST_MOVE2" state="Started" exchangesInflight="0" selfProcessingTime="0" oldestInflightExchangeId=""
        | rocessingTime="-1" deltaProcessingTime="0" meanProcessingTime="-1" startTimestamp="2018-09-16T19:37:51.400+0100" re
        | irstExchangeFailureExchangeId="" lastExchangeCompletedTimestamp="1970-01-01T00:59:59.999+0100" lastExchangeComplete
        |   <processorStats>
        |     <processorStat id="log2" index="4" state="Started" accumulatedProcessingTime="0" exchangesCompleted="0" exchang
        | Time="-1" startTimestamp="2018-09-16T19:48:22.099+0100" resetTimestamp="2018-09-16T19:48:22.099+0100" firstExchange
        | estamp="1970-01-01T00:59:59.999+0100" lastExchangeCompletedExchangeId="" lastExchangeFailureTimestamp="1970-01-01T0
        |     <processorStat id="to2" index="5" state="Started" accumulatedProcessingTime="0" exchangesCompleted="0" exchange
        | ime="-1" startTimestamp="2018-09-16T19:48:22.100+0100" resetTimestamp="2018-09-16T19:48:22.100+0100" firstExchangeC
        | stamp="1970-01-01T00:59:59.999+0100" lastExchangeCompletedExchangeId="" lastExchangeFailureTimestamp="1970-01-01T00
        |   </processorStats>
        | </routeStat>
        | ---- END ----


Backup/Restore
--------------

Create a Robo Archive (.rbar file):
    This operation exports Runners and optionally Global Dependencies from the Execution Agent into a [.rbar] file. Wildcards are
    supported.

    To include Global Dependencies to the archive, apply: [--includeglobaldeps]


        | C:\>robomqcli -c local --exportagent "*" --outdir c:\tmp2 --includeglobaldeps
        |
        | ======================
        | RoboMQ Command Utility
        | ======================
        |
        | Action: [export] [*]
        | Writing archive to folder: [C:/tmp2/RoboArchive_local_1537121992113.rbar]
        | Global dependencies will be included
        | Including runner: [BOB]
        | Including runner: [Runner__7091]
        | Including runner: [Runner__7092]
        | Including runner: [clob]
        | Including runner: [Runner__7095]
        | Response status for download file request: 200
        | Request complete
        | C:\>


Create a Robo Archive (.rbar file):
    Ensure that any Runners you are installing from your archive file does not already exist on the Execution Agent. Additionally, if there
    are any conflicting Global Dependencies, RoboMQ will attempt to overwrite whats on the agent with the archive contents. Care must be
    taken if these dependencies are in use by other Runners: depending on the operating system files in use may be locked, causing the
    restore to fail.

        | C:\>robomqcli -c local --importagent c:\tmp2\RoboArchive_local_1537121992113.rbar
        |
        | ======================
        | RoboMQ Command Utility
        | ======================
        |
        | Action: [import] [c:\tmp2\RoboArchive_local_1537121992113.rbar]
        | Applying archive: [C:/tmp2/RoboArchive_local_1537121992113.rbar]
        | Response status for download file request: 200
        | Request complete
        | C:\>


Deploy Project To Runner
------------------------
	From the Service Builder, export your project as a Project Archive. Contains a single project not tied to any Runner. Contains
	all dependencies and project info scoped at project level, but does not contain Execution Agent scoped Global Dependencies.

	If the project was configured with automatic environment mapping, the deployment process will check to ensure the project has
	a mapping for the host on which the Runner will execute. If this mapping is missing, then the deploy will be rejected.

        |
        |C:\>robomqcli --importproject "C:\tmp11\deploy_archive_UAT_AUTO_FALSE.zip" --runner BOB
        |
        |======================
        |RoboMQ Command Utility
        |======================
        |
        |Using default connection: [local]
        |Action: [importproject] [C:\tmp11\deploy_archive_PROD_AUTOMAPFALSE.zip]
        |Applying archive: [C:/tmp11/deploy_archive_PROD_AUTOMAPFALSE.zip] to Runner: [BOB]
        |Sending archive: [: C:\tmp11\deploy_archive_PROD_AUTOMAPFALSE.zip], Runner: [BOB]
        | - Env Map Name: [null]
        |  - Env Map Name will be taken from project settings at the time archive was created
        |Response Status: 200
        |Request complete
        |C:\>


Logs
----

Stream a Runner log file:
    This is the equivalent of [tail -f] on unix, but streamed server to client:

        | C:\>robomqcli -c local --tailrunner BOB

    To specify 2 lines of context:

        | C:\>robomqcli -c local --tailrunner BOB:2
        |
        | ======================
        | RoboMQ Command Utility
        | ======================
        |
        | Action: [tailrunner], Runner Name: [BOB], Context Lines: [2]
        | Stopping log streamer
        | Tailing file: [runners/BOB/logs/runner_out.log]
        | STARTING LOGGING STREAM
        | 2018-09-16 19:02:44,819 [main] INFO  org.apache.camel.spring.SpringCamelContext  - Total 1 routes, of which 1 is started.
        | 2018-09-16 19:02:44,819 [main] INFO  org.apache.camel.spring.SpringCamelContext  - Apache Camel 2.16.4 (CamelContext: camel-1) started in 0.000 seconds

Stream an arbitrary file:
    It is possible to [tail -f] any file on the Execution Agent's server (provided the file permissions are
    amenable. As before, apply [file:$x] to specify [$x] lines of context:


        | C:\>robomqcli -c local --tailfile "C:\dev2\RoboMQ\RoboMQ\scripts\manual.txt":3
        |
        | ======================
        | RoboMQ Command Utility
        | ======================
        |
        | Action: [tailfile], File Path: [C:\dev2\RoboMQ\RoboMQ\scripts\manual.txt], Context Lines: [3]
        | Stopping log streamer
        | Tailing file: [C:\dev2\RoboMQ\RoboMQ\scripts\manual.txt]
        | STARTING LOGGING STREAM
        | Stream an arbitrary file
        |     It is possible to [tail -f] any file on the Execution Agent's server (provided the file permissions are
        |     amenable. As before, apply [file:$x] to specify [$x] lines of context:


Sys Info
--------

Retrieve and display information about the Exec Agent, JVM and host server


        | C:\>robomqcli -c local --sysinfo
Back to top
RouteBLAZE Command Line Build Tool (robomqbuild)
RouteBLAZE™ comes with a command line build tool, providing for a DevOps model. The following manual is available directly from robomqbuild:$ robomqbuild --manual
---------------------------------------------------------------------------------------------------------------


                                       RouteBLAZEBuild
                                       ===============

Overview
========

RouteBLAZEBuild provides a command line mechanism for building deployable project archives from a source RoboMQ
project file. If the project was created with relative dependencies then this tool will need to know
the base directory of your project.

This can be specified via the command line options (see below). If a base directory is not specified, then
robomqbuild will default it to the current working directory


The executable can be found at:

    $ROBO_INSTALL_LOCATION/scripts

It may be advisable to add this path to your execution path so can be run regardless of the current working
directory of your shell.

To display this manual
        | C:\> robomqbuild --manual

The following operations are supported:

  --build                       # Execute the build


The following additional options are available:

  --outdir                      # Name of the output directory the deployable archive will be written to
  --outfile                     # Filename for the build archive.

  --basedir                     # Project base directory. This relates to resolving project dependencies. This
                                # setting is only relevant if "Relative Dependencies" have been enabled for the
                                # project being built. If so, then the path specified with --basedir  will be
                                # prefixed to each dependency in the project. This provides an absolute path to
                                # the dependency.
  --envmap                      # Environment map to apply. NOTE: N/A if project has
                                  automap featire enabled
  --releasenotes                # Attaches release notes to the build.
  --version                     # Print out version information for this tool


Examples
========

        | C:\> robomqbuild --build C:/project/MyProj.rbp --outdir C:/build_artifacts --outfile my_compiled_proj.zip --basedir C:/project
		|
		| C:\tmp> robomqbuild --build MyProj.rpr --outdir C:/tmp --outfile BUILD.ZIP --basedir C:/tmp --envmap "Default Map"
		|
		| C:\tmp> robomqbuild --build MyProj.rpr --outdir . --outfile BUILD.ZIP --basedir . --envmap PROD


======================
RoboMQ Command Utility
======================

usage: robomqbuild [-bd ] [-bu ] [-h] [-man] [-od ] [-of ]
       [-rn ] [-v]
-----
-bd,--basedir         Location of project base directory
-bu,--build           Create a deploy archive for specified RoboMQ project
                            [.rpr]
-h,--help                  Display this help
-man,--manual              Print user manual
-od,--outdir          Directory in which to write the build archive
-of,--outfile         Filename for the build archive
-rn,--releasenotes    Release notes for this build
-v,--version               Print version information
Back to top
Keyboard Shortcuts
The following keyboard shortcuts are available in RouteBLAZE™ Studio:| Key Press | App Scope | Effect |
|---|---|---|
| Ctrl-Q | Global | Exit RouteBLAZE™ Studio |
| Ctrl-M | Global | Open Atlas Data Mapper Tool |
| Ctrl-O | Broker Connection Tab | Open Browser Connection file |
| Ctrl-S | Broker Connection Tab | Save Browser Connection file |
| Ctrl-O | Inject Tab | Open text file into Inject Window |
| Ctrl-S | Inject Tab | Save text from Inject Window |
| Ctrl-O | Checkpoint Builder Tab | Open Checkpoint project |
| Ctrl-S | Checkpoint Builder Tab | Save Checkpoint project |
| Ctrl-O | Service Builder Tab | Open Servive Builder project |
| Ctrl-S | Service Builder Tab | Save Service Builder project |
| Alt-S | Global | Open Settings dialog |
| Ctrl-N | Service Builder Tab | New Service Builder project |
| Ctrl-D | Service Builder Tab | Open Deploy Dialog |
| Ctrl-D | XML Editor | Add current file to favourites |
| Alt-D | Deploy Dialog | Execute deployment |
| Ctrl-N | Checkpoint Builder Tab | New Checkpoint project |
| Ctrl-B | Global | Archive contents of currently connected queue |
| Ctrl-R | Global | Restore contents of currently connected queue |
| Ctrl-E | Global | Open XML Editor |
| Ctrl-I | Global | Inject text files into currently connected queue |
| Ctrl-Shift-T | XML Editor | Open XSLT Favourites dialog |
| Ctrl-T | XML Editor | Run most recent XSLT on selected text window |
| Ctrl-P | Except XML Editor | Show Palette |
| Ctrl-P | XML Editor | Print active document |
| F5 | Queue Browser | Refresh view |
| Delete | Queue Browser | Delete selected message[s] |
| Alt-X | Queue Browser | Cut message[s] to internal clipboard |
| Alt-C | Queue Browser | Copy message[s] to internal clipboard |
| Alt-V | Queue Browser | Paste message[s] from internal clipboard to current queue connection |
| Alt-M | Service Builder | Toggle Max/Minimize Camel XML text area |
| Ctrl-Shift-F5 | XML Editor, Injection, Service Builder, ReplayNode | Reformat XML |
| Ctrl+ | XML Editor, Injection, Service Builder, Quick View, Message Viewer, Log Viewer, Log Searcher | Increase font size |
| Ctrl- | XML Editor, Injection, Service Builder, Quick View, Message Viewer, Log Viewer, Log Searcher | Decrease font size |
| Ctrl-1 | Global | Switch to 'Broker Connection' tab |
| Ctrl-2 | Global | Switch to 'Browse' tab |
| Ctrl-3 | Global | Switch to 'Injection' tab |
| Ctrl-4 | Global | Switch to 'Monitor' tab |
| Ctrl-5 | Global | Switch to 'Checkpoint Builder' tab |
| Ctrl-6 | Global | Switch to 'Execution' tab |
| Ctrl-7 | Global | Switch to 'Service Builder' tab |